
5 Easy Ways to Transfer Contacts from Apple iPhone 8 to Android | Dr.fone
5 Easy Ways to Transfer Contacts from Apple iPhone 8 to Android
Whenever we move from one device to another, the first thing that we wish to do is transfer our contacts. After all, we can’t communicate with anyone without our list of contacts. Surprisingly, a lot of people find it hard to transfer contacts from Apple iPhone 8 to Android. Truth to be told - there can find countless ways to move contacts from Apple iPhone 8 to Android. You don’t need to worry a lot about the compatibility issues of different systems and can replace old phones at will when there is a new phone release, like the upcoming Samsung Galaxy S22 series. You can use a third-party app, a cloud service (like iCloud), and iTunes. Read on to learn how to transfer contacts from Apple iPhone 8 to Android in 5 different ways.
Part 1: Transfer all contacts from Apple iPhone 8 to Android in 1 click
The easiest way to transfer all the iPhone contacts to Android is by using Dr.Fone - Phone Transfer . A part of the Dr.Fone toolkit can easily transfer all your data from one device to another with a single click. The application is compatible with every leading Android and iPhone model. You can transfer your data from Apple iPhone 8 to Android and vice-versa. Besides a cross-platform transfer of data, iPhone to iPhone and Android to Android transfer is also supported.
The application also supports transferring all the leading data types such as videos, music, photos, messages, and so much more. Extremely easy to use, it is a must-have tool for every smartphone user out there. To learn how to move contacts from Apple iPhone 8 to Android, you can take these steps:
Step 1. First of all, launch the Dr.Fone toolkit on your Mac or Windows PC, and from its welcome screen, visit the “Phone Transfer” module.

Step 2. Connect your Android and iOS devices to the system and let the application detect them automatically. Since you wish to export iPhone contacts to Android, iPhone should be the source while Android should be the destination device. You can use the Flip button to interchange their positions.
Step 3. select the category of data you wish to transfer. Once you have checked the “Contacts” option, click on the “Start Transfer” button to start the process.

Step 4. Sit back and wait for a couple of minutes as the application syncs contacts from Apple iPhone 8 to Android. Make sure that both the Apple iPhone 8 devices are kept connected to the system until the process is completed.

Step 5. Once the transfer completes, you will be shown a message. In the end, you can remove the 2 devices safely from your system.

Part 2: Move contacts from Apple iPhone 8 to Android with Google Account
Another fast and hassle-free way to sync contacts from Apple iPhone 8 to Android is by using your Google Account. Since you can add your Google account on the iPhone, you can also use it to sync your contacts. While setting up your Android, you can use the same Google account. To learn how to import contacts from Apple iPhone 8 to Android using your Google account, these quick steps can be implemented.
Step 1. Unlock your iPhone and go to its Settings > Mail, Contacts, Calendars > Add Account and tap on “Google.”

Step 2. Sign in with your Google account credentials and grant your phone the needed permissions to access your Gmail data.
Step 3. Now, you can go back to your Google account from here and turn on the sync option for “Contacts.”

Step 4. Once your contacts are synced with your Google account, you can easily access them on any Android device. You can use the Google Contacts app or use the same account to set up your device for auto-sync contacts.
Part 3: Import contacts from Apple iPhone 8 to Android with iCloud
Another simple way to sync contacts from Apple iPhone 8 to Android is by using iCloud. Firstly, you need to sync the iPhone contacts with iCloud, and later you can export them a VCF file. To this end, the vCard can be imported to Google Contacts. Yes - it does sound a bit complicated. After all, the Dr.Fone tools provide such a hassle-free way to move contacts from Apple iPhone 8 to Android compared to this technique. Though, this is a free solution and can be your plan B. To learn how to transfer contacts from Apple iPhone 8 to Android via iCloud, follow these steps.
1. Before you proceed, make sure your iPhone contacts are synced with iCloud. To do this, go to the iCloud settings and turn on the sync for 1.Contacts.
2. Great! Once your contacts are synced with iCloud, you can easily access them remotely. Go to iCloud.com and log in with your Apple ID.
3. After logging in to your iCloud account, go to the “Contacts” option from the home screen.
4. This will display a list of all the synced contacts. Select the contacts you wish to move. To select all contacts, click on the gear icon (settings) at the bottom right corner.
5. Once you have made the desired selections, go to its settings again (the gear icon) and choose “Export vCard.” This will save a VCF file having all the contact details.
6. Now, go to Gmail and login with your account details. Select the Contacts option. Alternatively, you can go to the official website of Google Contacts as well.
7. From here, you can choose to Import a file. Click on the vCard option and browse the saved VCF file that you have just exported from iCloud.
8. Once you have imported these contacts to your Google account, you can easily access them on the connected device as well.
Part 4: Copy contacts from Apple iPhone 8 to Android using iTunes
If you are an avid user of iTunes, you can try this technique to export iPhone contacts to Android. Earlier, iTunes has a feature to sync contacts with Google, Outlook, and Windows account. Now, the Google feature has been removed from iTunes. Therefore, you first need to sync your contacts to your Windows account and can later export them into a card. Needless to say, the technique can also be a bit complicated. Though, you can implement these steps to copy contacts from Apple iPhone 8 to Android using iTunes.
1. Launch the latest version of iTunes from your system, and connect your iPhone with a cable.
2. Select your connected device and go to its Info tab. Enable the “Sync Contacts“ option and choose to sync them with Windows Contacts.
3. Ensure that you choose to sync “All Contacts” before clicking on the “Apply” button.
4. Great! Once you have synced your iPhone contacts to your Windows account, you can safely remove the Apple iPhone 8 device. Go to your Account > Contacts and click on the “Export” button on the toolbar.
5. Choose to export the contacts to a vCard and select the location to save the VCF file.


6. In the end, you can manually copy the VCF file to your Apple iPhone 8 or import it to your Google Contacts as well.
Part 5: Switch contacts from Apple iPhone 8 to Android without a computer
Often, users don’t wish to use a computer to export iPhone contacts to Android. If you have the same requirements, then you can use a data transfer app. While there are many apps out there that can help you move contacts from Apple iPhone 8 to Android, I would recommend My Contacts Backup. This is because the app is available on both iOS App Store and Google Play Store . To use this app to transfer contacts from Apple iPhone 8 to Android, follow these steps.
1. Firstly, download the My Contacts app on your iPhone and launch it. Grant the app the needed permissions to access your contacts.
2. The app will automatically detect all the contacts saved on your device and would give you an option to either mail them or save them to its server.
3. You can choose to email the contacts to your own Gmail account as well. A VCF file will be mailed to your account that can later be downloaded and synced.

4. Additionally, you can also upload the contacts to its server.
5. Now, you have to install the My Contacts Backup app on your Apple iPhone 8 and Google Play Store.
6. Launch the app and choose to restore your contacts using an in-app vCard. In this way, all the saved contacts will be exported to your Apple iPhone 8.

Now that you have learned 7 different ways to move contacts from Apple iPhone 8 to Android, you can easily fulfill your requirements. Out of all the 8 provided options, Dr.Fone - Phone Transfer is the fastest and most convenient option to move all the contacts at once.
How To Transfer Messages From Apple iPhone 8 to other iPhone [All iOS Versions]
Transferring messages from one iPhone to another is a common necessity. It often arises during device upgrades, replacements, or when sharing information between devices. With the evolution of iOS versions, the methods for transferring messages have also adapted and improved. Regardless of the version, transferring messages between iPhones remains vital and relevant.
This guide will go through many techniques to transfer messages from Apple iPhone 8 to iPhone. Our goal is to provide you with the necessary knowledge for transferring your messages between two iPhones. We will ensure a smooth transition process by offering clear step-by-step guidance and helpful tips.

Part 1: How To Sync Messages Between Two iOS Devices?
Synchronizing messages between two iOS devices is a convenient way. It ensures that conversations and attachments transfer from one iPhone to another smoothly. iOS offers iCloud as the method to achieve this synchronization. It enables users to maintain message continuity across their devices. Here is how to transfer messages from Apple iPhone 8 to iPhone via iCloud sync:
- Step 1. Ensure you’re signed in with the required Apple ID on both devices. Next, navigate to the “Settings” app on the source device and select “Apple ID.” On the following screen, press “iCloud” to proceed.

- Step 2. Here, tap “Show All” under the “Apps Using iCloud” section and press “Messages in iCloud.” On the ensuing screen, toggle on “Use on this iPhone” and then press the “Sync Now” option.

- Step 3. Now, move to the target device and access “iCloud” settings through the Settings app. Here, navigate to “Messages in iCloud,” and on the next screen, enable “Use on this iPhone.” Give it some time, and the messages on both devices will sync.

Part 2. How To Transfer Messages From Apple iPhone 8 to iPhone Using iCloud Backup
Transferring messages between iPhones using iCloud backup offers an efficient method. It guarantees the transfer of all your conversations, attachments, and message history. Nonetheless, a significant limitation of this approach is its exclusive usability during the setup of an iPhone. Moreover, you can’t restore messages selectively with this method. Here is how to transfer text messages from Apple iPhone 8 to iPhone using iCloud backup:
- Step 1. Ensure your old iPhone is linked to a reliable Wi-Fi network. Open “Settings,” tap on your name, and select “iCloud.” Tap “iCloud Backup” and ensure the “Back Up This iPhone” toggle switch is turned on.

- Step 2. Here, press “Back Up Now” to initiate an immediate backup and wait for the process to complete. Afterward, move to the new iPhone and start setting it up until you reach the “Apps & Data” screen.

- Step 3. Next, opt for “Restore from iCloud Backup.” Then, log in to your iCloud account with the identical credentials employed during the backup process. Pick the latest backup from the available options, including the messages you aim to transfer. The restoration process will begin, and once it’s completed, open the Messages app to verify that all your message history has been transferred.

Part 3. How To Transfer Messages From Apple iPhone 8 to iPhone via iTunes/Finder
Using iTunes or Finder provides an alternate method to transfer messages from one iPhone to another. iTunes is available for Windows and on macOS Mojave and earlier. The users of macOS Catalina and later can use the Finder app to use this method. This approach completely restores your previous iPhone’s data, including messages.
Ensure that both iPhones are updated to the latest iOS version and that your computer has the latest version of iTunes or Finder. This is to avoid any compatibility issues during the backup and restoration process. Here is how to transfer messages from Apple iPhone 8 to iPhone via iTunes/Finder backup:
- Step 1. Begin by connecting your old iPhone to the Mac or PC and access it in iTunes or Finder. On iTunes, click the Apple iPhone 8 device to access the “Summary” tab, while in Finder, access the “General” tab. Here, go to “Backups” and choose “Back Up Now” to create a backup for your device. Make sure to select either “This Computer” (for iTunes) or “Backup all data from your iPhone to this Mac” (for Finder).

- Step 2. Once the backup is completed, start setting up your new iPhone. Once you reach the “Apps & Data” screen, select “Restore from Mac or PC,” and follow this guide:
For Finder/iTunes: Link your iPhone to the PC and gain access by clicking on the “Device” icon at the top left corner. This action will lead you to the “Welcome to Your New iPhone” screen, where the “Restore from this backup” option is pre-selected. Here, choose the desired backup and click “Continue” to kickstart the backup restoration process.

Part 4. The Best Way To Transfer Messages From Apple iPhone 8 to iPhone Without Resetting
iCloud and iTunes are viable options for transferring messages, but both need an entire device reset. However, synchronization of devices is limited to those sharing the same Apple ID. Therefore, if you seek a hassle-free method, Wondershare Dr.Fone emerges as your optimal choice. It is a reliable and efficient solution that simplifies transferring data between iPhones.
With Dr.Fone, users can copy all their content from one device to another with just one click. This functionality also extends across different OS, enabling smooth transfers between iOS and Android devices. Users can move various data types, including contacts, SMS, photos, videos, music, etc.
Key Features of Wondershare Dr.Fone
- It is compatible with the latest iOS 17 and new models of iPhone 15.
- This Phone Transfer tool can operate with over 8000 devices, encompassing Apple, Samsung, and an extensive array of others.
- Wondershare Dr.Fone facilitates the transfer of up to 15 different file types between phones.
Steps To Transfer Messages From Apple iPhone 8 to iPhone Without Backup via Dr.Fone
When using Wondershare Dr.Fone for phone-to-phone transfer, the process requires no technical expertise. Here is how to transfer messages from Apple iPhone 8 to iPhone without backup using Dr.Fone:
- Step 1. Initiating Phone Transfer Setup
Start by installing and opening Wondershare Dr.Fone on your computer to begin the process. Navigate to “Toolbox” and select “Phone Transfer” to proceed. Now, connect your iOS devices and allow them to load on the following screen. In this step, designate the “Source” and “Destination” for the transfer to specify the direction of the phone transfer. If you need to switch the locations of your iOS devices, utilize the “Flip” button.
- Step 2. Data Type Selection and Transfer Initialization
Once the source and destination are confirmed, choose the particular data types for transfer. Make sure Messages are selected, then mark all other data if you want, and click on “Start Transfer.” Subsequently, a notification will prompt you to turn off the Find My feature on iOS devices.

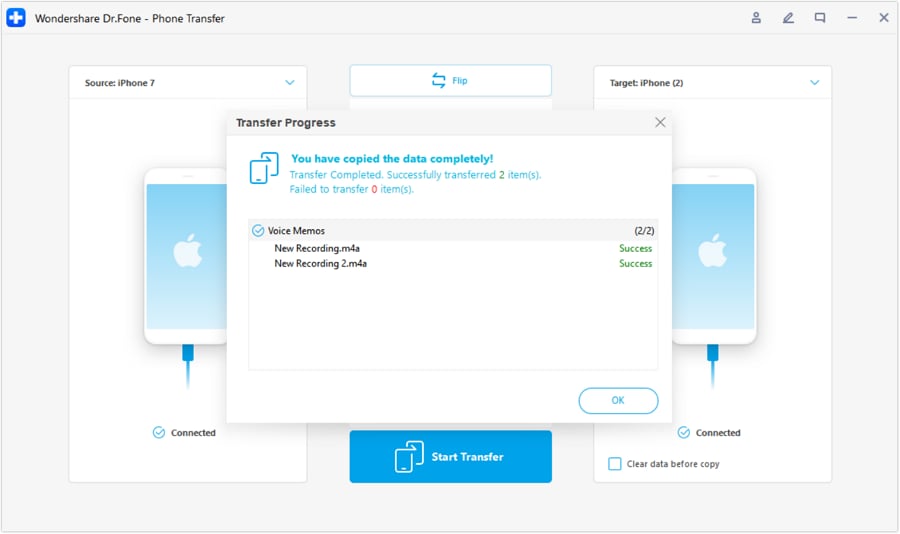
- Step 3. Disable Find My on iOS Device and Complete Data Transfer
Access the iOS device settings, tap on the name at the top, proceed to iCloud > Find My, and deactivate it. Once the feature is turned off, the data transfer will start, and the progress bar will indicate the completion of the transfer process. After completion, the front window displays the finished phone transfer. Press “OK” to finalize the entire process.
![]()
Pro Tip. How To View and Export Messages of iPhone on Your Computer/MacBook
Looking for a way to view and export your messages from your iPhone to your computer? If yes, Wondershare Dr.Fone has got you covered. Dr.Fone offers a robust iOS phone management tool that enables the export of data from your iOS device.
This functionality empowers you to create a backup of your iPhone messages directly onto your system. Here is how you can view and export your messages via Wondershare Dr.Fone:
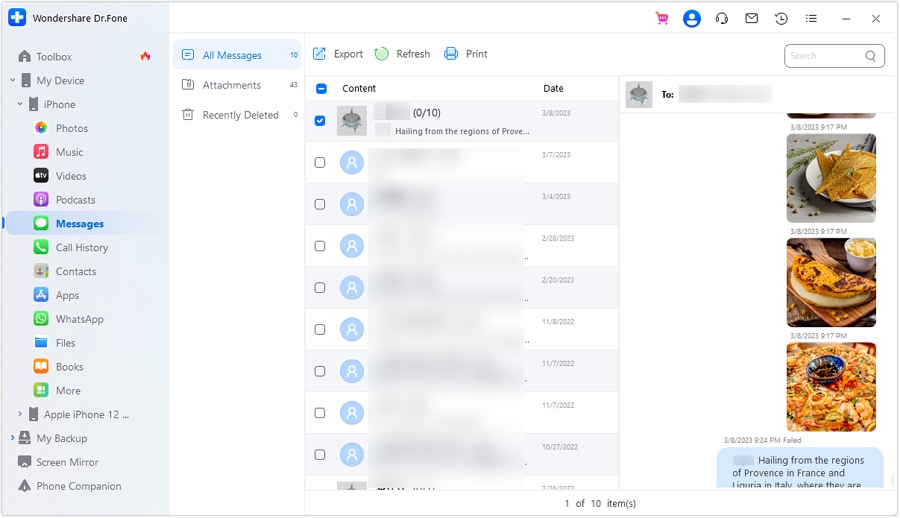
- Step 1. Access the Messages App Data
Start by establishing a link between your iOS device and the computer using a USB connection. After the Apple iPhone 8 device is detected, its specifics will be visible on the home screen. Proceed by selecting the “Messages” option from your device apps on the left side.

- Step 2. Export the Messages From the iPhone
Next, you can view all the messages and their attachments from your iPhone on your computer. If you want to export them, select the messages and press the “Export” button from the top. You can export the messages in Excel, CSV, or PDF format with all the details.
Conclusion
In conclusion, the process of transferring messages from Apple iPhone 8 to iPhone is crucial for maintaining communication continuity. Whether using iCloud, iTunes/Finder, or third-party solutions, each method offers advantages.
Yet, for effortless transfers without device resets, Wondershare Dr.Fone emerges as a standout choice. Its intuitive interface, selective data transfer, and message export capabilities make it an ideal solution. For effortless and efficient iPhone message handling, Dr.Fone proves to be a recommended tool.
iPhone Transfer: Transfer Contact from Apple iPhone 8 to iPhone without iCloud
Transferring contacts from Apple iPhone 8 to iPhone without iCloud is straightforward if you choose the right method. This process ensures your contacts are effortlessly moved between devices. This step-by-step guide proves invaluable when moving to a new iPhone or aiming to share contacts.
In this comprehensive guide, you’ll discover how to transfer contacts from Apple iPhone 8 to iPhone without iCloud using various tools and techniques to achieve successful contact transfer. Follow these simple yet effective steps to migrate your contacts successfully.

4 Basic Methods To Transfer Contacts From Apple iPhone 8 to iPhone Without iCloud
We will start by exploring the 4 basic methods to transfer contacts from Apple iPhone 8 to iPhone without iCloud. Each method offers its advantages and is tailored to suit different preferences. By understanding these methods, you can choose the most suitable one for your needs:
Method 1. AirDrop
AirDrop is a convenient built-in feature on iPhones. It allows quick and wireless transfer of various data types, including contacts. Moreover, it ensures a hassle-free and direct exchange without extra apps or services. Follow these steps to copy contacts from Apple iPhone 8 to iPhone without iCloud using AirDrop:
- Step 1: Begin by ensuring that AirDrop is enabled on both devices. For this, access the control center, expand the “Wireless” box, and long press the “AirDrop.” Now, set its visibility to “Contacts Only” or “Everyone for 10 Minutes.” Then, move your iPhone’s Contacts app and select the contact you want to share.

- Step 2: Following this, press “Share Contact” and select “AirDrop” as the sharing method. From the available devices on AirDrop, choose the targeted device. Finally, “Accept” the incoming AirDrop on your target iPhone to complete the process.

Method 2. NameDrop
NameDrop, integrated within iOS 17, enables the smooth sharing of contact information. All you need to do is bring your iPhone close to another iPhone. This feature eliminates the need for manual input of contact details. One of the standout advantages of NameDrop is its direct integration with AirDrop. This ensures swift and effortless sharing. Below are the steps to effortlessly share your contact information using NameDrop:
- Step 1: To enable the NameDrop feature, open your iPhone settings and access the “AirDrop” option from the “General settings. Afterward, turn on the “Bringing Devices Together” feature to activate NameDrop on your iOS devices.

- Step 2: If Contact Posters are generated in iOS 17, they will display on both iPhones. You will be given the option to either “Share” or “Receive Only.” If you wish to exchange contact information, select “Share.” The recipient can opt for “Receive Only” to obtain your details. You can also perform these steps in the opposite direction to get contact information on your iPhone.

Method 3. iTunes/Finder
If you want a more traditional approach to copying contacts from Apple iPhone 8 to iPhone without iCloud, iTunes/Finder can be a great choice. It is a more drastic approach as it involves restoring the entire device’s data. This method is recommended if you are switching devices. Here is how you can copy contacts from Apple iPhone 8 to iPhone without iCloud via iTunes/Finder:
- Step 1: After ensuring the latest iTunes/Finder is installed, use a USB cable to connect your source iPhone to your computer. To access the “Summary” tab in iTunes, click the “Device” icon. On Finder, select iPhone from “Locations” and access the “General” tab.

- Step 2: Move to the “Backups” section on iTunes/Finder and click “Back Up Now.” Before this, confirm the selection of “This Computer” in iTunes and for Finder” or “Back up all data from your iPhone to this Mac.”

- Step 3: Once the backup process is completed, remove the source iPhone and connect the target iOS device. Similarly, access the “Summary/General” tab and click “Restore Backup.” Choose the most recent backup and follow the on-screen guidelines to complete the process.

Method 4. Email
Another simple way to move contacts between iPhones is through email. This approach eliminates the necessity for extra applications or software. Yet, this method might be more suitable for transferring fewer contacts. This is due to the file size limitation of email attachments. The following are the steps to share contacts via email:
- Step 1: Open the Contacts app and move to the targeted contact you want to share. Select the contact and tap “Share Contact.” From the available sharing options, select “Email” and enter your email address in the recipient field.

- Step 2: Tap “Send” to email the selected contacts and open the email app on your target iPhone. Find the email you sent with the contacts attached and open it. Now, retrieve the attached vCard from the email. The contact will appear in your Contacts app but won’t be added directly. To save the contact, tap “Create New Contact,” write any contact details, and select “Done” to finish saving the contact.

Part 2: What Are the Problems Linked With the Basic Methods To Transfer Contacts?
The basic methods to transfer contacts from Apple iPhone 8 to iPhone without iCloud are effective. However, they come with certain limitations that users should be aware of. AirDrop, while a quick and handy way, can only share one contact per transfer. It will become a tedious and time-consuming task when sharing the entire contacts library. The same can be said about email, where limitations on attachment size prohibit large transfers.
Using email or other online methods may raise security concerns. This is due to sensitive contact information that could be intercepted during transmission. As for NameDrop, it is only available on devices running iOS 17. Older iPhone models or software versions do not support this method. It limits the compatibility of the transfer process. Moreover, it can only allow you to share new contact information.
Local backups created through iTunes or Finder might require ample storage space. Moreover, the iTunes/Finder backups are used to restore the entire device’s data. You cannot use them to transfer contacts with your friends or colleagues.
Part 3: 2 Advanced Solutions To Transfer Contacts From Apple iPhone 8 to iPhone Without iCloud
Want to know how to copy contacts from Apple iPhone 8 to iPhone without iCloud in one click? There is good news for you as a tool exists that can make the whole transfer process a breeze. When it comes to data transfer among smartphones, the number one phone transfer tool is Wondershare Dr.Fone. .
With it, you can even transfer data directly to an iOS device or computer. Here is how to copy contacts from Apple iPhone 8 to iPhone without iCloud using the Phone Manager of Wondershare Dr.Fone:
- Step 1: Access Contacts from The Left Panel. The first action is to download and install the latest Wondershare Dr.Fone version on your computer. Now, launch it and connect both of your iOS devices to the system. Choose the source iPhone from the left side panel and click “Contacts” from the expanded options.
- Step 2: Transfer the Selected Contacts. Once in the “Contacts” tab, choose the ones you want to transfer to the other device. After you have made the choice, click “To Device” from the top toolbar and select the targeted iOS device. Your chosen contacts will be immediately transferred to the other device.

Solution 2: Wondershare Dr.Fone - Phone Transfer
When you want to transfer all of your contacts from the source device, the recommended tool is the Wondershare Dr.Fone – Phone Transfer feature. It enables users to smoothly copy data from one phone to another with just one click. Moreover, it facilitates the smooth transfer of various data types. This includes contacts, text messages, photos, videos, music, and more.
The process is user-friendly, requiring simple clicks to initiate. It can transfer data between devices running on different OS, such as iOS and Android. Here is how to transfer contacts from Apple iPhone 8 to iPhone without iCloud via Dr.Fone:
- Step 1: Navigate to Phone Transfer in Dr.Fone. Within Wondershare Dr.Fone, access the “Toolbox” tab and click “Phone Transfer.” Now, you will need to connect both iOS devices to the computer. Wait for Dr.Fone to recognize and load them. Once they are loaded, assign the “Source” and “Destination” positions to the Apple iPhone 8 devices.
- Step 2: Make a Data Selection and Tap Start Transfer. After the Apple iPhone 8 devices are configured, select the data you want to transfer alongside Contacts. When you have selected the desired data, click “Start Transfer” to proceed. A prompt will soon be displayed on the screen, requesting the deactivation of the Find My feature on iOS devices. Access the iOS device’s Settings and tap on the name located at the top.
- Step 3: Turn Off Find My and Complete the Transfer Process. Then, navigate to “iCloud” and access “Find My” to proceed to deactivate it. After deactivating the feature, the data transfer begins. The progress bar indicates the process’s completion. Once finished, the foremost window exhibits the finalized phone transfer. Press “OK” to conclude the process fully.
Conclusion
In conclusion, the process to transfer contact from Apple iPhone 8 to iPhone without iCloud presents various challenges. However, advanced solutions like Wondershare Dr.Fone present efficient, secure, and comprehensive options. Moreover, Dr.Fone streamlines the process, overcoming the limitations of basic methods. Its intuitive interface and dedicated transfer features make it a recommended choice. With its reliability and effectiveness, Dr.Fone stands out as a trusted solution for hassle-free data transfer.
Also read:
- [Updated] 2024 Approved Guide to Incorited Visuals in Text Without Cost
- [Updated] In 2024, Drive Audience Participation Through Custom Stories Queries
- 2024 Approved Innovate in Note-Taking with Mematic Platform
- 4 Ways to Transfer Contacts from Apple iPhone 8 Plus to iPhone Quickly | Dr.fone
- Captivate Audiences, Gain Views Boosting Engagement in TikTok Unboxing Videos for 2024
- Discovering ChatGPT: Unveiling the Potential of Its Built-In Addons
- How to Move Custom Ringtones from Apple iPhone 14 Pro to Android? | Dr.fone
- In 2024, 5 Easy Ways to Transfer Contacts from Apple iPhone XR to Android | Dr.fone
- In 2024, 5 Tutorials on How to Transfer Photos From Apple iPhone 13 to New iPhone | Dr.fone
- In 2024, Can Life360 Track You When Your Apple iPhone 8 Plus is off? | Dr.fone
- In 2024, Methods to Transfer from Apple iPhone 6 Plus to Android | Dr.fone
- In 2024, Methods to Transfer from Apple iPhone SE (2020) to Android | Dr.fone
- In 2024, Premier's Picks High-Definition Monitors with Advanced Features
- Why You Should Embrace Online Conversation: 9 Advantages to Consider
- Title: 5 Easy Ways to Transfer Contacts from Apple iPhone 8 to Android | Dr.fone
- Author: Charlotte
- Created at : 2024-11-03 17:03:41
- Updated at : 2024-11-04 16:42:29
- Link: https://iphone-transfer.techidaily.com/5-easy-ways-to-transfer-contacts-from-apple-iphone-8-to-android-drfone-by-drfone-transfer-from-ios/
- License: This work is licensed under CC BY-NC-SA 4.0.