
5 Easy Ways to Transfer Contacts from Apple iPhone 7 to Android | Dr.fone
5 Easy Ways to Transfer Contacts from Apple iPhone 7 to Android
Whenever we move from one device to another, the first thing that we wish to do is transfer our contacts. After all, we can’t communicate with anyone without our list of contacts. Surprisingly, a lot of people find it hard to transfer contacts from Apple iPhone 7 to Android. Truth to be told - there can find countless ways to move contacts from Apple iPhone 7 to Android. You don’t need to worry a lot about the compatibility issues of different systems and can replace old phones at will when there is a new phone release, like the upcoming Samsung Galaxy S22 series. You can use a third-party app, a cloud service (like iCloud), and iTunes. Read on to learn how to transfer contacts from Apple iPhone 7 to Android in 5 different ways.
Part 1: Transfer all contacts from Apple iPhone 7 to Android in 1 click
The easiest way to transfer all the iPhone contacts to Android is by using Dr.Fone - Phone Transfer . A part of the Dr.Fone toolkit can easily transfer all your data from one device to another with a single click. The application is compatible with every leading Android and iPhone model. You can transfer your data from Apple iPhone 7 to Android and vice-versa. Besides a cross-platform transfer of data, iPhone to iPhone and Android to Android transfer is also supported.
The application also supports transferring all the leading data types such as videos, music, photos, messages, and so much more. Extremely easy to use, it is a must-have tool for every smartphone user out there. To learn how to move contacts from Apple iPhone 7 to Android, you can take these steps:
Step 1. First of all, launch the Dr.Fone toolkit on your Mac or Windows PC, and from its welcome screen, visit the “Phone Transfer” module.

Step 2. Connect your Android and iOS devices to the system and let the application detect them automatically. Since you wish to export iPhone contacts to Android, iPhone should be the source while Android should be the destination device. You can use the Flip button to interchange their positions.
Step 3. select the category of data you wish to transfer. Once you have checked the “Contacts” option, click on the “Start Transfer” button to start the process.

Step 4. Sit back and wait for a couple of minutes as the application syncs contacts from Apple iPhone 7 to Android. Make sure that both the Apple iPhone 7 devices are kept connected to the system until the process is completed.

Step 5. Once the transfer completes, you will be shown a message. In the end, you can remove the 2 devices safely from your system.

Part 2: Move contacts from Apple iPhone 7 to Android with Google Account
Another fast and hassle-free way to sync contacts from Apple iPhone 7 to Android is by using your Google Account. Since you can add your Google account on the iPhone, you can also use it to sync your contacts. While setting up your Android, you can use the same Google account. To learn how to import contacts from Apple iPhone 7 to Android using your Google account, these quick steps can be implemented.
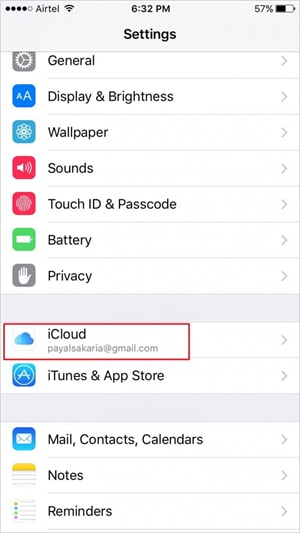
Step 1. Unlock your iPhone and go to its Settings > Mail, Contacts, Calendars > Add Account and tap on “Google.”

Step 2. Sign in with your Google account credentials and grant your phone the needed permissions to access your Gmail data.
Step 3. Now, you can go back to your Google account from here and turn on the sync option for “Contacts.”

Step 4. Once your contacts are synced with your Google account, you can easily access them on any Android device. You can use the Google Contacts app or use the same account to set up your device for auto-sync contacts.
Part 3: Import contacts from Apple iPhone 7 to Android with iCloud
Another simple way to sync contacts from Apple iPhone 7 to Android is by using iCloud. Firstly, you need to sync the iPhone contacts with iCloud, and later you can export them a VCF file. To this end, the vCard can be imported to Google Contacts. Yes - it does sound a bit complicated. After all, the Dr.Fone tools provide such a hassle-free way to move contacts from Apple iPhone 7 to Android compared to this technique. Though, this is a free solution and can be your plan B. To learn how to transfer contacts from Apple iPhone 7 to Android via iCloud, follow these steps.
1. Before you proceed, make sure your iPhone contacts are synced with iCloud. To do this, go to the iCloud settings and turn on the sync for 1.Contacts.
2. Great! Once your contacts are synced with iCloud, you can easily access them remotely. Go to iCloud.com and log in with your Apple ID.
3. After logging in to your iCloud account, go to the “Contacts” option from the home screen.
4. This will display a list of all the synced contacts. Select the contacts you wish to move. To select all contacts, click on the gear icon (settings) at the bottom right corner.
5. Once you have made the desired selections, go to its settings again (the gear icon) and choose “Export vCard.” This will save a VCF file having all the contact details.
6. Now, go to Gmail and login with your account details. Select the Contacts option. Alternatively, you can go to the official website of Google Contacts as well.
7. From here, you can choose to Import a file. Click on the vCard option and browse the saved VCF file that you have just exported from iCloud.
8. Once you have imported these contacts to your Google account, you can easily access them on the connected device as well.
Part 4: Copy contacts from Apple iPhone 7 to Android using iTunes
If you are an avid user of iTunes, you can try this technique to export iPhone contacts to Android. Earlier, iTunes has a feature to sync contacts with Google, Outlook, and Windows account. Now, the Google feature has been removed from iTunes. Therefore, you first need to sync your contacts to your Windows account and can later export them into a card. Needless to say, the technique can also be a bit complicated. Though, you can implement these steps to copy contacts from Apple iPhone 7 to Android using iTunes.
1. Launch the latest version of iTunes from your system, and connect your iPhone with a cable.
2. Select your connected device and go to its Info tab. Enable the “Sync Contacts“ option and choose to sync them with Windows Contacts.
3. Ensure that you choose to sync “All Contacts” before clicking on the “Apply” button.
4. Great! Once you have synced your iPhone contacts to your Windows account, you can safely remove the Apple iPhone 7 device. Go to your Account > Contacts and click on the “Export” button on the toolbar.
5. Choose to export the contacts to a vCard and select the location to save the VCF file.

6. In the end, you can manually copy the VCF file to your Apple iPhone 7 or import it to your Google Contacts as well.
Part 5: Switch contacts from Apple iPhone 7 to Android without a computer
Often, users don’t wish to use a computer to export iPhone contacts to Android. If you have the same requirements, then you can use a data transfer app. While there are many apps out there that can help you move contacts from Apple iPhone 7 to Android, I would recommend My Contacts Backup. This is because the app is available on both iOS App Store and Google Play Store . To use this app to transfer contacts from Apple iPhone 7 to Android, follow these steps.
1. Firstly, download the My Contacts app on your iPhone and launch it. Grant the app the needed permissions to access your contacts.
2. The app will automatically detect all the contacts saved on your device and would give you an option to either mail them or save them to its server.
3. You can choose to email the contacts to your own Gmail account as well. A VCF file will be mailed to your account that can later be downloaded and synced.

4. Additionally, you can also upload the contacts to its server.
5. Now, you have to install the My Contacts Backup app on your Apple iPhone 7 and Google Play Store.
6. Launch the app and choose to restore your contacts using an in-app vCard. In this way, all the saved contacts will be exported to your Apple iPhone 7.


Now that you have learned 7 different ways to move contacts from Apple iPhone 7 to Android, you can easily fulfill your requirements. Out of all the 8 provided options, Dr.Fone - Phone Transfer is the fastest and most convenient option to move all the contacts at once.
How to Transfer from Apple iPhone 7 to iPhone 8/X/11
If you’re one of those who is fond of new phones, then making the transfer to a new iPhone from your old phone can be a real struggle. The biggest problem comes when you need to transfer data from Apple iPhone 7 to iPhone 8 (Plus)/X/11 and data include your photos, documents, contacts, etc.
Cell phone data is highly important and no matter what, no one wants to be in a state where they have to lose their precious data. Having all the personal and professional contacts, documents, messages, music as well as all the memories which you have captured in the form of pictures.. no one can give it just like that.
Imagine getting a surprise on your birthday and here you have your brand new iPhone 8 (Plus)/X/11. The only thing that irritates you is the complex process to transfer your data from old iPhone to a newer one. Well, if you have ever faced such problem where transferring your data from one phone to another phone have been a nightmare for you, then this article is for you..
How to Transfer Everything from Apple iPhone 7 to iPhone 8 (Plus)/X/11
We have come up with a solution which will make transfer data from Apple iPhone 7 to iPhone 8 (Plus)/X/11 extremely easy. You might be wondering what we have. Well.. Dr.Fone is your ultimate stop and the best thing that can help you to transfer from Apple iPhone 7 to iPhone 8 (Plus)/X/11 without any kind of hassle.
Dr.Fone - Phone Transfer is great phone to phone transfer tool to help you transfer data from Apple iPhone 7 to iPhone 8 (Plus)/X/11 extremely easy with just one click. It is different from the traditional way of transfer data from Apple iPhone 7 to iPhone 8 (Plus)/X/11 by using iTunes. Comparative to iTunes, Dr.Fone is highly user-friendly and very easy to use. Thereby, making the transition and transfer data from old iPhone to iPhone 8 (Plus)/X/11 extremely easy. It works by following the very simple steps and you don’t even have to worry about backup and the restore things.
Dr.Fone - Phone Transfer
Transfer Everything from Apple iPhone 7 to iPhone 8 (Plus)/X/11 in 1 Click!.
- Easily transfer photos, videos, calendar, contacts, messages and music from old iPhone to new iPhone 15.
- Enable to transfer from HTC, Samsung, Nokia, Motorola and more to iPhone 15 and former.
- Works perfectly with Apple, Samsung, HTC, LG, Sony, Google, HUAWEI, Motorola, ZTE, Nokia and more smartphones and tablets.
- Fully compatible with major providers like AT&T, Verizon, Sprint and T-Mobile.
- Fully compatible with iOS 17 and Android 13
- Fully compatible with Windows 10 or Mac 14.
3,774,052 people have downloaded it
Still confused? Let us tell you easy steps that will help you to learn how to transfer everything from Apple iPhone 7 to iPhone 8 (Plus)/X/11 with Dr.Fone
- Download Dr.Fone - Phone Transfer Application. Open the Application and connect your Apple iPhone 7s to it.
- Click on to “Phone Transfer“. In order to boost the efficiency, make sure both the Apple iPhone 7 devices are connected
- Select the files and click “Start Transfer“ button.
Note: you can also click on to “Flip” button, in order to change the positions of the Apple iPhone 7 devices.
There are other methods too which enables the transfer data from old iPhone to iPhone 8 (Plus)/X/11.
Part 2: How to Transfer Everything from Apple iPhone 7 to iPhone 8 (Plus)/X/11 with iTunes
iTunes have been used traditionally to transfer the data. Let’s learn how iTunes works:
- In order to transfer your data from iPhone 6Plus to iPhone 8 (Plus)/X/11 via iTunes, first you need to make sure that the data from your previous device is backup with iTunes.
- To back up your data to iTunes, you need to connect your iPhone to the computer and then open the iTunes application. Please ensure that you’re using the latest version of the iTunes. Once, device is connected, click on “Backup Now“.
 with iTunes")
- Open your new device. Press home button once you see “Hello” Screen.
- Connect your phone to the laptop, where you have already backup your data with the iTunes.
- Open the iTunes application and then select your latest device to restore the backup.
 with iTunes")
- Wait until the process is completed.
Part 3: How to Transfer Everything from Apple iPhone 7 to iPhone 8 (Plus)/X/11 with iCloud
iCould is another software which also enables the transfer of data from Apple iPhone 7 to iPhone 8 (Plus)/X/11. In order to transfer data Apple iPhone 7 to iPhone 8 (Plus)/X/11 using iCloud, you can consider the following steps to make the process easy.
- Just like iTunes, with iCloud too you need to back up your data to iCloud so that it can be restored to your new iPhone 8 (Plus)/X/11. In order to back up, first you need to connect the Apple iPhone 7 device to the Wi-Fi network. Then go to the setting, click on iCloud button and then click on to iCloud backup. You need to check whether the iCloud backup is turned on or not. Make sure it is turned on. Click on “back up now“. Keep your phone connected to Wi-Fi until the process is completed.
 with iCloud")
- Connect your iPhone 8 (Plus)/X/11 to the computer when “Hello” screen appears.
- Connect your phone to the Wi-Fi network.
- To restore from iCloud backup, sign in to iCloud with the help of apple id and password.
 with iCloud")
- The application will ask for the backup. Once you’ve checked that the backup is correct you can click on it.
- Make sure your device is connected to it until the process is completed.
iTunes, iCloud and Dr.Fone are few of the methods which tend to enable the transfer data from old iPhone to iPhone 8 (Plus)/X/11. However, considering the complexity of the iTunes and iCloud, we’d urge the readers if they can try the Dr.Fone at least once. It is not only easy but also less time consuming. It prevents the additional steps such as backup and restore settings. Rather, the entire process is done with just one click. Dr.Fone is highly user friendly and a bit different from traditional ways of transfer data Apple iPhone 7 to iPhone 8 (Plus)/X/11.
We know the emotions and sentiments attached with one’s personal information and thus we have tried to give users a platform, where they can make the transition from one phone to another extremely simple. Simply download and have a try.
How to Transfer/Sync Notes from Apple iPhone 7 to iPad
The Notes app comes pre-installed on iPhone and iPad, and it proves to be very handy and useful when you need to jot down some ideas, details, plans, or any other important information which can be reviewed whenever you need. Sometimes you will need more to check your note from your iPhone on iPad. In this case, transferring/syncing notes from Apple iPhone 7 to iPad plays an important role. This article will provide the ways with and without iCloud to transfer notes from Apple iPhone 7 to iPad in detail.
Part 1. Transfer Notes from Apple iPhone 7 to iPad Using iCloud
This part will introduce how to transfer iPhone notes to iPad with iCloud. In fact, this is very easy to be done, and you’ll only need several simple steps. Check it out.
Step 1 Open Settings and select iCloud
Tap Settings > iCloud on both your iPhone and iPad.
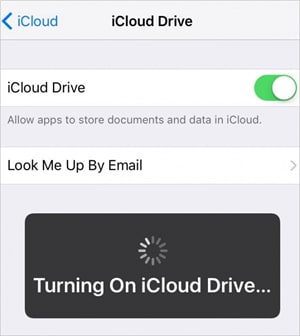
Step 2 Turn on iCloud Drive
Click on iCloud Drive option and then turn it on. You need to turn the option on both your iPhone and iPad.
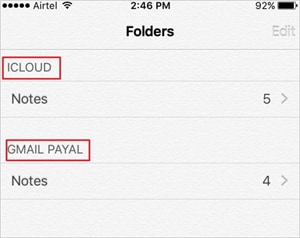
Step 3 Go to Notes App on iPhone
Now go to the Notes app on your iPhone, and you can see a folder named iCloud. Now you can create notes in the iCloud folder on your iPhone, and the notes will be automatically synced to the iPad when the two devices are connected with Wi-Fi connection.
Part 2. Sync Notes from Apple iPhone 7 to iPad Using Third-Party Software
Dr.Fone - Phone Manager (iOS)
Transfer Files Between iPhone and iPad without iTunes
- Transfer, manage, export/import your music, photos, videos, contacts, SMS, Apps, etc.
- Back up your music, photos, videos, contacts, SMS, Apps, etc. to the computer and restore them easily.
- Transfer music, photos, videos, contacts, messages, etc from one smartphone to another.
- Transfer media files between iOS devices and iTunes.
- Fully compatible with the latest iOS version and iPod.
3981454 people have downloaded it
Besides iCloud, there are several third-party softwares that also allow you to sync and transfer notes from Apple iPhone 7 to iPad. This part will introduce the top programs which can help you to get the work done easily.
1. CopyTrans
It allows you to transfer apps, notes, photos, videos, and other content between iOS devices, PC, and iTunes. The software also takes backup of data so that it can be restored in case of data loss. CopyTrans also enables you to import the artwork, playlist, and other information into iTunes.
Pros
- Easy-to-use and clean interface
- Provides the option to take back up iOS data
- The app provides multiple guides and tips for the users
Cons
- The time of transfer is long
- Many users have also complained about detecting virus
User reviews
- Thousands of songs can be copied back to iTunes in minutes
- Virus detected by windows 10. Windows 10 detected a virus and removed the download 2x. Never unzipped the file.
2. iExplorer
This is another app that allows you to sync notes from Apple iPhone 7 to iPad. The app allows you to transfer images, music, notes, SMS and all other information respectively without any need to sync the entire file every time. iExplorer helps to manage folders and transfer data for iOS devices, and it is a great iTunes alternative.
Pros
- The app displays the data of the Apple iPhone 7 device in a clear layout
- The detection of the Apple iPhone 7 device by the app is quick and thoroughly
- Allows users to drag and drop files for the transfer
Cons
- Many users complaint of crashing issues
- There are lots of pop-up dialog for full version purchase
- The access to SMS and the contacts information is with jailbreak terminals only
User Reviews
- Amazingly quick! Got the job in very short time. Very user-friendly.
- I forgot my login information for my old iTunes account and had no way of obtaining it since I was also using a new email address. I downloaded this program and it transferred all 600-something of my files within a minute or two. Saved me so much money!
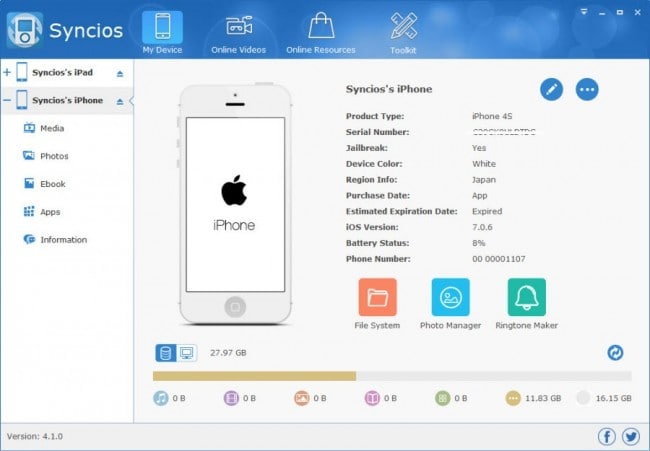
3. Syncios
Syncios also works as a decent iTunes alternative to transfer data between iOS devices and PC. The app allows users to transfer videos, photos, ringtones. TV shows, playlist, notes and all other data between iPhone/iPad/iPod and PC easily and quickly.
Pros
- Comes with easy setup wizard
- Excellent using experience when transfer files
Cons
- Free software does not comes with selected options to choose from
- Some users complain about the software collapse.
User Reviews
- Software crashed and we lost years of family photos, including photos of our kids with nanna who passed away recently. The scam part is this, if you go to the website you will notice they do data recovery, you can also download for free but to actually recover ‘photos’ etc, you have to pay $50.00 USD and there is the scam. They create the issue with the free software and then they sting you to give you back your photos. Warn everybody you know. BEWARE.
- Since I go through lots of music, videos, photos, I had to be able to backup the iPhones and this is where iTunes got kinda complicated for me. SyncIOS make the use of my Apple device much more user-friendly and comfortable.
Also read:
- [New] Crafting an Impactful Online Presence with Perfect YT Dimensions
- [Updated] Discover the Leading Tools for FB Video Downloads in Minutes for 2024
- 2024 Approved Skyrocket Your Marketing Game on Reddit Proven Success Techniques
- 5 Leading iPhone Data Rescue Software Solutions Supporting iOS 17 - Ranked!
- Circlesmith's Arsenal
- Complete Tutorial on Securely Saving Dailymotion Content Offline at No Cost
- Effortless Ways to Transfer Data from Your Apple iPhone 15 to iPhone 15 | Dr.fone
- Expert Strategies in Post-Processing Colors for 2024
- How to add a digital signature block to .fodt file
- How to Move Custom Ringtones from Apple iPhone 7 to Android? | Dr.fone
- How to Transfer Everything from Apple iPhone 14 Plus to iPhone | Dr.fone
- In 2024, 4 Ways to Transfer Messages from Apple iPhone 11 Pro to iPhone Including iPhone 15 | Dr.fone
- In 2024, How to Remove and Reset Face ID on Apple iPhone 14 | Dr.fone
- In 2024, iPhone Transfer Transfer Contact from Apple iPhone 13 Pro to iPhone without iCloud | Dr.fone
- In 2024, Transfer your Apple iPhone 12 mini Apps to New iPhone | Dr.fone
- In 2024, Ultimate Guide, How to Transfer Music From Apple iPhone 14 Pro to iPhone | Dr.fone
- iPhone Transfer Transfer Contact from Apple iPhone 11 to iPhone without iCloud | Dr.fone
- Revolutionize Your Online Presence: Advanced Features of ManyCam Live Video Technology
- Various Methods to Transfer Pictures from Apple iPhone 6s Plus to PC | Dr.fone
- Title: 5 Easy Ways to Transfer Contacts from Apple iPhone 7 to Android | Dr.fone
- Author: Charlotte
- Created at : 2024-10-30 17:14:30
- Updated at : 2024-11-04 16:46:20
- Link: https://iphone-transfer.techidaily.com/5-easy-ways-to-transfer-contacts-from-apple-iphone-7-to-android-drfone-by-drfone-transfer-from-ios/
- License: This work is licensed under CC BY-NC-SA 4.0.