
4 Ways to Transfer Messages from Apple iPhone 14 Plus to iPhone Including iPhone 15 | Dr.fone
4 Ways to Transfer Messages from Apple iPhone 14 Plus to iPhone Including iPhone 15
“Do text messages transfer to the new iPhone from the old iPhone? I have bought a new iPhone but can’t understand how to transfer messages from Apple iPhone 14 Plus to iPhone?”
Lately, we have gotten plenty of feedback like this from users who wish to learn how to transfer messages to new iPhone, like iPhone 15/15 Pro (Max), from an existing iOS device. If you have the same doubts, then you have come to the right place.
While it is quite easy to move music, videos, or pictures from one iPhone to another , you might need to walk an extra mile to transfer contacts or messages. To make it easier for our readers, we have come up with three different techniques to transfer messages from an old to a new iPhone effortlessly.
Read on and learn how to transfer messages from Apple iPhone 14 Plus to iPhone in no time.
Which method to choose?
There are 4 different ways on how to transfer messages to the new iPhone. But which one to choose? Chances are that you might get confused. To make things easier for you, we here provide a quick comparison.
Method 1: How to transfer messages from Apple iPhone 14 Plus to iPhone including iPhone 15/15 Pro (Max) in one click
If you want to learn how to transfer texts from Apple iPhone 14 Plus to iPhone seamlessly, then take the assistance of Dr.Fone toolkit. Simply use Dr.Fone - Phone Transfer to move your messages from one iPhone to another. Not only messages, but you can also use it to transfer all data files to new iPhone .
Dr.Fone - Phone Transfer
Quickly Transfer Text Messages /iMessages from Apple iPhone 14 Plus to iPhone
- Transfer messages from Apple iPhone 14 Plus to iPhone without backup.
- Support any iDevices including iPhone, iPad, and iPod.
- Transfer everything including contacts, music, video, photo, SMS, app data, and more.
- Can be installed both on Win and Mac computers.
3981454 people have downloaded it
In this technique, the simple process goes as follows to transfer messages to new iPhone:
Open software > Connect iPhones to PC > Select “Messages” > Click “Start Transfer”
Now let’s dive in and learn how to transfer messages to new iPhone:
1. Set up Dr.Fone - Phone Transfer to Windows or Mac computer. Connect and start the application with your iPhone. On the home screen, click the “Phone Transfer” option.

2. Confirm that both iPhones have the correct target and source positions. Or to exchange by clicking “Flip”.

3. Choose the type of information to be transferred. Before clicking on the button “Start Transfer” make sure that the option “Text Messages” is enabled.
4. Wait a while for your old iPhone messages to be transferred to the new iPhone.

5. Once it is done, you can disconnect your iPhones from the PC, and view the messages on the target iPhone.

After following these easy steps, you can learn how to transfer texts from Apple iPhone 14 Plus to iPhone with Dr.Fone - Phone Transfer.
Video Guide: How to transfer messages from Apple iPhone 14 Plus to iPhone
You may be interested in:
- _ 4 ways to transfer SMS from Apple iPhone 14 Plus to Android _
- _ 5 Ways to Transfer WhatsApp Messages from Apple iPhone 14 Plus to iPhone _
Method 2: How to Transfer Messages from Apple iPhone 14 Plus to iPhone Including iPhone 15/15 Pro (Max) Using iCloud Backup
Transferring data, including crucial messages, from an old iPhone to a new one is a smooth process using iCloud Backup. It allows you to access your essential conversations and other message data on your new device. Restoring your messages from an iCloud backup is a straightforward process. To effortlessly move your messages from one iPhone to another using an iCloud backup, adhere to the simple steps outlined below:
Step 1: Go to “Settings” on your iPhone, tap your name, and access “iCloud.” Press the “iCloud Backup” option, and on the following screen, ensure “Back Up This iPhone” is enabled. Now, “Back Up Now” to create a backup of your old iPhone’s data, including messages, on iCloud.

Step 2: Afterward, start setting up your new iPhone until you reach the “Apps & Data” screen. Here, choose “Restore from iCloud Backup” and log in using your Apple ID. Then, go on to select the backup you want to restore and complete the process by following the on-screen instructions.

Method 3: How to Transfer Messages from Apple iPhone 14 Plus to iPhone, including iPhone 15/15 Pro (Max), using iCloud Sync
Ensuring a smooth transition to the latest iPhone is made simple with the aid of iCloud sync. It enables the transfer of essential data, including precious messages, from your old device. With it, you can sync your messages and other crucial data to your new device. This allows continued access to your valuable conversations and attachments. Below are the step-by-step instructions for transferring messages using the iCloud sync feature:
Step 1: On your old iPhone, access phone Settings and tap on your Apple ID. Press “iCloud” on the following screen and move to the “Apps Using iCloud” section.

Step 2: Here, tap “Show All” and go on to press “Messages in iCloud” from the list. On the following screen, enable the “Use on this iPhone” feature. It will sync iMessage with your iCloud account, allowing you to access them on your new iPhone.

Method 4: How to transfer messages from Apple iPhone 14 Plus to iPhone including iPhone 15/15 Pro (Max) using iTunes/Finder
Besides iCloud, one can also take the assistance of iTunes/Finder to move their content from one iOS device to another. Not only do text messages transfer to new iPhone, other kinds of data files like photos or contacts can also be moved with this method. To learn how to transfer texts from Apple iPhone 14 Plus to iPhone using iTunes, follow these steps:
1. Connect your source iPhone to your computer and launch iTunes or Finder (Mac Computer).
2. Select the Apple iPhone 14 Plus device and go to its Summary page.
3. Under the Backups section, click on the “Backup Now” button to take a complete backup of your phone. Make sure that you are taking a backup on the computer instead of iCloud.

4. After taking a backup of your device, disconnect it, and connect the target phone to the computer.
5. Launch iTunes/Finder and wait for it to recognize the new iPhone. From here, you can choose to set up your device while restoring a previous backup.

6. Alternatively, you can also go to its “Summary” page and click on the “Restore Backup” option to restore the existing backup on your target device.

This will let you move not just messages, but all the major data files from one iOS device to another.
You may be interested in:
- _ Does iTunes Backup Text Messages? How to Restore? _
- iTunes Not Working? Here Are All Solutions You Need
Now when you know how to transfer messages from Apple iPhone 14 Plus to iPhone in different ways, you can simply pick the preferred option. We have also compared these techniques so that you can go with the most suitable alternative.
Go ahead and follow this stepwise tutorial to transfer your messages from one iPhone to another. Whenever someone asks “do text messages transfer to the new iPhone,” make them familiar with an easy solution by sharing this informative post.
How to Transfer Photos from Apple iPhone 14 Plus to other iPhone without iCloud
This article’s content focuses on the importance of photos, and the techniques and tools you require to transfer photos from Apple iPhone 14 Plus to another iPhone without iCloud including iPhone 15.
Photos are important because they reflect our memories, we have so many memories in our brain and it is not easy to pull them all up when required, but photos can help a lot to remember. Photos invoke emotions, sometimes photos are important to remember details, for example, “What did I wear on my last Christmas?”.
Method 1: How to Transfer Photos from Apple iPhone 14 Plus to iPhone without iCloud (All in One Click) [iPhone 15 Included]
The top method to transfer photos from Apple iPhone 14 Plus to iPhone without iCloud is to transfer all the photos in one click. With this method, you can complete the photo transfer even within seconds without any photo loss. All you need are two lightning cables to connect both iPhones to your PC or Mac, and the Dr.Fone - Phone Transfer (iOS & Android) software.
Dr.Fone - Phone Transfer
Easiest Way to Transfer Photos from Apple iPhone 14 Plus to iPhone without iCloud
- Transfer photos from an old iPhone to a new iPhone within seconds.
- Support the transfer of more data like contacts, messages, files, videos, etc. from phone to phone.
- Transfer everything from Apple iPhone 14 Plus to new iPhone , from Android to Android, from Apple iPhone 14 Plus to Android, and from Android to iPhone.
- Supports iPhone, iPad, iPod touch, and the latest iOS version.
- Fully compatible with the latest Windows or Mac version.
3981454 people have downloaded it
Here are the simple steps to transfer photos from Apple iPhone 14 Plus to iPhone without iCloud:
Step 1: Download the Dr.Fone software, open it, and you can see the following interface.
Step 2: Connect both iPhones to your PC and click “Phone Transfer”.

Note: Confirm which iPhone is your destination device and which one is the source. Click “Flip” to swap their positions if necessary.
Step 3: Select the “Photos” option and click “Start Transfer”. Then you can find all photos are transferred from Apple iPhone 14 Plus to iPhone without iCloud.
Video Guide: Transfer photos from Apple iPhone 14 Plus to iPhone without iCloud
Method 2: Transfer Photos from Apple iPhone 14 Plus to iPhone without iCloud (Selective Transfer) [iPhone 15 Included]
When you want to transfer your photos separately without transferring the other iDevice data, there is a perfect tool for you: Wondershare Dr.Fone . This action takes no time at all, and you can transfer the images within a matter of a few seconds. You can also use this phone manager app to transfer data from Apple iPhone 14 Plus to Android and iTunes or vice versa.
In addition, Wondershare Dr.Fone works efficiently without losing data while transferring media files between iOS devices. It can also transfer videos, contacts, messages, etc., from Apple iPhone 14 Plus to iPhone. Here is how to selectively transfer photos from Apple iPhone 14 Plus to iPhone without transferring the complete iPhone data via Wondershare Dr.Fone:
Step 1: Proceed With the Phone Manager feature
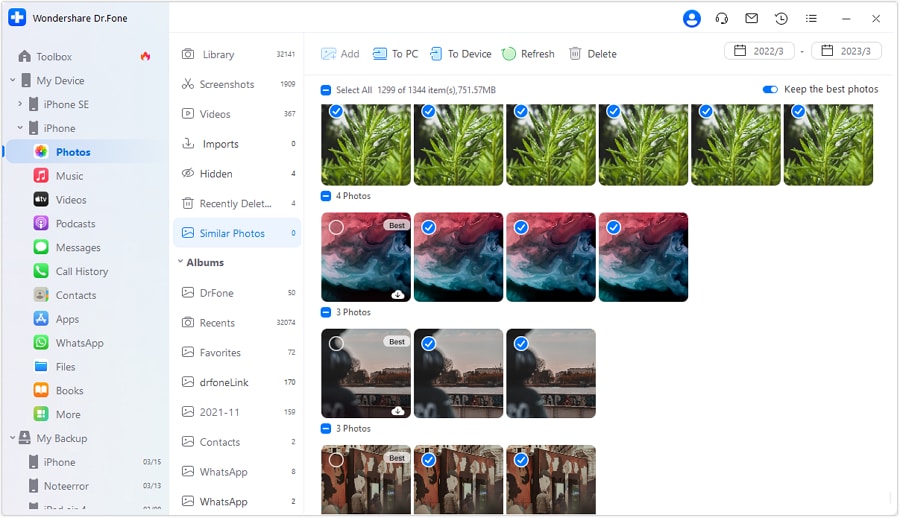
First, you need to install Wondershare Dr.Fone on your computer and connect both your iDevices to the computer using the Apple-certified USB cables. Next, locate the iPhone from which you want to transfer the images and expand it. Choose the “Photos” tab and let Wondershare Dr.Fone load all the pictures.

Step 2: Perform the Selective Photos Transfer
Once Dr.Fone detects all the photos in your iPhone, it will categorize them in the albums like they are in your iDevice. Choose the pictures you want to transfer and tap the “To Device” option. Then, click on the iPhone on which you want to send all the selected images and complete the photo transfer process.
Method 3: Transfer Photos from Apple iPhone 14 Plus to iPhone without iCloud via iTunes [iPhone 15 Included]
Using iCloud for transferring data is convenient, but it is not always practical due to the limitation of maximum data. In that case, iTunes can be a good option, which is another functional software from Apple. Following are the step-by-step instructions to transfer pictures from Apple iPhone 14 Plus to iPhone via iTunes to avoid data storage limitations:
Step 1: To begin with, launch iTunes on your computer and connect your source iPhone. Select the “Phone” icon near the top left corner of iTunes and move to the “Summary” tab. Then, navigate to the “Backups” section and check the “This Computer” option. Then, hit the “Back Up Now” button on the right side to start the backup process of your iDevice.

Step 2: Once the backup process is complete, disconnect the old iDevice. Next, you need to connect your new iPhone and proceed to the “Backups” section in the “Summary” tab. Here, tap “Restore Backup” and go on to choose the most recent backup. To complete the photo transfer process, tap “Restore” and wait for the backup to be restored.

Method 4: Transfer Photos from Apple iPhone 14 Plus to iPhone without iCloud via AirDrop [iPhone 15 Included]
AirDrop gives its users the wireless facility to transfer iPhone photos in a quick manner. Unlike iCloud or iTunes, it does not need to sync all the photos. You just have to select the photos from one of your iPhones and AirDrop them to another. However, the other iPhone should be within the Bluetooth and Wi-Fi range of the host iDevice. Here are the instructions you need to follow to AirDrop photos from old iPhone to new iPhone efficiently:
Step 1: On your old iPhone, you need to open the “Photos” app and hop into the desired folder. Next, pick the photos you want to share by tapping the “Select” button in the upper right corner.
Step 2: Following this, you will have to tap the “Share” icon, followed by selecting the targeted “AirDrop” recipient iPhone. Then, on the target iPhone, you have to choose “Accept” to receive them.

Tip: How to Transfer Photos from Apple iPhone 14 Plus to iPhone using iCloud
Step 1. To transfer the photos from your iPhone to another iPhone you must make sure that you make a backup through iCloud.
Step 2. On the home screen tap Settings. Once entered in settings tap iCloud.

Step 3. In the iCloud menu, you need to click on photos. Once entered in photos turn on the iCloud Photo Library option along with upload my photostream.
Step 4. When you are done your photos will be uploaded to iCloud and you can restore them by simply adding the iCloud id to the new iPhone device.
Editor’s Picks:
- 5 Ways to Transfer Everything from Old iPhone to your new iPhone
- 5 Ways to Transfer Photos from Apple iPhone 14 Plus to PC with/without iTunes
If you do not want to use iCloud for data transfer, run Dr.Fone - Phone Transfer on your computer and transfer data in one click quickly.
6 Methods for Switching from Apple iPhone 14 Plus to Samsung
Apple and Samsung are the most successful tech giant companies in the world. There are a huge number of people around the world who use devices from both of these tech giants. So it’s really obvious when anyone would want to switch their phone sometimes, just to enjoy and check out a device from Apple or Samsung. Each device has its new and great features with the latest upgrades every time. So who wouldn’t want to check out any latest device released by Apple or Samsung?
But what if you are already an iPhone user and you want to switch from Apple iPhone 14 Plus to Samsung, like the new release Samsung S21 FE or Samsung S22 series? Yes, it’s really possible to switch from Apple iPhone 14 Plus to Samsung. For example, switch to Samsung Galaxy S20/S21/S22. With the help of this article, you can learn how to transfer data from Apple iPhone 14 Plus to Samsung with a single click. After reading this article, you will definitely say that moving from Apple iPhone 14 Plus to Samsung is really easy. You’ll get the best 4 methods to transfer data from Apple iPhone 14 Plus to Samsung and start using your Samsung phone right away!
The Preparation before transferring from Apple iPhone 14 Plus to Samsung
Proper preparation before switching from an iPhone to a Samsung device is essential to ensure a seamless transition and safeguard your crucial data. Here are key steps to follow beforehand:
- Sync Contacts and Calendars: Confirm that your contacts and calendars are synced with your iCloud account. This synchronization will facilitate the transfer of these vital details to your new Samsung phone.
- Disable iMessage and FaceTime: Prevent issues with receiving text messages by deactivating iMessage and FaceTime. This action will ensure a smooth transition to your new Samsung device.
- Deactivate Find My iPhone: Navigate to “Settings > [Your Name] > Find My > Find My iPhone” and turn it off. This step is crucial to unlink your iPhone from your Apple ID before transitioning to a different device.
- Prepare Your Samsung Device: Charge your new Samsung phone fully and ensure it’s updated to the latest operating system version. Acquaint yourself with its interface and settings to streamline the transition process.
- Back up Your iPhone: You have the option of utilizing iCloud or iTunes to generate a comprehensive backup of your iPhone’s data, encompassing contacts, photos, videos, apps, messages, and settings. This backup is the primary source for transferring data to your new Samsung device.
Part 1: How to transfer from Apple iPhone 14 Plus to Samsung in 1 click?
If you don’t know how to transfer data from Apple iPhone 14 Plus to Samsung, then this part is perfect for you. You can easily transfer data from Apple iPhone 14 Plus to Samsung in 1 click with the help of Dr.Fone - Phone Transfer . It’s a great software that can help you when you are switching from Apple iPhone 14 Plus to Samsung. Dr.Fone - Phone Transfer will help you to transfer pictures , music, contacts, apps, videos, call logs, etc. from Apple iPhone 14 Plus to Samsung in a very short time. It supports various mobile brands that have been ruling the mobile industry nowadays and it’s fully compatible with iOS 17 and Android 14. With all the useful features, here is how to transfer from Apple iPhone 14 Plus to Samsung in 1 click by using Dr.Fone –
Dr.Fone - Phone Transfer
Transfer Data from Apple iPhone 14 Plus to Samsung in 1 Click!
- Easy, fast, and safe.
- Move data between devices with different operating systems, i.e. iOS to Android.
- Supports iOS devices that run the latest iOS version

- Transfer photos, text messages, contacts, notes, and many other file types.
- Supports over 6000+ Android devices. Works for all models of iPhone, iPad, and iPod.

3981454 people have downloaded it
Step 1. First, you need to download and install Dr.Fone - Phone Transfer on your Windows or Mac PC and launch it. When the homepage interface is in front of you, click on the “Phone Transfer” button.
Tips: Want to transfer without a PC? Just install the Android version of Dr.Fone - Phone Transfer on your Samsung phone. Then this app will allow you to transfer data from Apple iPhone 14 Plus to Samsung S21 FE/S22 directly, and get iCloud data on Samsung wirelessly.
Step 2. Now you need to connect both of your iPhone and Samsung phones to your PC by using 2 good quality USB cables. Then Dr.Fone will automatically detect your devices immediately. You need to make sure that your old iPhone is on the left side of the switch option and your new Samsung Galaxy S21 FE/S22 is on the right side. Now select the file types you want to transfer from Apple iPhone 14 Plus to Samsung and then click on the “Start Transfer” button.
Step 3. After a few minutes, all your data will be transferred to Samsung by using an iPhone.
Switch Data Now Switch Data Now
Part 2: How to transfer data from iCloud to Samsung?
If you don’t know anything about transferring data from Apple iPhone 14 Plus to Samsung using iCloud backup, then this part is perfectly described for you. With the help of Wondershare Dr.Fone , you can easily download, preview, and restore the iCloud backup to the Samsung phone in a very short time. So just don’t worry at all if you don’t have any idea about the iCloud transfer in iPhone to Samsung. Here is how you can transfer the iCloud backup to a Samsung phone.
Wondershare Dr.Fone
Restore iCloud/iTunes Backup to Samsung Selectively.
- Back up Android data to the computer with one click.
- Preview and selectively restore the backup to any Android device.
- Supports 6000+ Android devices.
- There is no data lost during backup, export, or restoration.
3,981,454 people have downloaded it
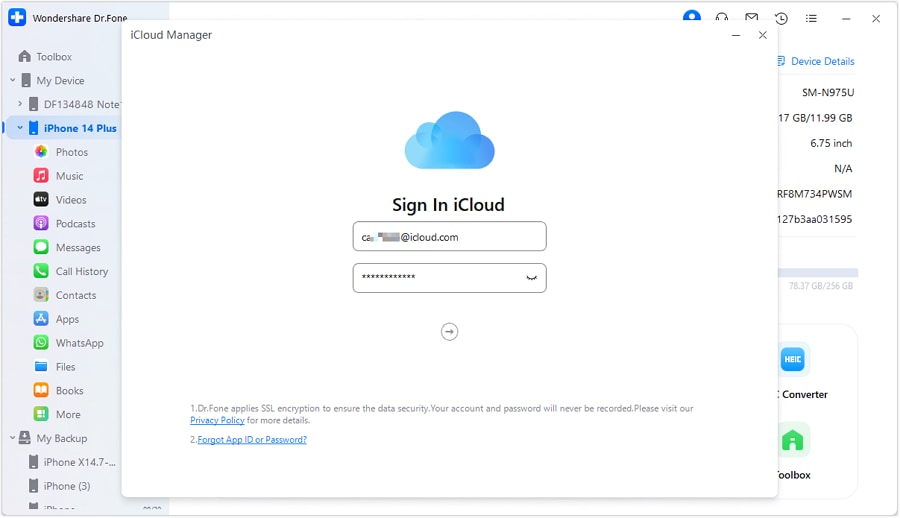
Step 1. First, you need to download and install Dr.Fone on your PC and launch it. Connect your Samsung device to your PC using a good-quality USB cable. Now click on the “iCloud Manager” button from the below page.
Step 2. From the next page, you need to log into your iCloud account.
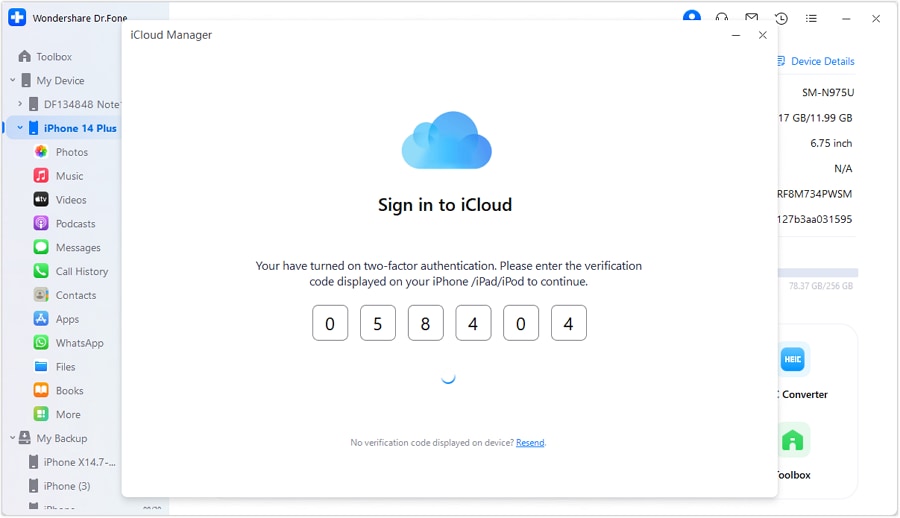
Step 3. If you have two-factor authentication enabled in your account then you will get a text message with a verification code on your phone. Use the code on the verification page and click on the “Verify” button.
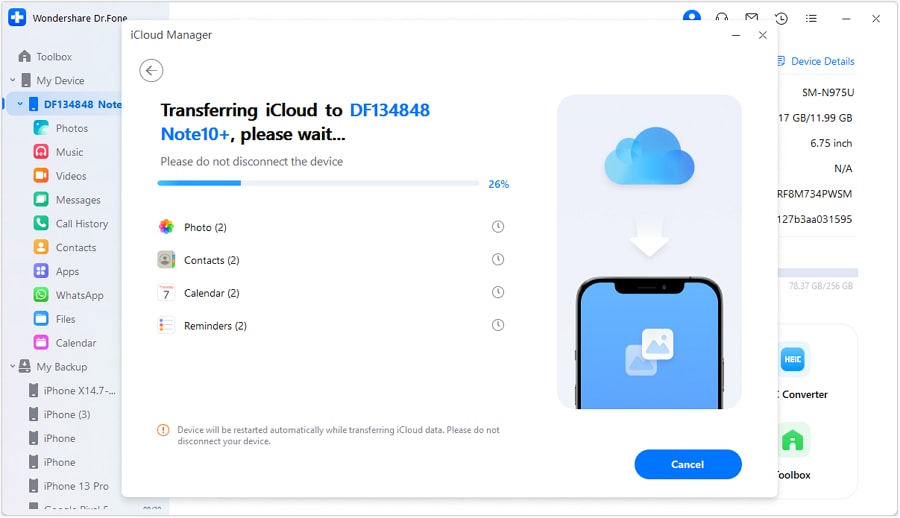
Step 4. After signing into your iCloud account, Dr.Fone will show you all the data inside the backup file. You can choose any specific data to restore or you can choose them all to restore the full backup file in your Apple iPhone 14 Plus by clicking on the “Restore to Device” button.

Step 5. Now Dr.Fone will transfer data on iCloud to your Samsung phone. Wait for the restore process to complete.
Restore iCloud Data to Samsung Restore iCloud Data to Samsungr
Part 3: How to switch from Apple iPhone 14 Plus to Samsung using Smart Switch?
Switching from Apple iPhone 14 Plus to Samsung can seem difficult. But with the help of the Samsung Smart Switch, you can switch from almost any smartphone, including an iOS device to a new Samsung smartphone efficiently. Samsung Smart Switch provides 3 ways to transfer data from Apple iPhone 14 Plus to Samsung: Restore from iCloud, USB-OTG adapter, and restore from iTunes backup. Here is how you can transfer from Apple iPhone 14 Plus to Samsung using Smart Switch.
3.1 How to restore from iCloud to Samsung?
- First, from your iPhone, go to the “Settings” option and then choose “iCloud”.
- Now swipe to and tap on Backup.
- If iCloud Backup is already turned off in your iPhone, tap on the slider, and then tap on the “Back Up Now” option.
- Now you need to open the “Smart Switch” app on your Samsung device and then tap on the “WIRELESS” button.
- Tap on the “RECEIVE” option and then choose “iOS”.
- Now provide your Apple ID and password and then tap on “SIGN IN”.
- Choose any of the basic files you want to transfer and then tap on the “IMPORT” button.
- Now choose any extra files you want to move and then tap on the “IMPORT” button.


Remember, you can’t transfer iTunes music and videos from iCloud. You need to use Smart Switch for PC or Mac to transfer iTunes music from Apple iPhone 14 Plus to Samsung. But iTunes videos are encrypted and cannot transfer them.
3.2 How to restore from iTunes backup to Samsung?
- First, you need to connect your iPhone to a PC and back up all the data on iTunes.
- Now download and install Smart Switch on your PC and restart your PC.
- Now connect your Samsung device to your PC and launch Smart Switch. Now click on the “Restore” button on the Smart Switch.
- On this final page, click on the “Restore Now” option to transfer data to your Samsung device.
3.3 How to transfer to Samsung using a USB-OTG adapter?
- Launch the Smart Switch app on both of your devices and choose the “USB CABLE” option.
- Now, connect the two devices using your iPhone’s USB cable and the USB-OTG adapter from your Samsung device.
- Tap on the “Trust” button on your iPhone.
- Now tap “NEXT” on your Samsung device.
- Choose the files you want to transfer and then tap on “TRANSFER”.

Your files will be transferred to the Samsung device.
Data Can Be Transferred: Contacts, Schedules, Calendar, Notes, Call History, Bookmarks, Live Photos, Photos, Documents, Recommended Apps, Videos (DRM-free content only), Voice Memos, Wi-Fi, and Alarms.
Part 4: How to Switch from Apple iPhone 14 Plus to Samsung via USB cable?
Migrating from an iPhone to a Samsung device using a USB cable presents a straightforward data transfer method. By using this method, you can transition from iOS to Android effortlessly. This even ensures that your important contacts, messages, and media move to your new Samsung device. The step-by-step process below outlines the detailed procedure for the hassle-free transfer of your data:
Step 1. Ensure both devices are charged, and then turn on your Samsung device. Insert a SIM card, connect the Apple iPhone 14 Plus device to a Wi-Fi network, and set it up until it asks you to connect the Apple iPhone 14 Plus devices.

Step 2. Now, connect both devices with a compatible USB cable and choose the “Trust” option on your iPhone. You might be required to enter your iPhone passcode a few times. Then, log into your Google account on the Samsung device.

Step 3. After logging in, it is time to choose the data you want to transfer from your iPhone. Choose the data on your Samsung device and hit the “Copy” button to begin the process. Once data has been transferred, don’t forget to turn off iMessage on your iPhone when prompted by hitting the “Done” button.

Data Can Be Transferred: Contacts, Photos, Videos, Calendar Events, Messages, Apps, Music, Call Logs, Alarms, and more.
Part 5: How to transfer from Apple iPhone 14 Plus to Samsung using email?
When manually migrating data from an iPhone to a Samsung device, email can be a viable option. This method is best suited for smaller quantities of data due to email attachment limitations. It’s effective for transferring photos, documents, contacts, or smaller files. Here’s a step-by-step guide to help with this method:
Step 1. On your iPhone, navigate to the data you want to transfer and long-press to select it. Then, tap the “Share” icon in the drop-down list and choose to send via “Email.” Open your email app on your iPhone and create a new email. Following this, type your email address in the “To” field to proceed further.

Step 2. Attach the selected files to the email. Once all the files are attached, send the email to yourself. Open the “Gmail” app on your Samsung device and access the email you sent yourself from the iPhone. Next, open the email and download the attached files to your Samsung device. You can download them by tapping the “Download” icon.

Data Can Be Transferred: Photos, Documents (PDFs, Word files, etc.), Contact vCards (individual contacts), Notes or Text-based Information, Small Video Files, or Audio Recordings.
Part 6: How to transfer from Apple iPhone 14 Plus to Samsung manually?
If you are interested in moving from Apple iPhone 14 Plus to Samsung, then you can easily follow this part. This part is about one of the easiest ways to send data from the iPhone to Samsung. You don’t have to follow any kind of confusing or long process and it’s really simple if you follow the guideline properly. If you don’t want to use any third-party software or app to move data from Apple iPhone 14 Plus to Samsung, then you can follow the below guidelines to transfer data manually.
- For this process, at first, you need 2 lightning USB cables. You need to connect both of your devices to your PC.
- Now you will see a pop-up on both devices and you need to tap on the “Trust” button to trust the PC on both devices.
- Next, you need to enter your iPhone folder from your PC and copy all the files/folders that you want to transfer.
- After that, you need to go to your Samsung device folder and choose any folder to paste all the copied files from your iPhone.
- You need to wait for a while until the process finishes because it can take some time to finish.
Remember, transferring data manually actually can only work for Photos. So if you want to transfer all of your photos, videos, music, call logs, messages, apps, etc. you need to choose Dr.Fone - Phone Transfer for this task.
FAQS
- How to Transfer WhatsApp data from Apple iPhone 14 Plus to Samsung?
Wondershare Dr.Fone is the best option for transferring WhatsApp data from an iPhone to a Samsung device. Dr. Fone simplifies the process with its user-friendly interface and dedicated “WhatsApp Transfer” feature. Simply connect both devices to your computer, select the “WhatsApp Transfer” option, and initiate the transfer. Dr.Fone efficiently moves WhatsApp chats, messages, and media from your iPhone to the Samsung device, ensuring a seamless transition of your conversations without compromising data integrity.
- Do I need to deactivate iMessage before switching?
Before transitioning from an iPhone to a non-Apple device, such as a Samsung phone, it is recommended to disable iMessage. This step is crucial as it prevents text messages intended for your phone number from being directed solely through iMessage. By deactivating iMessage, you facilitate the reception of SMS messages on your new Samsung device without any interference.
- What if I face issues during the transfer process?
In case you face any challenges while transferring data, consider these steps:
- Confirm that both devices have ample battery life and a reliable internet connection.
- Verify for any pending software updates on both devices and proceed with their installation if available.
- Review the chosen transfer method and follow the instructions to ensure accuracy and completeness.
- Refer to their troubleshooting guides or customer support for assistance if using specialized apps or services.
- For complex issues, consider seeking help from authorized service centers or tech support for both iPhone and Samsung.
- Can I still use my Apple Watch with my Samsung phone?
Apple Watch is designed to work seamlessly with iPhones and the Apple ecosystem. Unfortunately, you cannot directly pair an Apple Watch with a Samsung phone or use its full features, as it requires an iPhone for initial setup, updates, and functionality. The Apple Watch is incompatible with Android devices like Samsung phones beyond basic functionalities like displaying time.
Learning about the iPhone to Samsung transfer is easy when you have a clear and precise guideline. With the help of this article, you will not only be able to transfer data from Apple iPhone 14 Plus to Samsung but also completely switch your device in a very short time. These 6 methods can help you solve all your confusion on how to switch from Apple iPhone 14 Plus to Samsung easily. But if you ask me which method is the best for you that can ensure a 100% successful transfer and no data loss during the process, then I would blindly suggest you use Dr.Fone - Phone Transfer. This amazing software can simply transfer all types of data from your old iPhone device to your new Samsung device. There is no other software or app that can give you so many options in just 1 click! So if you have already become fed up trying a whole lot of software and apps or you are confused about choosing a third-party transfer app, then you should choose Dr.Fone - Phone Transfer for this.
Also read:
- [Updated] 2024 Approved Pro Tips for KineMaster Dominance + Best Digital Platforms on the Web
- 6 Methods for Switching from Apple iPhone 12 mini to Samsung | Dr.fone
- Deep Dive Into ACID Pro Functionality & Alternatives
- Discover Ways To Determine If Workplace Surveillance Is Tracking Your Digital Footprint!
- Easy Methods for Rebuilding Motherboard Driver Sets on Windows Operating System
- How to Bypass Android Lock Screen Using Emergency Call On Itel A05s?
- How to Transfer from Apple iPhone 14 to iPhone 8/X/11 | Dr.fone
- How to Transfer from Apple iPhone X to Samsung Galaxy S20? | Dr.fone
- In 2024, 3 Ways to Export Contacts from Apple iPhone 7 to Excel CSV & vCard Easily | Dr.fone
- In 2024, 4 Ways to Transfer Contacts from Apple iPhone 14 Pro to iPhone Quickly | Dr.fone
- In 2024, How to Transfer Apps from Oppo A2 to Another | Dr.fone
- In 2024, How to Transfer from Apple iPhone 6 Plus to iPhone 8/11/11 Pro | Dr.fone
- In 2024, Parody Basics Tips for Entertaining Mocks
- Switch Cards Between Apple iPhone 14 Pro and other iPhones Will Move All Phone Services? | Dr.fone
- Tackling Windows Update Hurdles Effortlessly
- Techniques De Sauvegarde Automatiques Et Manuelles D'Outlook Vers Dropbox: Guide Complet
- Title: 4 Ways to Transfer Messages from Apple iPhone 14 Plus to iPhone Including iPhone 15 | Dr.fone
- Author: Charlotte
- Created at : 2024-11-01 17:43:40
- Updated at : 2024-11-04 16:52:04
- Link: https://iphone-transfer.techidaily.com/4-ways-to-transfer-messages-from-apple-iphone-14-plus-to-iphone-including-iphone-15-drfone-by-drfone-transfer-from-ios/
- License: This work is licensed under CC BY-NC-SA 4.0.