
4 Ways to Transfer Contacts from Apple iPhone 11 to iPhone Quickly | Dr.fone
4 Ways to Transfer Contacts from Apple iPhone 11 to iPhone Quickly
Thought changing into a new phone is exciting, but changing phones can be a real pain because you have to move all your data into your new phone like iPhone 15 or iPhone 15 Pro (Max). Contacts are very important data on your phone because you won’t be able to make any calls or send texts to your known persons or friends and family without them. If you are an iPhone user, you need to follow some processes to transfer contacts from Apple iPhone 11 to iPhone. Also, you may want to import contacts from excel to iPhone . This article will give you all the information you need about how you can transfer contacts from Apple iPhone 11 to new iPhone like iPhone 15 or iPhone 15 Pro (Max).
Part 1. Transfer Contacts from Apple iPhone 11 to iPhone Including iPhone 15 with Dr.Fone (1- click solution)
Dr.Fone is a perfect tool for transferring contacts from Apple iPhone 11 to iPhone. It can transfer contacts and all kinds of data and media files from your iPhone to iPhone or Android and vice-versa. Dr.Fone - Phone Transfer is a great tool that supports all the latest iOS and Android-based smartphones; it also works smoothly on Windows and Mac. It’s the easiest, fastest, and safest way to transfer contacts from Apple iPhone 11 to iPhone.
Dr.Fone - Phone Transfer
1-Click Phone to Phone Transfer
- Easy, fast, and safe.
- Move data between devices with different operating systems, i.e., iOS to Android.
- Supports iOS devices that run the latest iOS

- Transfer photos, text messages, contacts, notes, and many other file types.
- Supports over 8000+ Android devices. Works for all models of iPhone, iPad, and iPod.

Follow these steps to learn how to transfer contacts from one iPhone to another.
Start The Process
First, you need to download dr. Fone on your computer and install it. Run the program and connect both of your iPhones to your computer with good-quality data cables. You will be able to see the home screen of Dr.Fone in front of you, and you will have to choose the option named “Phone Transfer.”

Transfer Contacts
Dr.Fone will show you both iPhones on your screen, and you will have to choose the “Contacts” option and click on the “Start Transfer” button.

Finish The Process
Your contacts will be transferred from the source iPhone to the target iPhone within a very short time.

Transferring contacts is easy with Dr.Fone - Phone Transfer. This doesn’t overwrite any data on your phone or doesn’t cause any data loss problem. Just follow the process to learn how to copy contacts from iPhone with the help of Dr.Fone - Phone Transfer.
Part 2. Transfer Contacts from Apple iPhone 11 to iPhone Including iPhone 15 by restoring from iCloud backup
You can easily transfer your contacts using iCloud backup without factory resetting the entire device and starting again. Just follow this process-
Log in to iCloud
You need to connect both your iPhones to Wi-Fi and log into your iCloud account from both of your iPhones.
Sync Contacts and Backup
Now you need to take your source iPhone and go to the Settings option. Then you need to tap the name at the top, go to the iCloud option, scroll down and make sure the option for Contact is toggled on. If you have iOS 10.2 and earlier on your phone, you will find it in Settings > iCloud.

After syncing the contacts, you need to scroll down to the iCloud Backup option and choose the Backup Now option.

Refresh Contacts
Ensure that the syncing contact option on your target iPhone is enabled from the settings option, and then open the contact app to swipe down and refresh it. Within a very short time, your contacts will start appearing on your target iPhone.
Part 3. Sync contacts from Apple iPhone 11 to iPhone Including iPhone 15 by iCloud syncing
You can easily learn how to transfer contacts from one iPhone to another (like iPhone 15 or iPhone 15 Pro) using iCloud syncing. It takes very little time, and all it needs is one apple account signed in to both your source and target iPhones at a time. Just follow these steps properly-
Merge Contacts
You need to go to the “Settings” option of your source iPhone and tap on your name at the top of the settings screen. Check the “Contacts” option is toggled on or not from the “iCloud” option. After that, hit merge to upload your contacts on iCloud.

You need to use the Apple ID and password on your target phone and do the same thing to toggle on the “Contacts” option from “iCloud” and wait until your iPhone asks you to merge contacts.

Refresh Contacts
After choosing the “Merge” option, you will see that existing contacts and previous contacts from the source iPhone will merge on your target iPhone. Now you need to refresh the contact list, which will allow you to find all the old contacts to your target iPhone.

Part 4. Move Contacts from Apple iPhone 11 to iPhone Including iPhone 15 using iTunes
iTunes is a great solution to transfer iPhone contacts. Many users prefer iTunes while transferring contacts because it comes directly from Apple, and it takes care of all your iOS device management needs. These steps will help you to transfer contacts from Apple iPhone 11 to iPhone using iTunes-
Install iTunes and connect source iPhone
Download the latest version of iTunes on your PC, install it properly, and launch the software. Connect your source iPhone to your PC, and iTunes will automatically detect it.
Backup Contacts
Now click on the “Device” option and then select iPhone. Then you need to select the “Summary” option and then choose “This Computer” and “Back Up Now” to back up all your data and contacts on your PC.

Restore Backup
In the end, you need to connect your target iPhone to your PC and choose the “Summary” option in the iTunes software. You need to choose the “Restore Backup” option and then browse and select the latest backup folder. At last, choose the “Restore” option. iTunes transfers contacts and all the data from the source iPhone to target the iPhone, and it’s essential to back up the data from your source iPhone.

Transferring any data from your old phone to a new phone can be very painful. But nowadays it’s very easy with the help of a lot of tools. If you want to transfer contacts from your old iPhone to a new one, you need to use Dr.Fone - Phone Transfer because it’s the best solution to use a 1-Click system to copy contacts from one phone to another in a very easy and fast way. You can also use iCloud backup, iCloud syncing, and iTunes to transfer your contacts, but Dr.Fone can give you the safest and easiest solution. I can assure you that you won’t regret it if you choose Dr.Fone for this issue.
Transfer your Apple iPhone 11 Apps to New iPhone
We would be very excited to buy a new iPhone like iPhone 15/15 Pro(Max) whenever possible. Just think, what makes us emotional and enthusiastic towards buying and using a new iPhone? Maybe the new and advanced features are better than the old one? Exactly! Once you have bought a new iPhone like iPhone 15/15 Pro(Max), definitely the next step would be to transfer all your applications, games, movies, photos, files, videos, etc. Now the question arises, how to transfer apps from Apple iPhone 11 to iPhone? There must be some solution for every query so, let us research the ways of transfer by using iTunes, iCloud, and the iPhone app store. To know more about the process let us go in-depth.
One-click to transfer apps between iPhone [iPhone 13 Included]
There are so many ways for transferring Apps between iOS devices. If you are searching for a time-saving way to transfer the data. You can try the Dr.Fone - Phone Transfer to help you get the Apps. There is no incompatibility or limitations on iOS models and systems. You can click to transfer one data type from one to another.
Dr.Fone - Phone Transfer
Transfer Apps from Apple iPhone 11 to iPhone in 1 Click Directly!
- Cross-platform data migrating between any devices of your choice from Android and iPhone.
- Support massive data including images, videos, music, messages, contacts, apps, and more.
- Works perfectly with almost mobile phones and tablets, such as iPhones, iPad, Samsung, Huawei, etc.
- Fully work with mobile systems iOS 17 and Android 10.0 and computer systems Windows 10 and Mac 14.
- 100% safe and risk-free, backup & restore data as the original.
3981454 people have downloaded it
Connect both the two iPhones to your computer. Once both the iPhones are connected successfully, all the data from source devices will be detected and listed on the screen. You can adjust the target devices and source devices by clicking the “Flip” button directly.

A more detailed guide can be learned from this user guide. Check it out!
Another way that can assist you to move photos from Android to iPhone is the Dr.Fone - Phone Manager (Android) . What is incredibly convenient about Dr.Fone - Phone Manager (Android) is its ability to transfer photos selectively. You can also use it to transfer contacts, videos, messages, podcasts, and anything else stored on your Android in minutes. Dr.Fone - Phone Manager (Android) is a secure, trustworthy program, hence you can be reassured that your information will be kept safe while transferring from one device to another.
Part 1: How to transfer apps from iPhone apps to the new iPhone via iTunes?
iTunes backup is one of the most commonly used transfer methods. All you have to do is take the backup from the old iPhone and using iTunes you can transfer it to the new iPhone like iPhone 15/15 Pro (Max). Very simply, you can transfer apps from the old iPhone to the iPhone 15/15 Pro(Max) or an earlier model.
The Whole Process is divided into two sections
- A- Backing up old phone data to iTunes.
- B- Transferring backed-up data to a new phone using iTunes.
Section A - To start, you have to start with the backup in iTunes using the old iPhone:
- Firstly, you have to connect the old iPhone and the computer using the USB cable.
- Next, Open the settings and view iTunes. Ensure have the latest version of iTunes.
- Choose the Apple iPhone 11 device.
- Create the passcode in terms of encryption. After that, directly, click the backup now button.

- Once the backup process is finished, you should check whether the backup was done in iTunes preferences in the old iPhone. You can check it by verifying your name, time, and date in the backup.
Note: You have created the backup process on your old iPhone. Now, you should start the next work to transfer apps to the new iPhone like iPhone 15/15 Pro (Max).
Section B - Once you are done with backing up your old phone data with iTunes, now the next process is to transfer apps from Apple iPhone 11 to iPhone using iTunes backed up data:
- The first step is to switch on your new iPhone. The screen “Hello” should be visible to you. If you did the steps already in your new iPhone then you have to remove the entire step out before transferring the apps.
- In your settings, you will have the option Apps & Data. Click it and choose the option “Restore from the iTunes backup” among other options.

- Now, you have to connect the new iPhone device to the PC where the backup from the old iPhone was done.
- View iTunes from the computer and choose your new iPhone like iPhone 15/15 Pro (Max).
- Choose the “Restore backup” and cross-check the date, time, iPhone old name, etc.
- If you set a passcode then enter it. Just wait for a few minutes to get complete the restore process. Keep On the Wifi support to the new iPhone like iPhone 15/15 Pro (Max) and your backup will automatically download to the new iPhone.
Note: You have done the entire process to transfer apps to the new iPhone 15/15 Pro (Max) or an earlier model.
Part 2: How to transfer apps from Apple iPhone 11 to iPhone using iCloud?
The next successful method is an iCloud backup. iCloud the most used application for verification purposes in the iPhone. This method will be very genuine and no complications occur throughout the process when you transfer apps from Apple iPhone 11 to iPhone 15/15 Pro (Max) or an earlier model.
Here also, we have summed up the transferring process via iCloud under two sections
Section A - Backing up the process: Let’s see the steps to take the backup in iCloud using the old iPhone.
- Connect the old iPhone to the Wifi connection.
- Tap the settings and choose iCloud. Click the iCloud and turn ON the iCloud backup.
- Just ensure that you have turned on backup on iCloud.
- Select the backup now button and don’t turn off the wifi till the process gets completed.

Note: You have taken the backup from the old iPhone using the iCloud application.
Section B: Now Let us move ahead to see the steps to transfer apps to the new iPhone like iPhone 15/15 Pro (Max):
1. First, we need to connect the new iPhone and wait for the hello message to receive. If you have completed the set up then you have to remove the setup for the backup process.
2. To remove the setup in the new device – choose settings and then general. From the general choose the reset option. Now select erase all the content and the settings.
Note: Doing so will erase any old setup.
3. Ensure the Wifi is connected to the Apple iPhone 11 device and complete the process to configure the wifi.
4. Open the Apps/Data and select “Restore from the iCloud backup”.

5: You will get the screen to enter the iCloud credential details such as ID/ password.

6: After entering the credentials, you will have the choice to select the backup process. Ensure the date/time of the backup process for verification.
7: The backup process starts on your new phone and you do not interrupt or stop the wifi connection while the backup process continues.
8: Your photos, videos, files, etc will be automatically downloaded into your new Phone using iCloud.
Part 3: How to transfer apps from Apple iPhone 11 to iPhone with the help of the App store?
In this part, we are going to transfer apps from Apple iPhone 11 to iPhone 15/15 Pro (Max) or an earlier model using the iPhone app store. In this method, you do not need to connect to the computer, or no lengthy steps needed. Let us see the steps carefully!
1: You can access the iPhone app store once if you log in to the iCloud account. Click on the settings and choose the “iTunes & App store”. It will ask you to enter the credentials such as Apple ID and password.
2: If you didn’t update the app store then update it by clicking the icon in the lower right corner of the window.

3: Once you tap on the update icon, it will show the option “My Purchase”. It will ask you to sign in the iCloud account.

4: After entering the credential, you have the two options such as all and not on this phone.
5: Select the option “not on this phone” present on the right upper side of the window. You will get the list of applications that you have purchased using the iCloud account.
6: Click the download button next to the icon of the apps. The apps will be installed on your new Phone.

Note: You have completed the installation of apps on your new iPhone.
We have given and explained to you 3 methods to transfer apps from Apple iPhone 11 to iPhone with proper guidance. Each method describes a unique verification process along with the manual setup. You now do not need to wait in a queue to transfer apps to your new iPhone. We can assure you that you would also be in no need of any help from outside. All the best!
Switch Cards Between Apple iPhone 11 and other iPhones Will Move All Phone Services?
The existence of SIM cards is the fundamental source of all cellular network connections. With their use from the inception of smartphones, SIM cards are associated with every significant cellular operation. All major functions, such as cellular calling, messaging, and cellular internet, are obtained through SIM cards. Whether you are using an iPhone or an Android, using a SIM card is standard.
If you are seeking to change your iPhone, you will have to shift everything, including the SIM cards. For that, the article discusses a guide explaining how to switch SIM cards in Apple iPhone 11 and other iPhones properly. Look through the discussion for better awareness of switching SIM cards between Apple iPhone 11 and other iPhones. The implications of shifting SIM cards and other details will be focused on throughout the discussion.
Part 1: Things To Know Before Switching SIM Cards in iPhone
Whenever you consider switching your SIM card to iPhone, you must keep a few things in mind. Considering these points will help you in avoiding all forms of discrepancies that can occur on your iOS device:
- Compatibility of SIM Card: You have to ensure that the SIM card is compatible with your iPhone. Some SIM cards do not operate on Apple iPhone 11 and other iPhones since they are incompatible.
- Unlocked iPhone: If you have an unlocked iPhone, you can utilize third-party SIM cards for this purpose. An unlocked iPhone is a best-case scenario for using such SIMs.
- Backup iPhone Data: Although there is no direct involvement of iPhone data in the process, it is best to back up the data. It includes all essential contacts and media that might get physically damaged while changing SIM cards.
- Turn Off iPhone While Switching SIM Cards: It is best to turn off your iOS device during such processes. To avoid any software anomaly, turning off the Apple iPhone 11 device can save you the drill.
Part 2: What Happens If You Switch Two SIM Cards in iPhone
On switching a SIM card to a new iPhone, there are multiple consequences that occur against it. The provided details explain the possible situations that can arise if you consider switching SIM cards in iPhone:
- SIM cards usually contain contacts from the previous device it is contained in. There is a possibility that the contacts present in the SIM card might be transferred into the new iPhone. On attaching the SIM card to the iPhone, the contacts will be automatically transferred.
- The cellular network, along with other cellular packages, will be in operational use as the SIM card will be attached to the iPhone. You will be paying according to the packages offered by your SIM carrier.
- If the SIM card is not compatible with the iPhone, the network operations will malfunction and not operate properly. Different connectivity issues will be reported across the scale.
- On switching your SIM card, you will have to reactivate iMessage and FaceTime under the cellular settings of the new SIM card. The previous settings for both services will be removed upon removing the SIM card.
Part 3: How To Switch SIM Card to New iPhone Safely
Once you have learned the implications of switching your SIM card to your new iPhone, you will need to understand the operability involved in the process. To know how to switch SIM cards iPhone perfectly, follow the step-by-step process provided below:
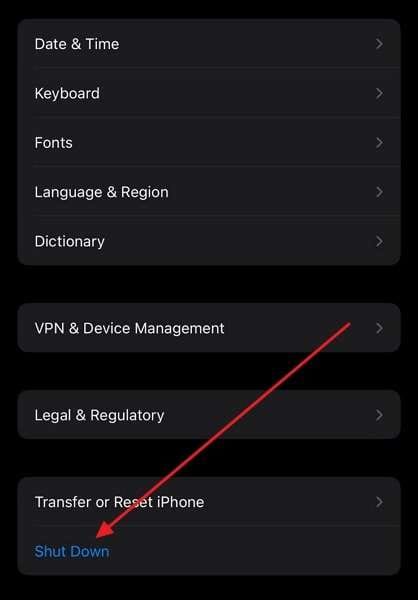
Step 1: Turn off your iPhone to remove the current SIM card from your device. For that, lead into the “Settings” and look for the “General” section. Follow through the screen and scroll down to find the option of “Shut Down” to turn off your iOS device.
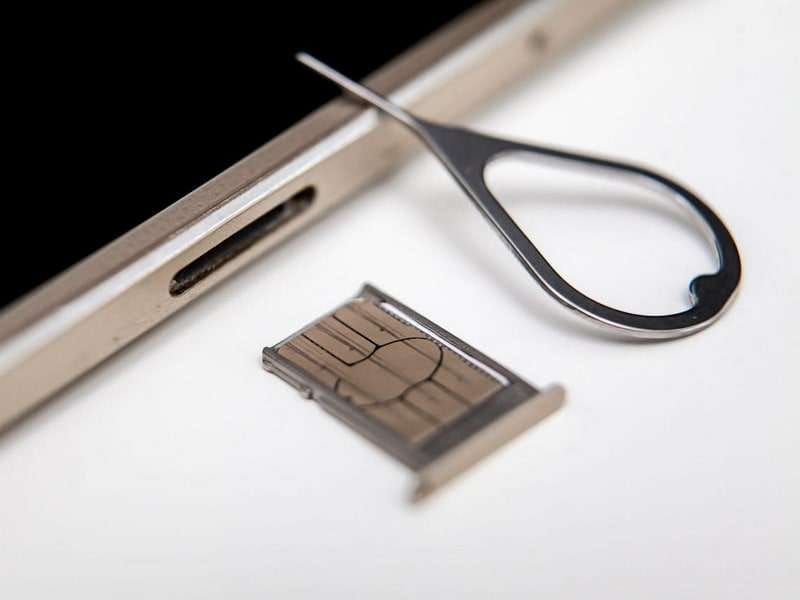
Step 2: As the Apple iPhone 11 device turns off, use a proper pin to open the SIM tray on your iPhone, which completely depends on your model. For the latest and newest Apple iPhone 11 and other iPhones, the SIM tray is present on the bottom-left side of the Apple iPhone 11 device. Remove the old SIM card and replace it with the new one according to the position. Re-insert the SIM tray back into the Apple iPhone 11 device.

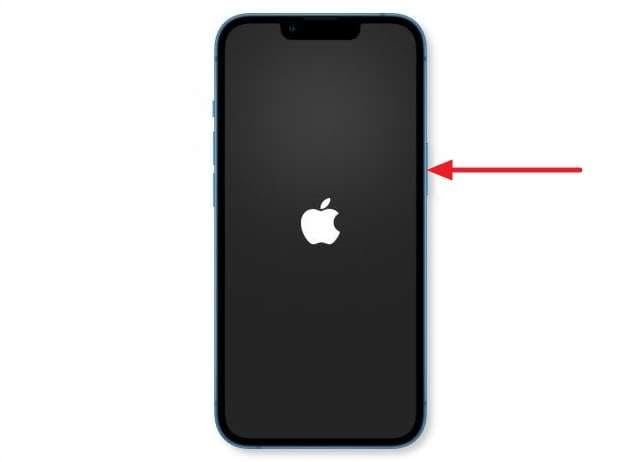
Step 3: Use the “Power” button on your iOS device to turn it on. Once it turns on, you will find the cellular operations working according to the new SIM card.
Part 4: What Happens If You Switch to an iPhone Locked to A Specific Carrier?
If you switch to an iPhone locked to a specific carrier, you might encounter several complications. These could prevent the Apple iPhone 11 device from functioning with your desired network provider. In such instances, the iPhone’s functionality could be limited. It hinders your ability to use certain features or services on the Apple iPhone 11 device. This issue is particularly prevalent when trying to use a SIM card from a different carrier than the one the iPhone is locked to.
To address this concern, you can use Dr.Fone - Screen Unlock (iOS) , a cutting-edge solution. It is designed to unlock SIM locks and enable the use of the iPhone with any compatible carrier. Dr.Fone provides a reliable and user-friendly method to unlock various locks. This also includes SIM locks on Apple iPhone 11 and other iPhones, allowing you to switch between carriers.
Dr.Fone - Screen Unlock (iOS)
Best SIM Unlock for iPhone.
- Simple, click-through, process.
- Fix SIM unlock with a few clicks.
- Supports almost all carriers, from Vodafone to Sprint.
- No tech knowledge required, everybody can handle it.
- Supports iPhone 5S to iPhone X, which are running between iOS 12.0 and iOS 14.8.1
3,046,049 people have downloaded it
Steps To Remove iPhone SIM Lock via Dr.Fone - Screen Unlock (iOS)
The following are the steps you need to follow to remove the iPhone SIM lock with the help of Wondershare Dr.Fone:
Step 1: Access Screen Unlock Within Wondershare Dr.Fone
Start installing and launching Wondershare Dr.Fone on your computer and selecting “Toolbox.” From the main interface, click “Screen Unlock” and identify “iOS” as your device. Now, tap “Remove SIM Locked” from the “Screen Unlock” menu and connect your iPhone.
Step 2: Jailbreak Your iDevice
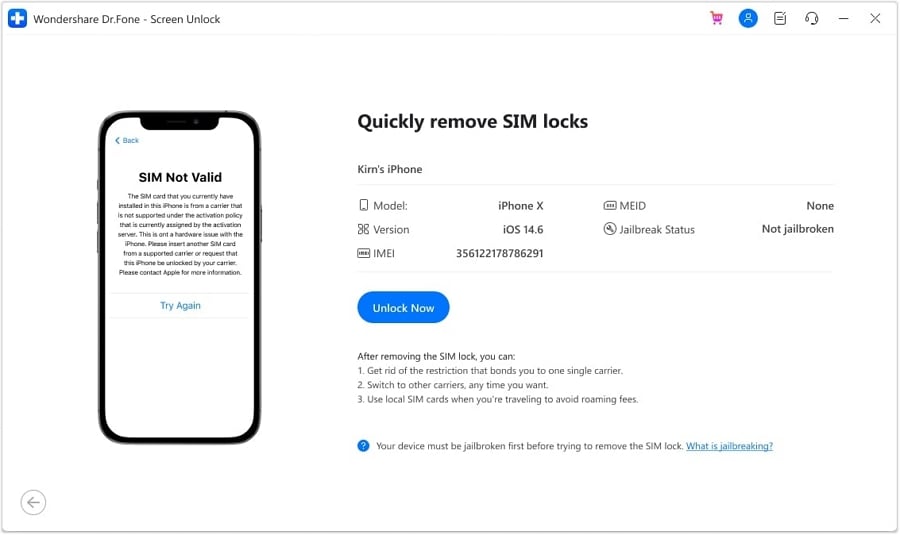
On the following screen, tap “Start” and follow it by clicking “Unlock Now” as Wondershare Dr.Fone recognizes your device. Now, you will need to jailbreak your device, for which the instructions are given on the screen. Remove the SIM card from the phone and access “WLAN” through device Settings.
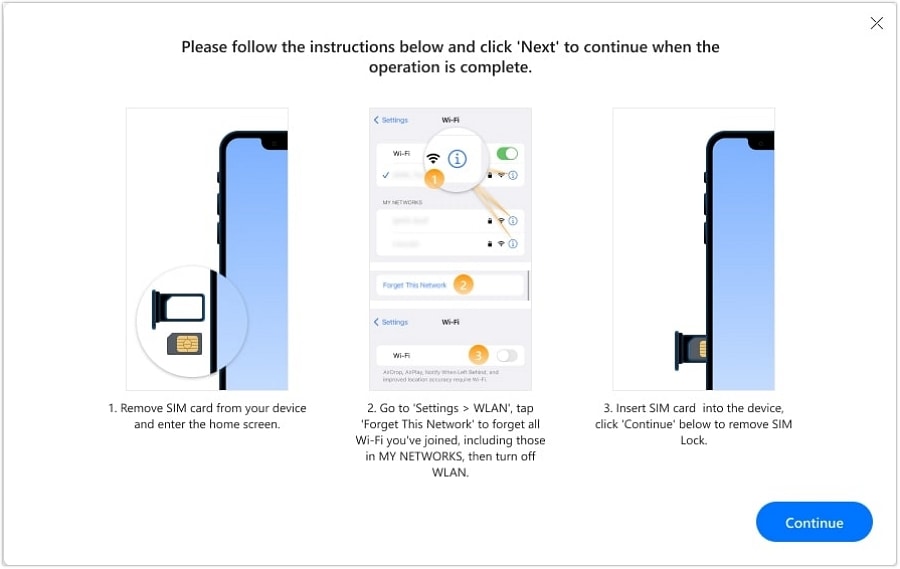
Step 3: Complete the SIM Lock Removal Process
Go to the Wi-Fi network you are connected to and choose “Forget This Network.” Then, move to each saved Wi-Fi network in “My Networks” and remove all of them. Reinsert the SIM card to the Apple iPhone 11 device and press “Continue” on the screen. It will initiate the SIM lock removal process, which will be finished in a few moments.
Part 5: How To Switch All Data to New iPhone in One Click
Whenever you consider changing your SIM card on your new iPhone, there are certain things you must look out for. Maintaining all the data is one appropriate consideration that can be effective for your operations. Keeping data backups under such circumstances is the best-case scenario to avoid discrepancies. Although you are switching SIM cards between Apple iPhone 11 and other iPhones, what if you are required to shift data?
If you have bought a new iPhone and need to switch all data along with the SIM card, you will need a proper direction. For this, Dr.Fone - Phone Transfer (iOS) is the savior. This particular platform is known for making operations of data transfer easier. While Dr.Fone replicates multiple features and functions, it offers some extensive characteristics. An overview of these features is presented as follows:
- You can transfer various data between devices, ranging between 8 to 15. It entirely depends on the nature of the transfer between devices.
- The process of transferring data is straightforward. You are not required to put in any effort to transfer data.
- The results provided in the data transfer are incredibly high. Dr.Fone reports concluding proceedings within 3 minutes.
Steps To Switch Data to New iPhone With Dr.Fone - Phone Transfer
As you seek to know the steps to switch data to a new iPhone with Dr.Fone - Phone Transfer, follow the steps as provided next:
Step 1: Open Dr.Fone and Select Phone Transfer
Launch Wondershare Dr.Fone after downloading and installing it on your device. Continue to select “Phone Transfer” from the available options. Following this, connect your old and new Apple iPhone 11 and other iPhones to your device.
Step 2: Set Source and Destination
As you connect both devices in the transfer process, define the source and destination. Set your old device as the “Source” and the new iPhone as the “Target.” To change the Apple iPhone 11 devices, use the “Flip” button.

Step 3: Select File Types and Transfer
Select the file types that you wish to transfer from the center section. Select “Start Transfer” to initiate the process. The data will be successfully transferred in a few minutes.

Frequently Asked Questions
Here are answers to some of the FAQs available on the internet regarding how to change a SIM card on an iPhone.
- Can I use the same eSIM card to switch between different Apple iPhone 11 and other iPhones?
Yes, you can use the same eSIM card to switch between different Apple iPhone 11 and other iPhones, provided that the specific carrier supports eSIM technology and allows the transfer of the eSIM between devices. With eSIMs, the process of switching between devices is typically smoother compared to physical SIM cards. The reason is it involves digital activation and can be done remotely without the need to swap cards physically.
- Is there a difference between switching physical SIM cards and using eSIM for transferring phone services between Apple iPhone 11 and other iPhones?
Physical SIM cards are tangible, removable chips that need to be inserted into a SIM card tray, whereas eSIMs are integrated directly into the Apple iPhone 11 device’s hardware. Swapping physical SIM cards involves physically removing and inserting the card into the new device, whereas transferring an eSIM between devices can be done remotely. Physical SIM cards can store limited contact information and some network settings, whereas eSIMs can store multiple network profiles.
Conclusion
This article has provided a valuable overview of switching SIM cards to new Apple iPhone 11 and other iPhones. With a proper understanding of the repercussions involved in the process, a guide has been discussed. Along with its thorough discussion, you have also figured out how to transfer data to a new iPhone. For that, Dr.Fone - Phone Transfer is the best option in the market.
Also read:
- [New] Key Tactics Procuring Premium Media Backdrops with Ease
- 4 Quick Ways to Transfer Contacts from Apple iPhone 12 to iPhone With/Without iTunes | Dr.fone
- How to Transfer from Apple iPhone 7 to iPhone 8/11/11 Pro | Dr.fone
- How to Transfer Music from Vivo Y36 to iPod | Dr.fone
- In 2024, 3 Ways to Fake GPS Without Root On Apple iPhone 13 Pro Max | Dr.fone
- In 2024, How to Transfer Apple iPhone 6 Data to iPhone 12 A Complete Guide | Dr.fone
- Methods to Transfer from Apple iPhone XS Max to Android | Dr.fone
- The Ultimate Fix Guide for When Windows Ignores Your Wireless Adapter – TL-WN722N Edition
- Updated Unlock Adobe Premieres Full Potential 6 Expert-Level Editing Hacks for 2024
- Title: 4 Ways to Transfer Contacts from Apple iPhone 11 to iPhone Quickly | Dr.fone
- Author: Charlotte
- Created at : 2024-11-03 16:20:04
- Updated at : 2024-11-04 16:00:02
- Link: https://iphone-transfer.techidaily.com/4-ways-to-transfer-contacts-from-apple-iphone-11-to-iphone-quickly-drfone-by-drfone-transfer-from-ios/
- License: This work is licensed under CC BY-NC-SA 4.0.