
4 Quick Ways to Transfer Contacts from Apple iPhone 7 Plus to iPhone With/Without iTunes | Dr.fone
4 Quick Ways to Transfer Contacts from Apple iPhone 7 Plus to iPhone With/Without iTunes
“How to transfer contacts from Apple iPhone 7 Plus to iPhone without using iTunes? I have got a new iPhone, but can’t seem to transfer contacts from Apple iPhone 7 Plus to iPhone without iTunes.”
Lately, we have got plenty of queries like this from our readers who like to learn how to transfer contacts from Apple iPhone 7 Plus to iPhone, such as iPhone 12/ 12 Pro (Max)/ 12 Mimi without iTunes. After all, when we get a new iPhone, this is the first thing that comes to our mind. If you are also going through the same dilemma, don’t worry as we have a perfect solution. This post will teach you how to transfer contacts from Apple iPhone 7 Plus to iPhone without iTunes and transfer contacts with iTunes.
Part 1: Transfer Contacts from Apple iPhone 7 Plus to iPhone Including iPhone 12/ 12 Pro (Max)/ 12 Mini with iTunes
To start with, let’s learn how to transfer contacts from Apple iPhone 7 Plus to iPhone using iTunes. If you have an updated version of iTunes, you can transfer and sync your data between various devices. Ideally, you can either sync your contacts or backup and restore them. We have discussed both of these techniques to transfer contacts from Apple iPhone 7 Plus to iPhone with iTunes.
Method 1: Backup and Restore iPhone contacts with iTunes
This is the easiest approach to learn how to transfer contacts from Apple iPhone 7 Plus to iPhone with iTunes. In this, we will first take a backup of our old phone (including contacts) and later restore the backup to a new device. Needless to say, all the existing data on the target device would be erased, and with your contacts, the entire backup will be restored.
- 1. Firstly, connect your existing iPhone to your system and launch iTunes.
- 2. Select your device and visit its Summary section.
- 3. Under the Backups section, choose to take a backup on the local computer.
- 4. In the end, click on the “Backup Now” button and wait for iTunes to backup your device entirely.

- 5. Once you have taken a backup locally, you can connect the target device and go to its Summary.
- 6. From here, click on the “Restore Backup” and select the target backup and device.

In this way, your entire backup (including contacts) would be restored, and you can transfer contacts from Apple iPhone 7 Plus to iPhone with iTunes.
Method 2: Sync Contacts with iTunes
If you only wish to transfer your contacts, then it can be achieved by syncing your device. To learn how to transfer contacts from Apple iPhone 7 Plus to iPhone using iTunes, follow these steps:
- 1. Firstly, connect your existing iPhone to your system and launch an updated version of iTunes.
- 2. Select the Apple iPhone 7 Plus device and go to its “Info” tab. From here, enable the option of “Sync Contacts”. You can either select all contacts or selected groups.
- 3. After making your selection, click on the Sync button and wait for it to complete the process.

- 4. Now, disconnect the Apple iPhone 7 Plus device and connect your target iPhone to it.
- 5. Follow the same drill, go to its Info tab, and enable the option to “Sync Contacts”.
- 6. Additionally, you can visit its Advanced section and replace the old contacts with the new ones as well.
- 7. Once you have selected the option, click on the “Sync” button.

In this way, you would be able to learn how to transfer contacts from Apple iPhone 7 Plus to iPhone with iTunes easily.
Part 2: 1-Click to transfer contacts from Apple iPhone 7 Plus to iPhone, Including iPhone 12/ 12 Pro (Max)/ 12 Mini without iTunes
As you can see, learning how to transfer contacts from Apple iPhone 7 Plus to iPhone using iTunes can be a little complicated. Therefore, we recommend using trying Dr.Fone - Phone Transfer . It provides a one-click solution to transfer the data of your choice from one device to another. The tool comes with an intuitive process and has a free trial as well. It is compatible with every leading iOS device (including devices running on iOS 14).
Besides transferring your contacts, you can also move other data files like photos, videos, calendars, messages, music, etc. It can also transfer data between different platforms (like Android to iOS, iOS to Windows, and more). To learn how to transfer contacts from Apple iPhone 7 Plus to iPhone without iTunes, follow these steps:
Dr.Fone - Phone Transfer
1-Click to Transfer Contacts from Apple iPhone 7 Plus to iPhone without iTunes
- Easy, fast, and safe.
- Move data between devices with different operating systems, i.e., iOS to Android.
- Supports iOS devices that run the latest iOS

- Transfer photos, text messages, contacts, notes, and many other file types.
- Supports over 8000+ Android devices. Works for all models of iPhone, iPad, and iPod.

4,777,470 people have downloaded it
- 1. To start with, launch Dr.Fone and select the option of “Phone Transfer” from its welcome screen.

- 2. Now, connect the source and the target iOS device to your system and wait for them to be detected.
- 3. Dr.Fone - Phone Transfer follows an intuitive process and automatically lists the Apple iPhone 7 Plus devices as Source and Destination. Though, you can click on the “Flip” button to exchange their positions.

- 4. Now, select the type of data you wish to transfer. For instance, if you want to move only contacts, select “Contacts” and click on the “Start Transfer” button. Additionally, you can select the option of “Clear data before copy” and delete the existing data on the target iPhone.
- 5. This will initiate the process and start the transfer process. You can view the progress from the on-screen indicator. Make sure that both the Apple iPhone 7 Plus devices are connected at this stage.
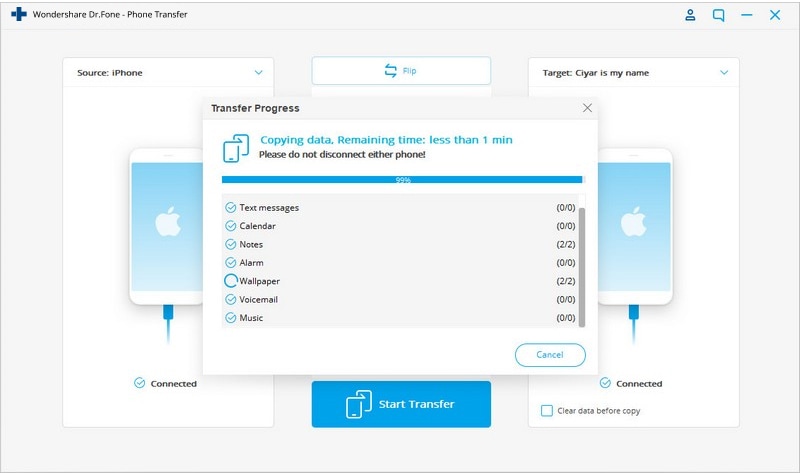
- 6. Once the process is complete, you will be notified. In the end, you can safely remove both the Apple iPhone 7 Plus devices and use them the way you like.

Here is the video tutorial for you:
Part 3: Transfer iPhone contacts to iPhone Including iPhone 12/ 12 Pro (Max)/ 12 Mini without iTunes using Gmail
As you can see, Dr.Fone Phone Transfer provides a one-click solution to transfer your data from one iPhone to another. Though, if you want to try another option, then you can take the assistance of Gmail. Even though this is a more cumbersome process, it will meet your basic requirements. To learn how to transfer contacts from Apple iPhone 7 Plus to iPhone without iTunes, you can try this approach.
- 1. If you are not using Gmail on your device, go to the Accounts settings and log in to your Gmail.
- 2. Afterwards, go to the Apple iPhone 7 Plus device’s Settings > Mail, Contacts, Calendar > Gmail and turn on the option of Contacts.

- 3. Now, you can follow the same drill on the target device and sync your Gmail contacts.
- 4. Alternatively, you can visit your Gmail account on your desktop and go to its Contacts.
- 5. Select the contacts you wish to transfer and click on the “Export” button.

- 6. Choose to export your contacts to a vCard format. Once a vCard is created, you can manually move it to the target iPhone to import contacts from it.

Part 4: Transfer Contacts from Apple iPhone 7 Plus to iPhone Including iPhone 12/ 12 Pro (Max)/ 12 Mini without iTunes using Bluetooth
If nothing else would work, you can transfer contacts from one iPhone to another using Bluetooth. It might be time-consuming, but it is also one of the easiest ways to learn how to transfer contacts from Apple iPhone 7 Plus to iPhone without iTunes.
- 1. Turn on Bluetooth on both devices and make sure they are nearby.
- 2. You can always go to the Bluetooth settings of the source device and pair both devices.

- 3. Now, go to its Contacts and select the ones you wish to transfer.
- 4. Tap on the Share button and select the target device from the list of options.

- 5. Accept the incoming data on the target iPhone to complete the process.
After following these steps, you can learn how to transfer contacts from Apple iPhone 7 Plus to iPhone with iTunes and without it. Besides these methods, you can also AirDrop the contacts or sync them via iCloud as well. As you can see, there are numerous ways to transfer contacts from Apple iPhone 7 Plus to iPhone with iTunes (and without it) that you can try. We recommend Dr.Fone Phone Transfer as it is one of the easiest and fastest ways to transfer data between different devices.
Ultimate Guide, How to Transfer Music From Apple iPhone 7 Plus to iPhone
The evolution of technology continually transforms how we consume and enjoy music. The iPhone stands among the most dominant brands in the smartphone world. Thus, the need for effortless ways to transfer music from iDevices has never been more paramount. In this comprehensive article, we will go through various methods and tools. This guide aims to simplify the process and empower you with the knowledge to transfer your music hassle-free.
It will explore native functionalities provided by Apple and third-party apps. Moreover, it will take you through music transfer employing cloud services. The goal is to equip you with the most effective, efficient, and reliable methods to transfer music from Apple iPhone 7 Plus to iPhone.
Part 1: How To Transfer Selective and All Music From Apple iPhone 7 Plus to iPhone in One-Click
When it comes to transferring music between iPhones, Wondershare Dr.Fone emerges as a versatile solution. It allows you to move the entire music library or selective tracks with a single click. With its one-click transfer functionality, managing your music collection becomes a smooth experience.
This ensures that your favorite tunes are available on your new iPhone. The following are the detailed methods on how to transfer music from Apple iPhone 7 Plus to iPhone using Wondershare Dr.Fone:
Method 1: Transfer Music Using Wondershare Dr.Fone – Phone Manager
Wondershare Dr.Fone offers a comprehensive solution for managing your iPhone. It allows you to handle your iPhone data efficiently. You can perform tasks like importing, exporting, and deleting files. With its intuitive drag-and-drop feature, you can move files into any desired app on your device. You can transfer a variety of data between your iOS device and computer. Here is how to transfer music from Apple iPhone 7 Plus to iPhone using the phone manager feature:
- Step 1: Access the Source iPhone in Wondershare Dr.Fone
The first thing you need to do is install and launch Wondershare Dr.Fone. Then, connect both iPhones to the computer and wait for their detection by Dr.Fone. Once detected, click the source iPhone from the left panel.

- Step 2: Transfer the Selected Music Track
From the expanded options for the source iPhone, choose “Music.” Now, go to the track you want to share and select it. Now, tap “To Device” from the top toolbar and select the other iPhone as the destination. As soon as you select the other iPhone, the music file will be transferred.

Method 2: Transfer Music Using Wondershare Dr.Fone – Phone Transfer
Wondershare Dr.Fone - Phone Transfer simplifies transferring different data types between 8000+ devices. It ensures ease of use with a simple click-through process. Moreover, it is compatible with Apple, Samsung, HUAWEI, OPPO, Sony, Google, and more.
You also get full support for the latest iOS and Android versions. It supports the transfer of over 15 types of data between different OS. Here is how to transfer music from iPod to iPhone using the Phone Transfer tool of Wondershare Dr.Fone:
- Step 1: Click Phone Transfer in Wondershare Dr.Fone
To begin, you need to connect both devices to the computer with Wondershare Dr.Fone. Within Dr.Fone, click “Toolbox” from the left panel and choose “Phone Transfer” as the option. It will lead to a new screen where you need to assign the positions to the iPhones.
- Step 2: Select Music and Tap Start Transfer
The iPhone from which you want to transfer the music should be in the “Source” position. Now, give the “Destination” position to the iPhone where you want to transfer music. Then select “Music” from the available data type and click “Start Transfer.” Wait for the transfer process to complete, which will take time, depending on the library size.

Part 2: How To Transfer Music From Apple iPhone 7 Plus to iPhone Using iTunes
iTunes remains a reliable and widely used application for managing iOS devices. Many iPhone users prefer this method for transferring music between iOS devices, which is limited to purchased songs. Follow these steps to transfer music from Apple iPhone 7 Plus to iPad using iTunes:
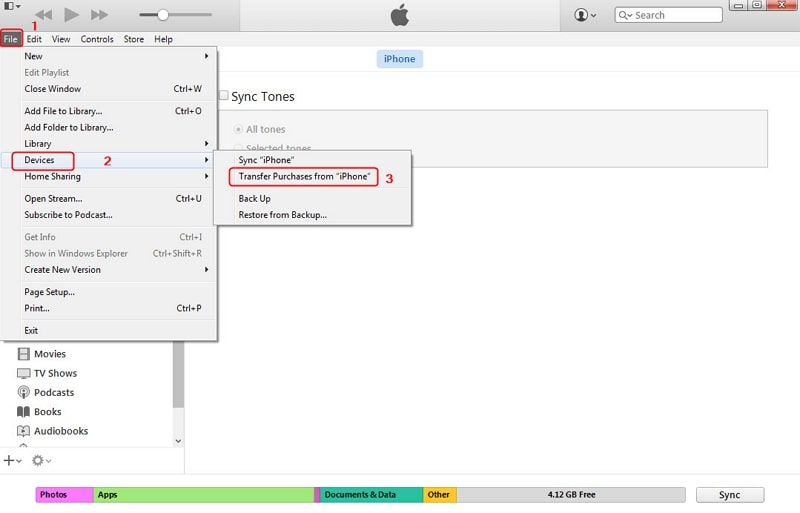
- Step 1. Run the latest version of iTunes on your computer and connect the source iPhone. After accessing iTunes, click on “File,” located in the top left corner, and choose “Devices.” Next, select “Transfer Purchases from iPhone” and let the process finish.
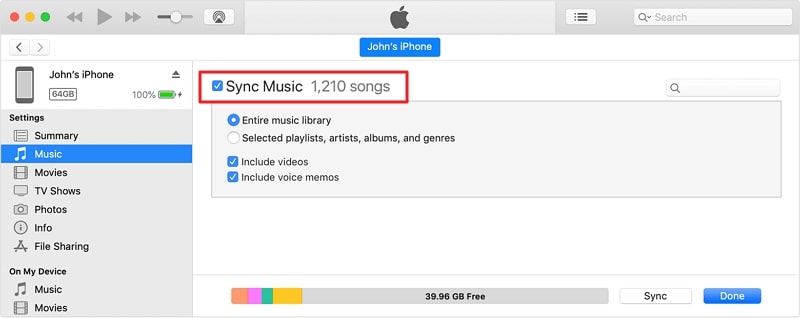
- Step 2. Once all the purchased songs are transferred, disconnect the source iPhone. Now, connect the targeted iPhone and wait for iTunes to recognize it. Then tap the “Device” icon to access the iPhone window.
- Step 3. Here, click the “Music” tab from the left side panel. Now check the “Sync Music” box and select “Entire Library” or another option depending on your choice. Finally, press “Sync” to commence the music transfer process.
Part 3: How To Transfer Music From Apple iPhone 7 Plus to iPhone via AirDrop
AirDrop provides a convenient and wireless way to transfer music between iPhones. It allows you to share songs, albums, or playlists effortlessly. You don’t need any cable or extra software to use this method. This wireless approach simplifies the process, making it an excellent choice for transferring a few tracks or albums. Follow these steps to transfer music from Apple iPhone 7 Plus to iPhone without iTunes:
- Step 1. Start by ensuring that AirDrop is enabled on both devices and its visibility is set to “Everyone.” Moreover, you also need to ensure that both Wi-Fi and Bluetooth are also enabled, as they are essential.
- Step 2. Now open the Music app and find the track you want to transfer to the other iPhone. Tap the three-dots icon and select “Share Song.” From the available options, choose “AirDrop.”
- Step 3. Among the available devices to AirDrop, select the targeted iPhone. Now, you will receive a prompt on the targeted iPhone, which you need to accept to complete the data transfer.

Part 4: How To Transfer Music From Apple iPhone 7 Plus to iPhone by Syncing Apple Music Library
Syncing your Apple Music Library across iPhones offers a smooth way to transfer music. It ensures all your favorite tracks, playlists, and albums are available on your new device. This method ensures a consistent music experience. It allows you to enjoy your favorite tunes without the need for manual transfers. Follow these steps to transfer music from iPad to iPhone Apple Music:
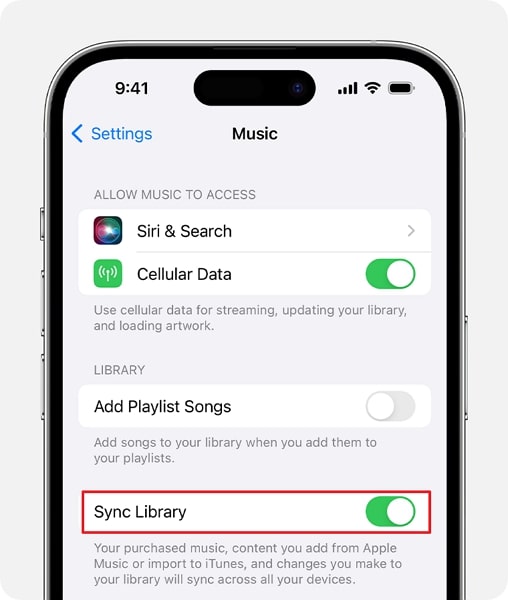
- Step 1. On both of your iPhone devices, log in using the same Apple ID. Then, move to the source iPhone and access the Apple iPhone 7 Plus device’s Settings. Here, scroll down to find and tap the “Music” option.
- Step 2. Now, move to toggle on the “Sync Library” option on the following screen. Afterward, repeat the same process on the new iPhone. Give the syncing process some time, and you will be able to access all songs on the new device.
Part 5: How To Transfer Music From Apple iPhone 7 Plus to iPhone Using Google Drive
Transferring music via Google Drive offers a convenient way to move your music collection. This allows a music exchange between iPhones without the need for cables. It’s a particularly useful method for transferring a few select songs or albums. With it, you can transfer songs that you have downloaded from the internet. The following are the steps you need to follow to transfer music from iDevices via Google Drive:
- Step 1. Once you’ve installed the Google Drive app on your iPhone, launch the app, sign in, and tap the “+” icon located at the lower right. Select “Upload” to proceed. Now, tap “Browse” and then go on to locate and select the targeted songs.
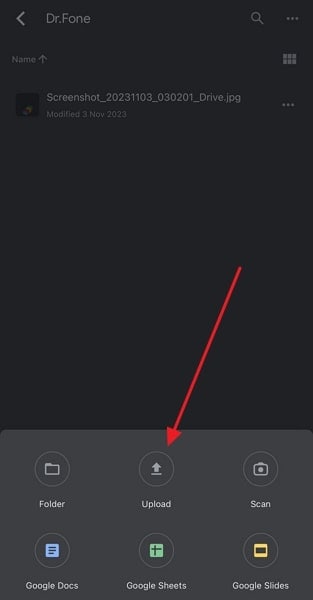
- Step 2. Once they are uploaded, move to the new iPhone and install the Google Drive app there. Here, log in using the same Google ID and access the songs you uploaded from the source device. Then tap the “Three dots” icon and select “Make available offline” to complete the process.

Part 6: How To Transfer Music Streaming Services Playlists From Apple iPhone 7 Plus to iPhone
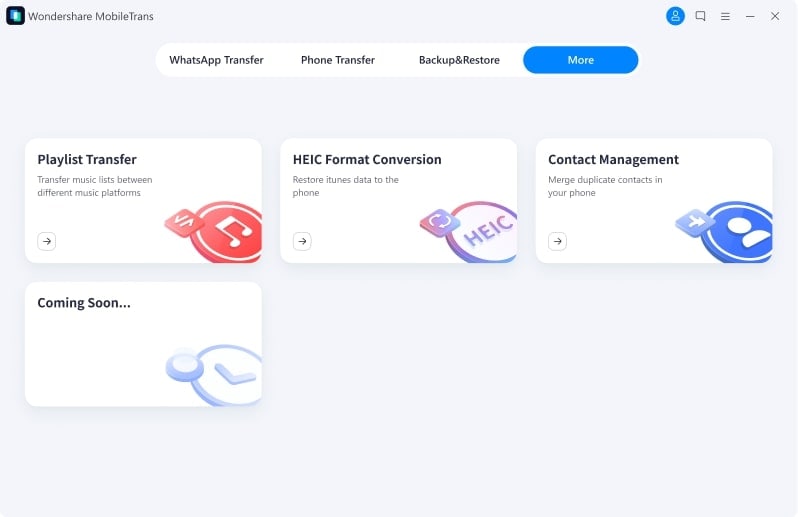
Transitioning between music streaming platforms can be challenging. However, with Wondershare MobileTrans, you can effortlessly transfer your beloved playlists. You can move your Spotify playlists to Apple Music, YouTube Music, or between various services hassle-free. Whether you’re tech-savvy or not, its user-friendly interface ensures easy operation. Additionally, it supports more platforms and is completely free to use. Here are the steps you need to follow for playlist transfer:
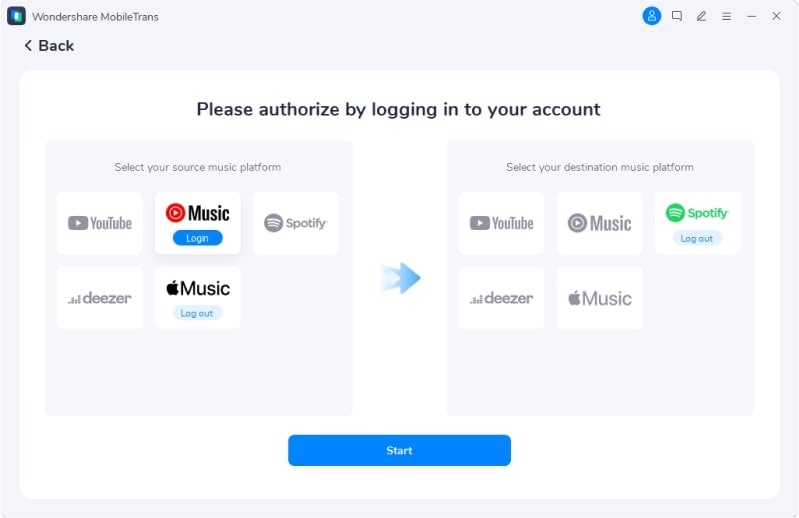
- Step 1. You start the process by installing Wondershare MobileTrans on your computer. Now, launch it and move to the “More” tab. Here, click the first option, “Playlist Transfer” to proceed.
- Step 2. On the following screen, log into both music streaming services. Once you are logged in, tap “Start” to commence the playlist transfer procedure. The time it will take depends upon the number of playlists and songs.
Conclusion
In conclusion, transferring music between iPhones is essential for preserving our musical experiences. Whether using iTunes, AirDrop, cloud services, or specialized tools, the process can be simplified. For a comprehensive and user-friendly solution, consider Wondershare Dr.Fone. Its intuitive interface and versatile functionalities streamline the music transfer process. This makes Dr.Fone an ideal choice for how to transfer music from Apple iPhone 7 Plus to iPhone.
Easy Methods: How To Transfer Pictures From Apple iPhone 7 Plus to PC
Photo transfer from your iPhone to your PC is a common practice for various reasons. It can free up your device’s storage space, create backups, or simply edit and organize your photos on a larger screen.
Thankfully, there are various methods to transfer pictures from your iPhone to your PC, providing flexibility to users based on their preferences and convenience. Read our comprehensive guide on how to transfer pictures from Apple iPhone 7 Plus to PC. This article covers step-by-step instructions so you can easily and efficiently manage and transfer your iPhone photos to your computer while preserving your cherished memories.
Part 1: How To Transfer Pictures From Apple iPhone 7 Plus to PC with iCloud
One of the widely used and efficient methods to transfer pictures from your iPhone to a PC is through iCloud, Apple’s cloud-based service. iCloud provides seamless integration across Apple devices, allowing users to sync and access their photos and videos effortlessly.
However, even if your PC is using other operating systems, such as Windows, you can still use iCloud for Windows to save and transfer your iPhone photos from iCloud.
How to transfer iPhone photos to a computer using iCloud:
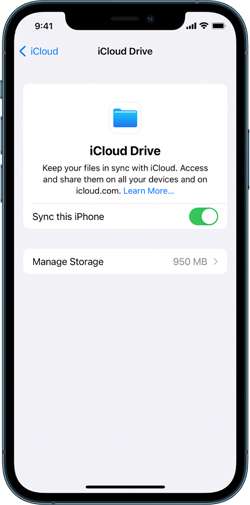
Step 1: Make sure you have synced iCloud photos on your iPhone.
On your iPhone Settings, go to your profile and tap iCloud. Then, select Photos and turn on the switch next to “Sync this [device].” Otherwise, go to iCloud settings > iCloud Drive, and switch on “Sync this iPhone.”
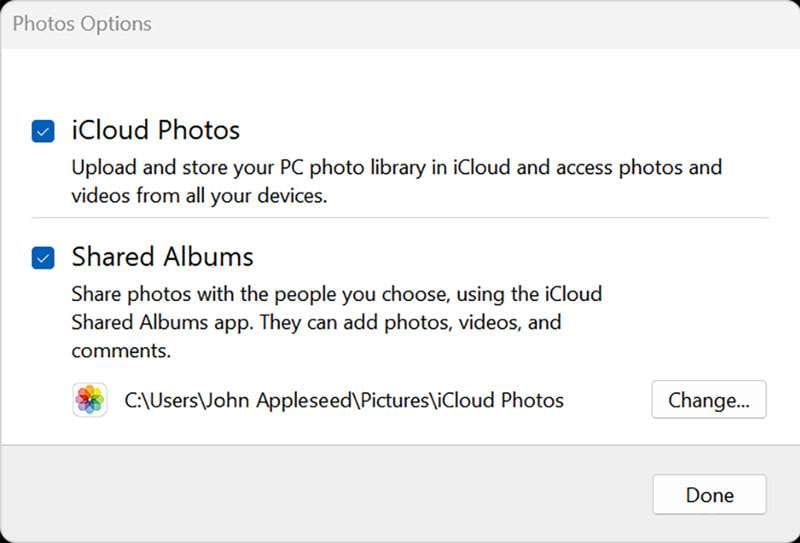
Step 2: Set up your iCloud for Windows.
Open iCloud for Windows and ensure you’re signed in with your Apple ID. Next to Photos, select Options > iCloud Photos. Click “Done” and “Apply” to save the changes and close the window.
Step 3: Keep iPhone photos on PC.
Open iCloud Photos and select the images you want to transfer to your PC. Right-click to open a drop-down menu and choose “Always keep on this device.”
That’s it! Now, you can find your iPhone Photos on your computer.
Part 2: How To Transfer Pictures From iPhone with Google Drive
Another convenient way to transfer iPhone pics to a computer is through Google Drive. As a cloud-based storage solution, Google Drive allows users to seamlessly store, manage, and share files, including photos, across different devices.
If you already have a Google account, you can jump right into Google Drive without signing up. However, be aware that the free version only gives you 15 GB of space. If you need more room, you’ll have to sign up for a subscription.
How to transfer iPhone pictures to a computer with Google Drive:
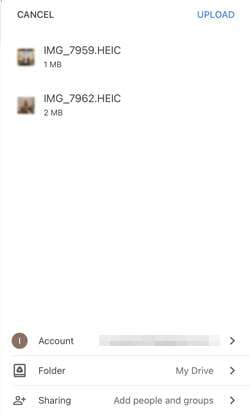
Step 1: Set up your Google Drive.
Open Google Drive on your iPhone. Once opened, tap the multicolored + symbol and select “Upload” > “Photos and Videos.” If prompted, grant access to all photos by tapping “Allow Access to All Photos.”
Step 2: Upload your iPhone photos on Google Drive.
Browse through your iPhone albums to locate the specific photos you wish to upload. Hold and tap to select multiple photos. Then, tap “Upload” to upload your iPhone photos to Google Drive.
Optional: Automatic backup or sync with Google Photos
For those seeking automatic backups, open Google Photos, tap your profile image, navigate to “Google Photos settings,” and select “Backup & Sync.” Toggle “Backup & Sync” to On for continuous backups.
Step 3: Transfer your iPhone photos from Google Drive to your PC.
Once your photos are stored on Google Drive, proceed to save and transfer them to your PC. Select the desired photos in Google Drive, and click “Download.”
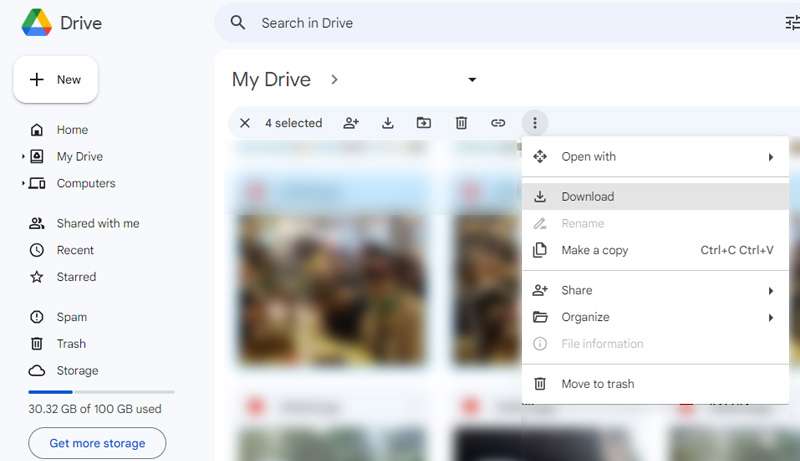
To save all photos from a specific Google Drive folder, open Google Drive and select “My Drive.” Locate the intended folder, and click the three dots to open the drop-down menu. Select “Download,” and all photos and files within the folder will be saved to your computer in ZIP format.
Part 3: How To Transfer Pictures From iPhone with iTunes
You can also make the most of iTunes to secure your iPhone with backups, keep it up-to-date, or synchronize content between your iOS device and your computer in both directions. Even if you’re a Windows PC user, there’s no need to fret. Although iTunes is an Apple product, it’s also available for Windows use.
To get started, make sure that you have iTunes for Windows installed or update your existing version to at least iTunes 12.5.1. Once done, follow the instructions below.
How to transfer iPhone pics to a PC using iTunes:
Step 1: Connect your device to your computer.
Plug in your iPhone to your computer using a USB cable.
Step 2: Grant access to your iPhone Photos.
If your phone is asking you to Trust This Computer, tap “Trust” or “Allow to proceed.”
Step 3: Open your computer’s Photos app.
Go to the Start menu on your PC. Search and select Photos to open the Photos app.
Step 4: Import your Photos to your PC.
Within the Photos app, click on Import > From a USB device and follow the instructions on the screen. You can choose specific photos for the transfer and decide where to save them on your PC. Remember to make sure that the photos are saved on the Apple iPhone 7 Plus device rather than stored in the cloud.
Finally, allow a few moments for the system to detect and transfer the selected photos.
Part 4: How To Quick Transfer Pictures From Apple iPhone 7 Plus to PC
If you find the above methods difficult, there is a quick and easy way to transfer photos from your iPhone to a PC with Dr. Fone’s Export All Data feature. With this feature, there’s no need to navigate through various locations to just locate and transfer files from your iPhone.
Dr.Fone - Phone Manager (iOS)
Transfer Photos from Computer to iPod/iPhone/iPad without iTunes
- Transfer, manage, export/import your music, photos, videos, contacts, SMS, Apps, etc.
- Back up your music, photos, videos, contacts, SMS, Apps, etc., to the computer and restore them easily.
- Transfer music, photos, videos, contacts, messages, etc., from one smartphone to another.
- Transfer media files between iOS devices and iTunes.
- Fully compatible with iOS 7 to iOS 15 and iPod.
3981454 people have downloaded it
Dr. Fone’s Export All Data feature offers some great functionalities, including:
- Comprehensive data export, including Photos, Contacts, Messages, Voicemail, and more
- Encrypted data transfer and backups
- Available for iOS and Android devices
- Regular updates to provide an enhanced user experience
To transfer photos from your iPhone to a PC using Dr.Fone, follow the step-by-step below:
Step 1: Launch Dr.Fone and make device connections using a USB cable.
Start by Image nameing your iPhone device to the computer via a USB connection. Launch Dr.Fone and select “Export all data” in the My Device section.
Step 2: Choose file types for export
When a new window appears, select the specific file types you wish to transfer (in this case, your photos). Then, click “Export” at the bottom of the screen to initiate the procedure. Choose the preferred location for saving the exported data.

Step 3: Make a password for the backup file
Next, you will be asked to create an encrypted password for the backup file to be stored on the computer. Set a password, confirm it, and click “Done” to execute the process.

Step 4: Monitor the progress
Your iPhone will start exporting its data to the computer through Dr.Fone. You can wait and monitor the progress on the screen.

Step 5: Successful export of data to the computer
After successful completion of exporting the data, a window will appear on your computer screen. Click “Open” to review the exported data at the specified location.

Conclusion
Before, you must have wondered how do you transfer pictures from Apple iPhone 7 Plus to PC. But after learning from the article above, you now have a variety of straightforward methods in your hand, whether with iCloud, Google Drive, iTunes, or reliable software like Dr.Fone.
If you’re embedded in the Apple ecosystem, iCloud provides seamless integration of your iPhone Photos. Alternatively, Google Drive offers a cross-platform solution, enabling you to upload your iPhone photos to the cloud and access them on your computer browser.
For those who prefer a more traditional approach, iTunes provides a straightforward method via a USB connection. And if you’re looking for a quick and versatile third-party solution, software like Dr.Fone simplifies the data transfer process with its user-friendly interface and robust features.
Also read:
- [Updated] In 2024, China on Ice Revelry at the 2022 Beijing Olympics
- [Updated] Social Media Music Grabber
- 2024 Approved Premier Screen Captures No-Cost PUBG Sets
- 5 Ways to Send Ringtones from Apple iPhone 12 mini to iPhone Including iPhone 15 | Dr.fone
- 5 Ways to Send Ringtones from Apple iPhone 13 Pro Max to iPhone Including iPhone 15 | Dr.fone
- Affordable Setups Tailored OBS for Budget Computers for 2024
- HERO7 Black's Impact on High-Quality Action Films
- How To Transfer From Apple iPhone 12 Pro to Samsung Simplified Guide | Dr.fone
- In 2024, How to Transfer Apple iPhone X Data to iPhone 12 A Complete Guide | Dr.fone
- In 2024, How to Transfer Photos from Apple iPhone XR to other iPhone without iCloud | Dr.fone
- In 2024, How to Transfer/Sync Notes from Apple iPhone 14 Pro to iPad | Dr.fone
- In 2024, Rescuing a Halted OBS Video Input Stream
- Stop Side-by-Side Siri & ChatGPT: What Separates Them?
- Switch Cards Between Apple iPhone 6 and other iPhones Will Move All Phone Services? | Dr.fone
- Unpack RAR Compressed Files Effortlessly on Your Mac
- Title: 4 Quick Ways to Transfer Contacts from Apple iPhone 7 Plus to iPhone With/Without iTunes | Dr.fone
- Author: Charlotte
- Created at : 2024-10-31 17:34:24
- Updated at : 2024-11-04 16:56:10
- Link: https://iphone-transfer.techidaily.com/4-quick-ways-to-transfer-contacts-from-apple-iphone-7-plus-to-iphone-withwithout-itunes-drfone-by-drfone-transfer-from-ios/
- License: This work is licensed under CC BY-NC-SA 4.0.