
3 Ways to Export Contacts from Apple iPhone 15 Pro to Excel CSV & vCard Easily | Dr.fone
3 Ways to Export Contacts from Apple iPhone 15 Pro to Excel CSV & vCard Easily
A lot of readers have asked us how to export contacts from Apple iPhone 15 Pro to Excel. After all, it allows them to keep their contacts handy and transfer them to any other device pretty easily. Though, if you are using an iOS device, then you might find it hard to export iPhone contacts to CSV at first. Nevertheless, there are some smart and quick ways of exporting iPhone contacts to Excel that every iOS user should know. In this guide, we will teach you in three different ways, how to export iPhone contacts to Excel free.
Part 1: How to export contacts from Apple iPhone 15 Pro to Excel using Dr.Fone - Phone Manager (iOS)
If you are looking for a hassle-free solution to export contacts from Apple iPhone 15 Pro to Excel, then try Dr.Fone - Phone Manager (iOS) . It is a part of the Dr.Fone toolkit, which is developed by Wondershare. The desktop application is available for both Windows and Mac, and comes with a free trial as well. Therefore, you can export iPhone contacts to Excel free using Dr.Fone - Phone Manager (iOS). The tool works flawlessly with all the leading versions of iOS, including iOS 11.
It would be a one-stop solution to transfer all kinds of content between your iOS device and computer. Besides exporting iPhone contacts to Excel, you can also move photos, messages, music, and more. It can also be used to transfer iTunes media as well. The best part is that you don’t need to use iTunes (or any other complicated tool) to export iPhone contacts to CSV. All you need to do is follow these simple steps:
Dr.Fone - Phone Manager (iOS)
Transfer MP3 to iPhone/iPad/iPod without iTunes
- Transfer, manage, export/import your music, photos, videos, contacts, SMS, Apps etc.
- Backup your music, photos, videos, contacts, SMS, Apps etc. to computer and restore them easily.
- Transfer music, photos, videos, contacts, messages, etc from one smartphone to another.
- Transfer media files between iOS devices and iTunes.
- Fully compatible with iOS 7, iOS 8, iOS 9, iOS 10, iOS 11 and iPod.
4,244,162 people have downloaded it
1. First of all, connect your iOS device to your system using an authentic cable and launch Dr.Fone on it. From the welcome screen, you need to select the “Transfer” module.

2. Since the tool follows an intuitive process, it will automatically detect your iPhone and prepare it for the transfer process. Once it is ready, you will get the following interface.

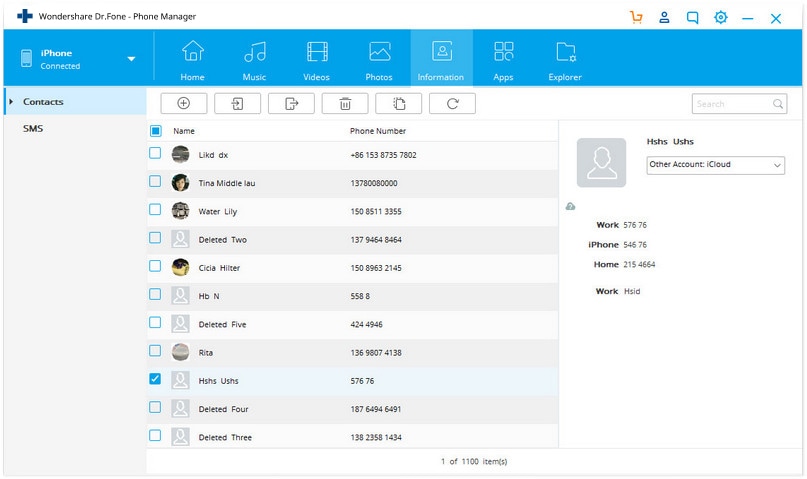
3. Instead of selecting options from its home, go to the “Information” tab.
4. The Information tab will have data related to your device’s contacts and SMS. You can switch between Contacts and SMS from their selective options on the left panel.
5. Now, to export contacts from Apple iPhone 15 Pro to Excel, go to the “Contacts” tab from the left panel. This will display all the contacts saved on your device. From here, you can add a contact, delete it, sort them, etc.
6. Select the contacts that you wish to export. You can even look for a contact from the search bar. If you wish to export the entire list, then check the select all button.
7. After making your selections, click on the Export icon on the toolbar. The tool will allow you to export contacts in different formats like CSV, vCard, etc. Select the “to CSV File” option.
That’s it! In this way, you would be able to automatically export iPhone contacts to CSV. Now you can just visit the location and copy the file to any other device.

Part 2: Export iPhone contacts to Excel free using SA Contacts Lite
You can also try SA Contacts Lite to export iPhone contacts to Excel free as well. It is a freely available app that can be downloaded from the App Store. The app can be used to import and export your contacts in different formats. It makes the process of exporting iPhone contacts to Excel pretty easy. You can make it work with these simple steps:
1. Firstly, download SA Contacts Lite on your iPhone. Whenever you wish to export contacts from Apple iPhone 15 Pro to Excel, launch the app.
2. Go to the “Export” section of the app. It will ask permission to access the contacts on your device. Simply grant the respected permission to proceed.
3. Now, you can choose if you wish to export all contacts, groups, or selected contacts. Additionally, from the Property Style dropdown menu, you can choose if you wish to export iPhone contacts to CSV, vCard, Gmail, etc.

4. Go with the default option of “Separated” or “Backup” and tap on the Start button to initiate the process.
5. In no time, the app will create a CSV file of your contacts. From here, you can mail yourself the CSV file as well.
6. Furthermore, you can tap on the More option as well. This will allow you to upload the CSV file to any cloud service like Dropbox, OneDrive, Google Drive, etc.

7. For instance, if you wish to upload the file to Dropbox, simply select the provided option and grant the app the needed permissions.
Part 3: Export iPhone contacts to CSV using iCloud
If you don’t want to take the assistance of any third-party app to export iPhone contacts to Excel free, then you can also use iCloud. The process of exporting iPhone contacts to Excel using iCloud is a little tedious compared to other methods. Though, these steps will help you meet your requirements.
1. Before you proceed, make sure that you have already synced your iPhone contacts with iCloud by visiting its Settings on your device.

2. Afterward, go to the official website of iCloud and log in with your credentials. From its welcome page, select the Contacts option.

3. Click on the gear icon (Settings) on the bottom left corner. From here, you can select all contacts in one go. Though, if you wish, you can manually select the contacts you wish to export as well.

4. Once you have made your selection, go to the Settings again and click on the option of “Export vCard”.

5. The exported vCard will automatically be saved in the Downloads folder (or any other default location). Now, you can simply go to a vCard to CSV converter web tool to convert the vCard to a CSV file.

We hope that our quick and smart guide would be able to help you export contacts from Apple iPhone 15 Pro to Excel. Dr.Fone Transfer provides a fast and easy solution export iPhone contacts to CSV and other formats. It can also be used to transfer other types of content between your iOS device and computer too. Give it a try and make the most of your iPhone without any trouble.
Easy Methods: How To Transfer Pictures From Apple iPhone 15 Pro to PC
Photo transfer from your iPhone to your PC is a common practice for various reasons. It can free up your device’s storage space, create backups, or simply edit and organize your photos on a larger screen.
Thankfully, there are various methods to transfer pictures from your iPhone to your PC, providing flexibility to users based on their preferences and convenience. Read our comprehensive guide on how to transfer pictures from Apple iPhone 15 Pro to PC. This article covers step-by-step instructions so you can easily and efficiently manage and transfer your iPhone photos to your computer while preserving your cherished memories.
Part 1: How To Transfer Pictures From Apple iPhone 15 Pro to PC with iCloud
One of the widely used and efficient methods to transfer pictures from your iPhone to a PC is through iCloud, Apple’s cloud-based service. iCloud provides seamless integration across Apple devices, allowing users to sync and access their photos and videos effortlessly.
However, even if your PC is using other operating systems, such as Windows, you can still use iCloud for Windows to save and transfer your iPhone photos from iCloud.
How to transfer iPhone photos to a computer using iCloud:
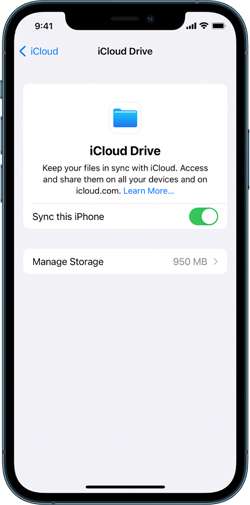
Step 1: Make sure you have synced iCloud photos on your iPhone.
On your iPhone Settings, go to your profile and tap iCloud. Then, select Photos and turn on the switch next to “Sync this [device].” Otherwise, go to iCloud settings > iCloud Drive, and switch on “Sync this iPhone.”
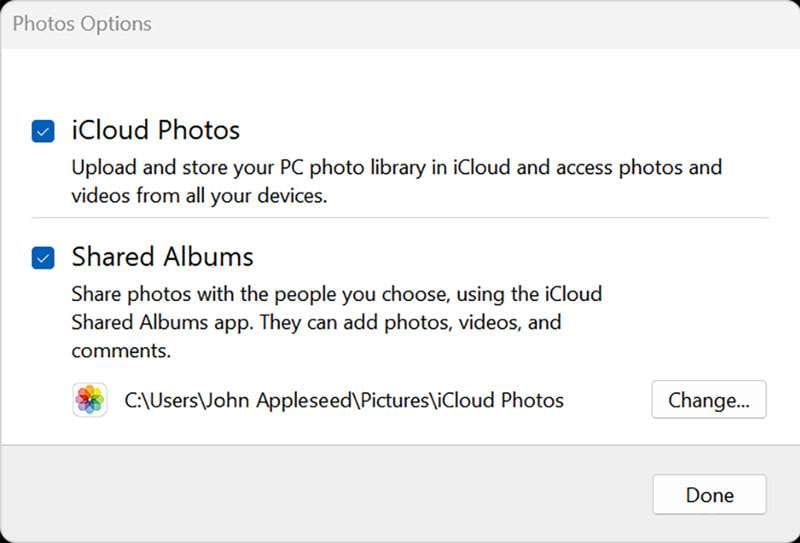
Step 2: Set up your iCloud for Windows.
Open iCloud for Windows and ensure you’re signed in with your Apple ID. Next to Photos, select Options > iCloud Photos. Click “Done” and “Apply” to save the changes and close the window.
Step 3: Keep iPhone photos on PC.
Open iCloud Photos and select the images you want to transfer to your PC. Right-click to open a drop-down menu and choose “Always keep on this device.”
That’s it! Now, you can find your iPhone Photos on your computer.
Part 2: How To Transfer Pictures From iPhone with Google Drive
Another convenient way to transfer iPhone pics to a computer is through Google Drive. As a cloud-based storage solution, Google Drive allows users to seamlessly store, manage, and share files, including photos, across different devices.
If you already have a Google account, you can jump right into Google Drive without signing up. However, be aware that the free version only gives you 15 GB of space. If you need more room, you’ll have to sign up for a subscription.
How to transfer iPhone pictures to a computer with Google Drive:
Step 1: Set up your Google Drive.
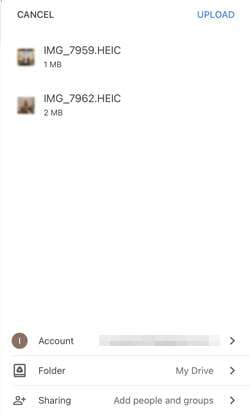
Open Google Drive on your iPhone. Once opened, tap the multicolored + symbol and select “Upload” > “Photos and Videos.” If prompted, grant access to all photos by tapping “Allow Access to All Photos.”
Step 2: Upload your iPhone photos on Google Drive.
Browse through your iPhone albums to locate the specific photos you wish to upload. Hold and tap to select multiple photos. Then, tap “Upload” to upload your iPhone photos to Google Drive.
Optional: Automatic backup or sync with Google Photos
For those seeking automatic backups, open Google Photos, tap your profile image, navigate to “Google Photos settings,” and select “Backup & Sync.” Toggle “Backup & Sync” to On for continuous backups.
Step 3: Transfer your iPhone photos from Google Drive to your PC.
Once your photos are stored on Google Drive, proceed to save and transfer them to your PC. Select the desired photos in Google Drive, and click “Download.”
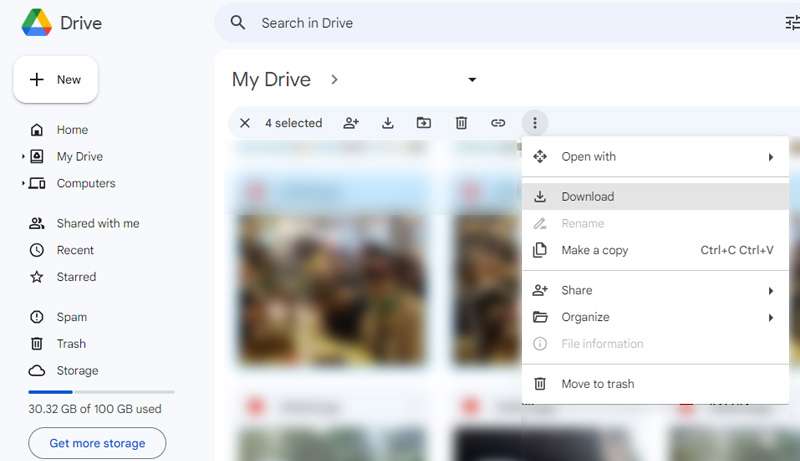
To save all photos from a specific Google Drive folder, open Google Drive and select “My Drive.” Locate the intended folder, and click the three dots to open the drop-down menu. Select “Download,” and all photos and files within the folder will be saved to your computer in ZIP format.
Part 3: How To Transfer Pictures From iPhone with iTunes
You can also make the most of iTunes to secure your iPhone with backups, keep it up-to-date, or synchronize content between your iOS device and your computer in both directions. Even if you’re a Windows PC user, there’s no need to fret. Although iTunes is an Apple product, it’s also available for Windows use.
To get started, make sure that you have iTunes for Windows installed or update your existing version to at least iTunes 12.5.1. Once done, follow the instructions below.
How to transfer iPhone pics to a PC using iTunes:
Step 1: Connect your device to your computer.
Plug in your iPhone to your computer using a USB cable.
Step 2: Grant access to your iPhone Photos.
If your phone is asking you to Trust This Computer, tap “Trust” or “Allow to proceed.”
Step 3: Open your computer’s Photos app.
Go to the Start menu on your PC. Search and select Photos to open the Photos app.
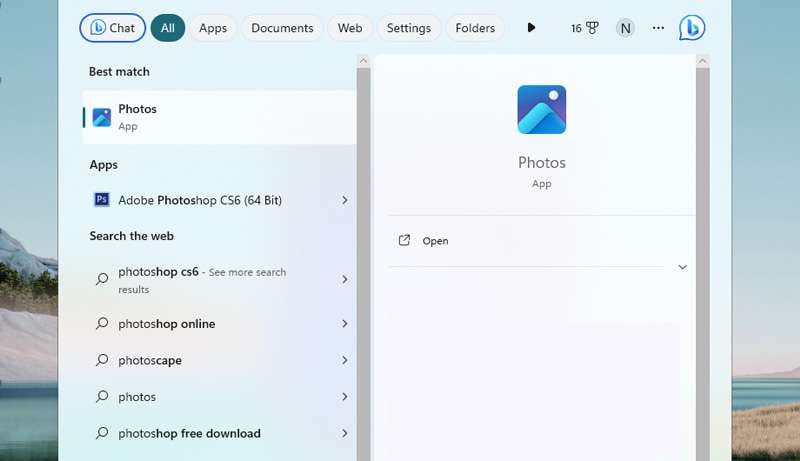
Step 4: Import your Photos to your PC.
Within the Photos app, click on Import > From a USB device and follow the instructions on the screen. You can choose specific photos for the transfer and decide where to save them on your PC. Remember to make sure that the photos are saved on the Apple iPhone 15 Pro device rather than stored in the cloud.
Finally, allow a few moments for the system to detect and transfer the selected photos.
Part 4: How To Quick Transfer Pictures From Apple iPhone 15 Pro to PC
If you find the above methods difficult, there is a quick and easy way to transfer photos from your iPhone to a PC with Dr. Fone’s Export All Data feature. With this feature, there’s no need to navigate through various locations to just locate and transfer files from your iPhone.
Dr.Fone - Phone Manager (iOS)
Transfer Photos from Computer to iPod/iPhone/iPad without iTunes
- Transfer, manage, export/import your music, photos, videos, contacts, SMS, Apps, etc.
- Back up your music, photos, videos, contacts, SMS, Apps, etc., to the computer and restore them easily.
- Transfer music, photos, videos, contacts, messages, etc., from one smartphone to another.
- Transfer media files between iOS devices and iTunes.
- Fully compatible with iOS 7 to iOS 15 and iPod.
3981454 people have downloaded it
Dr. Fone’s Export All Data feature offers some great functionalities, including:
- Comprehensive data export, including Photos, Contacts, Messages, Voicemail, and more
- Encrypted data transfer and backups
- Available for iOS and Android devices
- Regular updates to provide an enhanced user experience
To transfer photos from your iPhone to a PC using Dr.Fone, follow the step-by-step below:
Step 1: Launch Dr.Fone and make device connections using a USB cable.
Start by Image nameing your iPhone device to the computer via a USB connection. Launch Dr.Fone and select “Export all data” in the My Device section.
Step 2: Choose file types for export
When a new window appears, select the specific file types you wish to transfer (in this case, your photos). Then, click “Export” at the bottom of the screen to initiate the procedure. Choose the preferred location for saving the exported data.

Step 3: Make a password for the backup file
Next, you will be asked to create an encrypted password for the backup file to be stored on the computer. Set a password, confirm it, and click “Done” to execute the process.

Step 4: Monitor the progress
Your iPhone will start exporting its data to the computer through Dr.Fone. You can wait and monitor the progress on the screen.

Step 5: Successful export of data to the computer
After successful completion of exporting the data, a window will appear on your computer screen. Click “Open” to review the exported data at the specified location.

Conclusion
Before, you must have wondered how do you transfer pictures from Apple iPhone 15 Pro to PC. But after learning from the article above, you now have a variety of straightforward methods in your hand, whether with iCloud, Google Drive, iTunes, or reliable software like Dr.Fone.
If you’re embedded in the Apple ecosystem, iCloud provides seamless integration of your iPhone Photos. Alternatively, Google Drive offers a cross-platform solution, enabling you to upload your iPhone photos to the cloud and access them on your computer browser.
For those who prefer a more traditional approach, iTunes provides a straightforward method via a USB connection. And if you’re looking for a quick and versatile third-party solution, software like Dr.Fone simplifies the data transfer process with its user-friendly interface and robust features.
How to Transfer from Apple iPhone 15 Pro to iPhone 8/11/11 Pro
Are you an Apple iPhone 15 Pro user? Well, iPhone 8/11/11 Pro will be a huge technological leap for you. In this article we will take you through how to transfer everything from Apple iPhone 15 Pro to iPhone 8/11/11 Pro easily in three sim-ple steps because we understand that no smartphone works up to our expectations if our data, such as contacts, music, photos, notes, etc is not fed in it.
So if you are planning to buy the new iPhone 8/11/11 Pro, here is everything you need to know to transfer data from old iPhone to new iPhone. Also, even if you want to retain your old device, transfer Apple iPhone 15 Pro to iPhone 8/11/11 Pro and enjoying the same data on both your iPhones.
Best iPhone to iPhone transfer tool - transfer files from old device to new iPhone 8/11/11 Pro without iTunes
We bet you have heard of Dr.Fone software. It is the most reliable 1-Click Phone Transfer tool to send data (contacts/text messages/photos/etc.) from an old phone to new one. Its user-friendliness and intuitive interface make it the best and most efficient software to transfer Apple iPhone 15 Pro to iPhone 8/11/11 Pro as it is fully compatible with iOS 13. It is available for both Mac and Windows and is very thoughtfully designed to prevent hacking and data loss.
You may also put this software to good use to backup and restore your iPhone data.
Dr.Fone - Phone Transfer
Transfer Everything from iPhone 5S to iPhone 8/11/11 Pro in 1 Click!
- Easily transfer photos, videos, calendar, contacts, messages and music from old iPhone to new iPhone 8/11/11 Pro.
- Enable to transfer from HTC, Samsung, Nokia, Motorola and more to iPhone X/8/7S/7/6S/6 (Plus)/5s/5c/5/4S/4/3GS.
- Works perfectly with Apple, Samsung, HTC, LG, Sony, Google, HUAWEI, Motorola, ZTE, Nokia and more smartphones and tablets.
- Fully compatible with major providers like AT&T, Verizon, Sprint and T-Mobile.
- Supports iPhone, iPad, iPod touch and the latest iOS version.
- Fully compatible with the latest Windows or Mac version.
3981454 people have downloaded it
How to transfer everything from Apple iPhone 15 Pro to iPhone 8/11/11 Pro
In this segment, we will learn how to transfer everything from Apple iPhone 15 Pro to iPhone 8/11/11 Pro with Dr.Fone. To do so, download and install the software on your computer and follow the steps given below:
Step 1: Launch Dr.Fone software
Once Dr.Fone - Phone Transfer is installed on your PC, launch the program and connect the Apple iPhone 15 Pro and iPhone 8/11/11 Pro to the PC with the help of two different USB cables. Next up, select “Phone Transfer” option on Dr.Fone toolkit and move on.
Step 2. Data Transfer from iPhone 5S to iPhone 8/11/11 Pro
In this step, select content to transfer data from old iPhone to iPhone 8/11/11 Pro. Also, make sure the source and target device are duly recognized (if not, just swap them).
Step 3. Initiate the Transfer from iPhone 5S to iPhone 8/11/11 Pro
This is the last step which only requires you to hit the “Start Transfer” button and view the transfer progress on the screen.

Note: The images above are of iPhone 6Plus. There is no difference in procedure to transfer Apple iPhone 15 Pro to iPhone 8/11/11 Pro.
Simple, right? In just one click, all the data is moved from Apple iPhone 15 Pro to iPhone 8/11/11 Pro.
Part 2: How to transfer everything from Apple iPhone 15 Pro to iPhone 8/11/11 Pro with iTunes?
iTunes is the software developed by Apple Inc. to manage iPhones and other iOS devices. Many users still prefer to use iTunes to transfer data from old iPhone to iPhone 8/11/11 Pro, thus, here are simple steps to help you do so:
Step 1. First and foremost, download the latest version of iTunes on your PC from Apple’s official website. Install it and launch the program.
Step 2. Using an USB, connect the Apple iPhone 15 Pro to your PC and wait until iTunes automatically detects it. You will be able to view your Apple iPhone 15 Pro under the “Devices” tab.
Step 3. Click Apple iPhone 15 Pro to view all the options at the left hand side of the iTunes interface. Select “Backup Now” to backup all the data stored in the Apple iPhone 15 Pro which needs to be transferred to iPhone 8/11/11 Pro.

Step 4. Let the process of backing up Apple iPhone 15 Pro finish completely. Once this is done, disconnect it and use another USB to connect new iPhone 8/11/11 Pro to the PC.
Step 5. Follow the steps given above to view the options with respect to the new iPhone 8/11/11 Pro on the iTunes interface. Select “Restore Backup” and waiter the process to get over to transfer data from old iPhone to iPhone 8/11/11 Pro.
Part 3: How to transfer everything from Apple iPhone 15 Pro to iPhone 8/11/11 Pro with iCloud?
iCloud is another great way to transfer Apple iPhone 15 Pro to iPhone 8/11/11 Pro in hassle free manner. Since it is a cloud service by Apple, it stores all our data and allows us to restore it on any and every iOS device with the same Apple ID and password.
Follow the steps given below to understand how to transfer everything from Apple iPhone 15 Pro to iPhone 8/11/11 Pro:
Step 1. Do not set up your new iPhone 8/11/11 Pro. If you already have, Visit “Settings” > “General” > “Reset” > Erase all content and settings to start from scratch.
Step 2. Now on your old Phone 5s, visit “Settings” and tap on your name. Select “iCloud” and scroll down to select “iCloud Backup” and hit “Backup Now”. Let the process finish completely and note down the exact timing of the back up file.

Step 3. Now, on the iPhone 8/11/11 Pro, start setting it up once again and connect it to a WiFi network.
Step 4. Once you reach the “Set Up” Page, select “Restore from iCloud backup” .
Step 5. Select the most recent back up file. Feed in your Apple ID details and let the iPhone restore all the data from iCloud backup. Let your iPhone 8/11/11 Pro reboot at the end of restoration process.

Moving data from old Apple iPhone 15 Pro to new iPhone 8/11/11 Pro is an easy job with the help of three tools listed above. All our data, such as photos, videos, music, contacts, notes, calendar, messages, Apps, etc, are important to us and need to be restored in the new device for us to start enjoying our new iPhone 8/11/11 Pro.
Where iTunes and iCloud are easy and go-to tools for many users, Dr.Fone - Phone Transfer is comparatively new, but way more effective than the other two methods to transfer data from old iPhone to iPhone 8/11/11 Pro. We recommend that you download and install this software right away and also share your experience along with this guide with your friends and family. Explore its features and make life simpler by managing your iPhone in a better and more secure way.
Also read:
- [Updated] Amusing Clip Loading Appraisal
- [Updated] In 2024, Building an Auto-Subscribe Direct Link for Youtube
- [Updated] In 2024, Global Viewer Count Triumphs Play Button Honors
- [Updated] In 2024, Smoothing Out Aerial Footage Pulsation
- [Updated] Professional 4K at Your Fingertips BenQ BL2711U Uncovered for 2024
- 5 Easy Ways to Transfer Contacts from Apple iPhone 13 mini to Android | Dr.fone
- How to Move Custom Ringtones from Apple iPhone 8 Plus to Android? | Dr.fone
- How to Transfer Everything from Apple iPhone 6 to iPhone | Dr.fone
- How to Transfer Photos from Apple iPhone 7 to other iPhone without iCloud | Dr.fone
- In 2024, 5 Ways to Transfer Music from Apple iPhone 12 to Android | Dr.fone
- In 2024, How to Stop Google Chrome from Tracking Your Location On Samsung Galaxy S23 Tactical Edition? | Dr.fone
- In 2024, How to Transfer from Apple iPhone 14 Plus to Samsung Galaxy S20? | Dr.fone
- In 2024, How to Transfer from Apple iPhone XR to Samsung Galaxy S20? | Dr.fone
- Monetizing Your Content Deciphering the Minimum Views Needed
- Pioneers in Stop Motion Top 15 Must-Watch Films for 2024
- Step-by-Step Guide: Enabling Camera Access for Snapchat Photos & Videos
- Title: 3 Ways to Export Contacts from Apple iPhone 15 Pro to Excel CSV & vCard Easily | Dr.fone
- Author: Charlotte
- Created at : 2024-10-31 16:33:02
- Updated at : 2024-11-04 17:04:52
- Link: https://iphone-transfer.techidaily.com/3-ways-to-export-contacts-from-apple-iphone-15-pro-to-excel-csv-and-vcard-easily-drfone-by-drfone-transfer-from-ios/
- License: This work is licensed under CC BY-NC-SA 4.0.