
3 Ways to Export Contacts from Apple iPhone 12 Pro to Excel CSV & vCard Easily | Dr.fone
3 Ways to Export Contacts from Apple iPhone 12 Pro to Excel CSV & vCard Easily
A lot of readers have asked us how to export contacts from Apple iPhone 12 Pro to Excel. After all, it allows them to keep their contacts handy and transfer them to any other device pretty easily. Though, if you are using an iOS device, then you might find it hard to export iPhone contacts to CSV at first. Nevertheless, there are some smart and quick ways of exporting iPhone contacts to Excel that every iOS user should know. In this guide, we will teach you in three different ways, how to export iPhone contacts to Excel free.
Part 1: How to export contacts from Apple iPhone 12 Pro to Excel using Dr.Fone - Phone Manager (iOS)
If you are looking for a hassle-free solution to export contacts from Apple iPhone 12 Pro to Excel, then try Dr.Fone - Phone Manager (iOS) . It is a part of the Dr.Fone toolkit, which is developed by Wondershare. The desktop application is available for both Windows and Mac, and comes with a free trial as well. Therefore, you can export iPhone contacts to Excel free using Dr.Fone - Phone Manager (iOS). The tool works flawlessly with all the leading versions of iOS, including iOS 11.
It would be a one-stop solution to transfer all kinds of content between your iOS device and computer. Besides exporting iPhone contacts to Excel, you can also move photos, messages, music, and more. It can also be used to transfer iTunes media as well. The best part is that you don’t need to use iTunes (or any other complicated tool) to export iPhone contacts to CSV. All you need to do is follow these simple steps:
Dr.Fone - Phone Manager (iOS)
Transfer MP3 to iPhone/iPad/iPod without iTunes
- Transfer, manage, export/import your music, photos, videos, contacts, SMS, Apps etc.
- Backup your music, photos, videos, contacts, SMS, Apps etc. to computer and restore them easily.
- Transfer music, photos, videos, contacts, messages, etc from one smartphone to another.
- Transfer media files between iOS devices and iTunes.
- Fully compatible with iOS 7, iOS 8, iOS 9, iOS 10, iOS 11 and iPod.
4,244,162 people have downloaded it
1. First of all, connect your iOS device to your system using an authentic cable and launch Dr.Fone on it. From the welcome screen, you need to select the “Transfer” module.

2. Since the tool follows an intuitive process, it will automatically detect your iPhone and prepare it for the transfer process. Once it is ready, you will get the following interface.

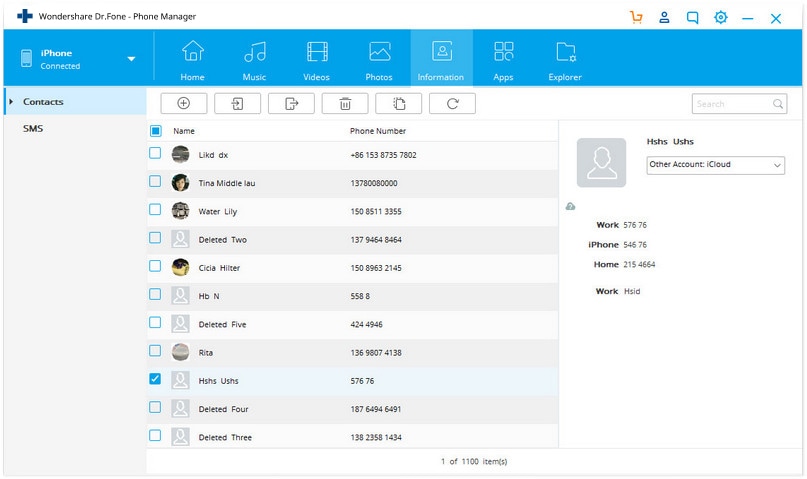
3. Instead of selecting options from its home, go to the “Information” tab.
4. The Information tab will have data related to your device’s contacts and SMS. You can switch between Contacts and SMS from their selective options on the left panel.
5. Now, to export contacts from Apple iPhone 12 Pro to Excel, go to the “Contacts” tab from the left panel. This will display all the contacts saved on your device. From here, you can add a contact, delete it, sort them, etc.
6. Select the contacts that you wish to export. You can even look for a contact from the search bar. If you wish to export the entire list, then check the select all button.
7. After making your selections, click on the Export icon on the toolbar. The tool will allow you to export contacts in different formats like CSV, vCard, etc. Select the “to CSV File” option.
That’s it! In this way, you would be able to automatically export iPhone contacts to CSV. Now you can just visit the location and copy the file to any other device.
Part 2: Export iPhone contacts to Excel free using SA Contacts Lite
You can also try SA Contacts Lite to export iPhone contacts to Excel free as well. It is a freely available app that can be downloaded from the App Store. The app can be used to import and export your contacts in different formats. It makes the process of exporting iPhone contacts to Excel pretty easy. You can make it work with these simple steps:
1. Firstly, download SA Contacts Lite on your iPhone. Whenever you wish to export contacts from Apple iPhone 12 Pro to Excel, launch the app.
2. Go to the “Export” section of the app. It will ask permission to access the contacts on your device. Simply grant the respected permission to proceed.
3. Now, you can choose if you wish to export all contacts, groups, or selected contacts. Additionally, from the Property Style dropdown menu, you can choose if you wish to export iPhone contacts to CSV, vCard, Gmail, etc.

4. Go with the default option of “Separated” or “Backup” and tap on the Start button to initiate the process.
5. In no time, the app will create a CSV file of your contacts. From here, you can mail yourself the CSV file as well.
6. Furthermore, you can tap on the More option as well. This will allow you to upload the CSV file to any cloud service like Dropbox, OneDrive, Google Drive, etc.

7. For instance, if you wish to upload the file to Dropbox, simply select the provided option and grant the app the needed permissions.
Part 3: Export iPhone contacts to CSV using iCloud
If you don’t want to take the assistance of any third-party app to export iPhone contacts to Excel free, then you can also use iCloud. The process of exporting iPhone contacts to Excel using iCloud is a little tedious compared to other methods. Though, these steps will help you meet your requirements.
1. Before you proceed, make sure that you have already synced your iPhone contacts with iCloud by visiting its Settings on your device.

2. Afterward, go to the official website of iCloud and log in with your credentials. From its welcome page, select the Contacts option.

3. Click on the gear icon (Settings) on the bottom left corner. From here, you can select all contacts in one go. Though, if you wish, you can manually select the contacts you wish to export as well.

4. Once you have made your selection, go to the Settings again and click on the option of “Export vCard”.

5. The exported vCard will automatically be saved in the Downloads folder (or any other default location). Now, you can simply go to a vCard to CSV converter web tool to convert the vCard to a CSV file.

We hope that our quick and smart guide would be able to help you export contacts from Apple iPhone 12 Pro to Excel. Dr.Fone Transfer provides a fast and easy solution export iPhone contacts to CSV and other formats. It can also be used to transfer other types of content between your iOS device and computer too. Give it a try and make the most of your iPhone without any trouble.
How to Transfer Photos from Apple iPhone 12 Pro to other iPhone without iCloud
This article’s content focuses on the importance of photos, and the techniques and tools you require to transfer photos from Apple iPhone 12 Pro to another iPhone without iCloud including iPhone 15.
Photos are important because they reflect our memories, we have so many memories in our brain and it is not easy to pull them all up when required, but photos can help a lot to remember. Photos invoke emotions, sometimes photos are important to remember details, for example, “What did I wear on my last Christmas?”.
Method 1: How to Transfer Photos from Apple iPhone 12 Pro to iPhone without iCloud (All in One Click) [iPhone 15 Included]
The top method to transfer photos from Apple iPhone 12 Pro to iPhone without iCloud is to transfer all the photos in one click. With this method, you can complete the photo transfer even within seconds without any photo loss. All you need are two lightning cables to connect both iPhones to your PC or Mac, and the Dr.Fone - Phone Transfer (iOS & Android) software.
Dr.Fone - Phone Transfer
Easiest Way to Transfer Photos from Apple iPhone 12 Pro to iPhone without iCloud
- Transfer photos from an old iPhone to a new iPhone within seconds.
- Support the transfer of more data like contacts, messages, files, videos, etc. from phone to phone.
- Transfer everything from Apple iPhone 12 Pro to new iPhone , from Android to Android, from Apple iPhone 12 Pro to Android, and from Android to iPhone.
- Supports iPhone, iPad, iPod touch, and the latest iOS version.
- Fully compatible with the latest Windows or Mac version.
3981454 people have downloaded it
Here are the simple steps to transfer photos from Apple iPhone 12 Pro to iPhone without iCloud:
Step 1: Download the Dr.Fone software, open it, and you can see the following interface.
Step 2: Connect both iPhones to your PC and click “Phone Transfer”.

Note: Confirm which iPhone is your destination device and which one is the source. Click “Flip” to swap their positions if necessary.
Step 3: Select the “Photos” option and click “Start Transfer”. Then you can find all photos are transferred from Apple iPhone 12 Pro to iPhone without iCloud.

Video Guide: Transfer photos from Apple iPhone 12 Pro to iPhone without iCloud
Method 2: Transfer Photos from Apple iPhone 12 Pro to iPhone without iCloud (Selective Transfer) [iPhone 15 Included]
When you want to transfer your photos separately without transferring the other iDevice data, there is a perfect tool for you: Wondershare Dr.Fone . This action takes no time at all, and you can transfer the images within a matter of a few seconds. You can also use this phone manager app to transfer data from Apple iPhone 12 Pro to Android and iTunes or vice versa.
In addition, Wondershare Dr.Fone works efficiently without losing data while transferring media files between iOS devices. It can also transfer videos, contacts, messages, etc., from Apple iPhone 12 Pro to iPhone. Here is how to selectively transfer photos from Apple iPhone 12 Pro to iPhone without transferring the complete iPhone data via Wondershare Dr.Fone:
Step 1: Proceed With the Phone Manager feature
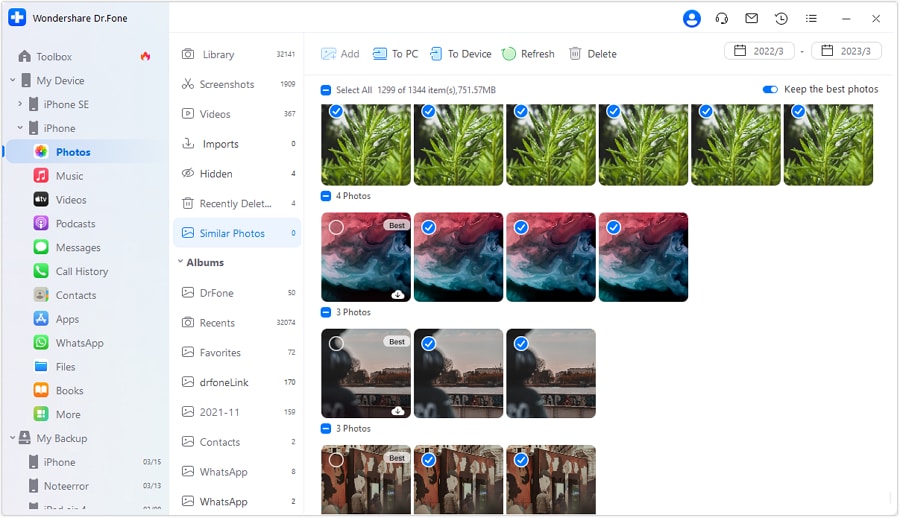
First, you need to install Wondershare Dr.Fone on your computer and connect both your iDevices to the computer using the Apple-certified USB cables. Next, locate the iPhone from which you want to transfer the images and expand it. Choose the “Photos” tab and let Wondershare Dr.Fone load all the pictures.
Step 2: Perform the Selective Photos Transfer
Once Dr.Fone detects all the photos in your iPhone, it will categorize them in the albums like they are in your iDevice. Choose the pictures you want to transfer and tap the “To Device” option. Then, click on the iPhone on which you want to send all the selected images and complete the photo transfer process.
Method 3: Transfer Photos from Apple iPhone 12 Pro to iPhone without iCloud via iTunes [iPhone 15 Included]
Using iCloud for transferring data is convenient, but it is not always practical due to the limitation of maximum data. In that case, iTunes can be a good option, which is another functional software from Apple. Following are the step-by-step instructions to transfer pictures from Apple iPhone 12 Pro to iPhone via iTunes to avoid data storage limitations:
Step 1: To begin with, launch iTunes on your computer and connect your source iPhone. Select the “Phone” icon near the top left corner of iTunes and move to the “Summary” tab. Then, navigate to the “Backups” section and check the “This Computer” option. Then, hit the “Back Up Now” button on the right side to start the backup process of your iDevice.

Step 2: Once the backup process is complete, disconnect the old iDevice. Next, you need to connect your new iPhone and proceed to the “Backups” section in the “Summary” tab. Here, tap “Restore Backup” and go on to choose the most recent backup. To complete the photo transfer process, tap “Restore” and wait for the backup to be restored.

Method 4: Transfer Photos from Apple iPhone 12 Pro to iPhone without iCloud via AirDrop [iPhone 15 Included]
AirDrop gives its users the wireless facility to transfer iPhone photos in a quick manner. Unlike iCloud or iTunes, it does not need to sync all the photos. You just have to select the photos from one of your iPhones and AirDrop them to another. However, the other iPhone should be within the Bluetooth and Wi-Fi range of the host iDevice. Here are the instructions you need to follow to AirDrop photos from old iPhone to new iPhone efficiently:
Step 1: On your old iPhone, you need to open the “Photos” app and hop into the desired folder. Next, pick the photos you want to share by tapping the “Select” button in the upper right corner.
Step 2: Following this, you will have to tap the “Share” icon, followed by selecting the targeted “AirDrop” recipient iPhone. Then, on the target iPhone, you have to choose “Accept” to receive them.

Tip: How to Transfer Photos from Apple iPhone 12 Pro to iPhone using iCloud
Step 1. To transfer the photos from your iPhone to another iPhone you must make sure that you make a backup through iCloud.
Step 2. On the home screen tap Settings. Once entered in settings tap iCloud.

Step 3. In the iCloud menu, you need to click on photos. Once entered in photos turn on the iCloud Photo Library option along with upload my photostream.
Step 4. When you are done your photos will be uploaded to iCloud and you can restore them by simply adding the iCloud id to the new iPhone device.
Editor’s Picks:
- 5 Ways to Transfer Everything from Old iPhone to your new iPhone
- 5 Ways to Transfer Photos from Apple iPhone 12 Pro to PC with/without iTunes
If you do not want to use iCloud for data transfer, run Dr.Fone - Phone Transfer on your computer and transfer data in one click quickly.
4 Quick Ways to Transfer Contacts from Apple iPhone 12 Pro to iPhone With/Without iTunes
“How to transfer contacts from Apple iPhone 12 Pro to iPhone without using iTunes? I have got a new iPhone, but can’t seem to transfer contacts from Apple iPhone 12 Pro to iPhone without iTunes.”
Lately, we have got plenty of queries like this from our readers who like to learn how to transfer contacts from Apple iPhone 12 Pro to iPhone, such as iPhone 12/ 12 Pro (Max)/ 12 Mimi without iTunes. After all, when we get a new iPhone, this is the first thing that comes to our mind. If you are also going through the same dilemma, don’t worry as we have a perfect solution. This post will teach you how to transfer contacts from Apple iPhone 12 Pro to iPhone without iTunes and transfer contacts with iTunes.
Part 1: Transfer Contacts from Apple iPhone 12 Pro to iPhone Including iPhone 12/ 12 Pro (Max)/ 12 Mini with iTunes
To start with, let’s learn how to transfer contacts from Apple iPhone 12 Pro to iPhone using iTunes. If you have an updated version of iTunes, you can transfer and sync your data between various devices. Ideally, you can either sync your contacts or backup and restore them. We have discussed both of these techniques to transfer contacts from Apple iPhone 12 Pro to iPhone with iTunes.
Method 1: Backup and Restore iPhone contacts with iTunes
This is the easiest approach to learn how to transfer contacts from Apple iPhone 12 Pro to iPhone with iTunes. In this, we will first take a backup of our old phone (including contacts) and later restore the backup to a new device. Needless to say, all the existing data on the target device would be erased, and with your contacts, the entire backup will be restored.
- 1. Firstly, connect your existing iPhone to your system and launch iTunes.
- 2. Select your device and visit its Summary section.
- 3. Under the Backups section, choose to take a backup on the local computer.
- 4. In the end, click on the “Backup Now” button and wait for iTunes to backup your device entirely.

- 5. Once you have taken a backup locally, you can connect the target device and go to its Summary.
- 6. From here, click on the “Restore Backup” and select the target backup and device.

In this way, your entire backup (including contacts) would be restored, and you can transfer contacts from Apple iPhone 12 Pro to iPhone with iTunes.
Method 2: Sync Contacts with iTunes
If you only wish to transfer your contacts, then it can be achieved by syncing your device. To learn how to transfer contacts from Apple iPhone 12 Pro to iPhone using iTunes, follow these steps:
- 1. Firstly, connect your existing iPhone to your system and launch an updated version of iTunes.
- 2. Select the Apple iPhone 12 Pro device and go to its “Info” tab. From here, enable the option of “Sync Contacts”. You can either select all contacts or selected groups.
- 3. After making your selection, click on the Sync button and wait for it to complete the process.

- 4. Now, disconnect the Apple iPhone 12 Pro device and connect your target iPhone to it.
- 5. Follow the same drill, go to its Info tab, and enable the option to “Sync Contacts”.
- 6. Additionally, you can visit its Advanced section and replace the old contacts with the new ones as well.
- 7. Once you have selected the option, click on the “Sync” button.

In this way, you would be able to learn how to transfer contacts from Apple iPhone 12 Pro to iPhone with iTunes easily.
Part 2: 1-Click to transfer contacts from Apple iPhone 12 Pro to iPhone, Including iPhone 12/ 12 Pro (Max)/ 12 Mini without iTunes
As you can see, learning how to transfer contacts from Apple iPhone 12 Pro to iPhone using iTunes can be a little complicated. Therefore, we recommend using trying Dr.Fone - Phone Transfer . It provides a one-click solution to transfer the data of your choice from one device to another. The tool comes with an intuitive process and has a free trial as well. It is compatible with every leading iOS device (including devices running on iOS 14).
Besides transferring your contacts, you can also move other data files like photos, videos, calendars, messages, music, etc. It can also transfer data between different platforms (like Android to iOS, iOS to Windows, and more). To learn how to transfer contacts from Apple iPhone 12 Pro to iPhone without iTunes, follow these steps:
Dr.Fone - Phone Transfer
1-Click to Transfer Contacts from Apple iPhone 12 Pro to iPhone without iTunes
- Easy, fast, and safe.
- Move data between devices with different operating systems, i.e., iOS to Android.
- Supports iOS devices that run the latest iOS

- Transfer photos, text messages, contacts, notes, and many other file types.
- Supports over 8000+ Android devices. Works for all models of iPhone, iPad, and iPod.

4,777,470 people have downloaded it
- 1. To start with, launch Dr.Fone and select the option of “Phone Transfer” from its welcome screen.
- 2. Now, connect the source and the target iOS device to your system and wait for them to be detected.
- 3. Dr.Fone - Phone Transfer follows an intuitive process and automatically lists the Apple iPhone 12 Pro devices as Source and Destination. Though, you can click on the “Flip” button to exchange their positions.

- 4. Now, select the type of data you wish to transfer. For instance, if you want to move only contacts, select “Contacts” and click on the “Start Transfer” button. Additionally, you can select the option of “Clear data before copy” and delete the existing data on the target iPhone.
- 5. This will initiate the process and start the transfer process. You can view the progress from the on-screen indicator. Make sure that both the Apple iPhone 12 Pro devices are connected at this stage.
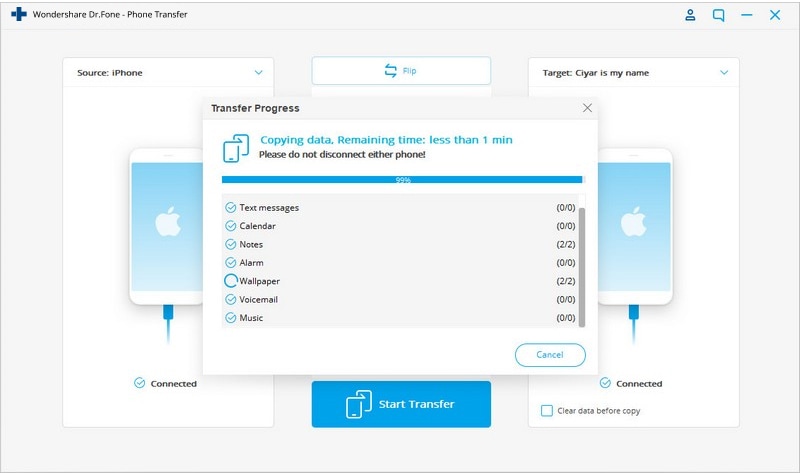
- 6. Once the process is complete, you will be notified. In the end, you can safely remove both the Apple iPhone 12 Pro devices and use them the way you like.

Here is the video tutorial for you:
Part 3: Transfer iPhone contacts to iPhone Including iPhone 12/ 12 Pro (Max)/ 12 Mini without iTunes using Gmail
As you can see, Dr.Fone Phone Transfer provides a one-click solution to transfer your data from one iPhone to another. Though, if you want to try another option, then you can take the assistance of Gmail. Even though this is a more cumbersome process, it will meet your basic requirements. To learn how to transfer contacts from Apple iPhone 12 Pro to iPhone without iTunes, you can try this approach.
- 1. If you are not using Gmail on your device, go to the Accounts settings and log in to your Gmail.
- 2. Afterwards, go to the Apple iPhone 12 Pro device’s Settings > Mail, Contacts, Calendar > Gmail and turn on the option of Contacts.

- 3. Now, you can follow the same drill on the target device and sync your Gmail contacts.
- 4. Alternatively, you can visit your Gmail account on your desktop and go to its Contacts.
- 5. Select the contacts you wish to transfer and click on the “Export” button.

- 6. Choose to export your contacts to a vCard format. Once a vCard is created, you can manually move it to the target iPhone to import contacts from it.

Part 4: Transfer Contacts from Apple iPhone 12 Pro to iPhone Including iPhone 12/ 12 Pro (Max)/ 12 Mini without iTunes using Bluetooth
If nothing else would work, you can transfer contacts from one iPhone to another using Bluetooth. It might be time-consuming, but it is also one of the easiest ways to learn how to transfer contacts from Apple iPhone 12 Pro to iPhone without iTunes.
- 1. Turn on Bluetooth on both devices and make sure they are nearby.
- 2. You can always go to the Bluetooth settings of the source device and pair both devices.

- 3. Now, go to its Contacts and select the ones you wish to transfer.
- 4. Tap on the Share button and select the target device from the list of options.

- 5. Accept the incoming data on the target iPhone to complete the process.
After following these steps, you can learn how to transfer contacts from Apple iPhone 12 Pro to iPhone with iTunes and without it. Besides these methods, you can also AirDrop the contacts or sync them via iCloud as well. As you can see, there are numerous ways to transfer contacts from Apple iPhone 12 Pro to iPhone with iTunes (and without it) that you can try. We recommend Dr.Fone Phone Transfer as it is one of the easiest and fastest ways to transfer data between different devices.
Also read:
- [Updated] 2024 Approved Effective Strategies for Twitter Marketing
- [Updated] Explore Top 10 iPhone/Android Intro Creation Software
- 4 Ways to Sync Contacts from Apple iPhone 14 to iPad Easily | Dr.fone
- Effortless Ways to Transfer Data from Your Apple iPhone 7 to iPhone 15 | Dr.fone
- Ensure Flawless Play with Fixing Xbox One Controller
- Full Guide How To Fix Connection Is Not Private on Vivo V30 Lite 5G | Dr.fone
- G2 Tutorial - Bypass Lock Screen,Security Password Pin,Fingerprint,Pattern
- How to Successfully Fix Failed HCOM Monitor Driver Setup Errors
- In 2024, Capture the Blue Depths Pro Tips for GoPro Water Filming
- In 2024, Effective Ways To Fix Checkra1n Error 31 From iPhone 13
- In 2024, Fix Apple iPhone SE (2020) Stuck on Data Transfer Verified Solution! | Dr.fone
- In 2024, How to Copy Contacts from Apple iPhone 14 Plus to SIM? | Dr.fone
- In 2024, How To Transfer From Apple iPhone 12 to Samsung Simplified Guide | Dr.fone
- In 2024, How to Transfer from Apple iPhone 14 Pro to iPhone 8/11/11 Pro | Dr.fone
- In 2024, Various Methods to Transfer Pictures from Apple iPhone 7 to PC | Dr.fone
- The Rise of Horizontal PC Cases as the Ultimate Choice in Motherboard Enclosures – Insights Revealed
- Title: 3 Ways to Export Contacts from Apple iPhone 12 Pro to Excel CSV & vCard Easily | Dr.fone
- Author: Charlotte
- Created at : 2024-11-03 17:33:37
- Updated at : 2024-11-04 17:36:28
- Link: https://iphone-transfer.techidaily.com/3-ways-to-export-contacts-from-apple-iphone-12-pro-to-excel-csv-and-vcard-easily-drfone-by-drfone-transfer-from-ios/
- License: This work is licensed under CC BY-NC-SA 4.0.