
3 Ways to Export Contacts from Apple iPhone 12 Pro Max to Excel CSV & vCard Easily | Dr.fone
3 Ways to Export Contacts from Apple iPhone 12 Pro Max to Excel CSV & vCard Easily
A lot of readers have asked us how to export contacts from Apple iPhone 12 Pro Max to Excel. After all, it allows them to keep their contacts handy and transfer them to any other device pretty easily. Though, if you are using an iOS device, then you might find it hard to export iPhone contacts to CSV at first. Nevertheless, there are some smart and quick ways of exporting iPhone contacts to Excel that every iOS user should know. In this guide, we will teach you in three different ways, how to export iPhone contacts to Excel free.
Part 1: How to export contacts from Apple iPhone 12 Pro Max to Excel using Dr.Fone - Phone Manager (iOS)
If you are looking for a hassle-free solution to export contacts from Apple iPhone 12 Pro Max to Excel, then try Dr.Fone - Phone Manager (iOS) . It is a part of the Dr.Fone toolkit, which is developed by Wondershare. The desktop application is available for both Windows and Mac, and comes with a free trial as well. Therefore, you can export iPhone contacts to Excel free using Dr.Fone - Phone Manager (iOS). The tool works flawlessly with all the leading versions of iOS, including iOS 11.
It would be a one-stop solution to transfer all kinds of content between your iOS device and computer. Besides exporting iPhone contacts to Excel, you can also move photos, messages, music, and more. It can also be used to transfer iTunes media as well. The best part is that you don’t need to use iTunes (or any other complicated tool) to export iPhone contacts to CSV. All you need to do is follow these simple steps:
Dr.Fone - Phone Manager (iOS)
Transfer MP3 to iPhone/iPad/iPod without iTunes
- Transfer, manage, export/import your music, photos, videos, contacts, SMS, Apps etc.
- Backup your music, photos, videos, contacts, SMS, Apps etc. to computer and restore them easily.
- Transfer music, photos, videos, contacts, messages, etc from one smartphone to another.
- Transfer media files between iOS devices and iTunes.
- Fully compatible with iOS 7, iOS 8, iOS 9, iOS 10, iOS 11 and iPod.
4,244,162 people have downloaded it
1. First of all, connect your iOS device to your system using an authentic cable and launch Dr.Fone on it. From the welcome screen, you need to select the “Transfer” module.

2. Since the tool follows an intuitive process, it will automatically detect your iPhone and prepare it for the transfer process. Once it is ready, you will get the following interface.

3. Instead of selecting options from its home, go to the “Information” tab.
4. The Information tab will have data related to your device’s contacts and SMS. You can switch between Contacts and SMS from their selective options on the left panel.
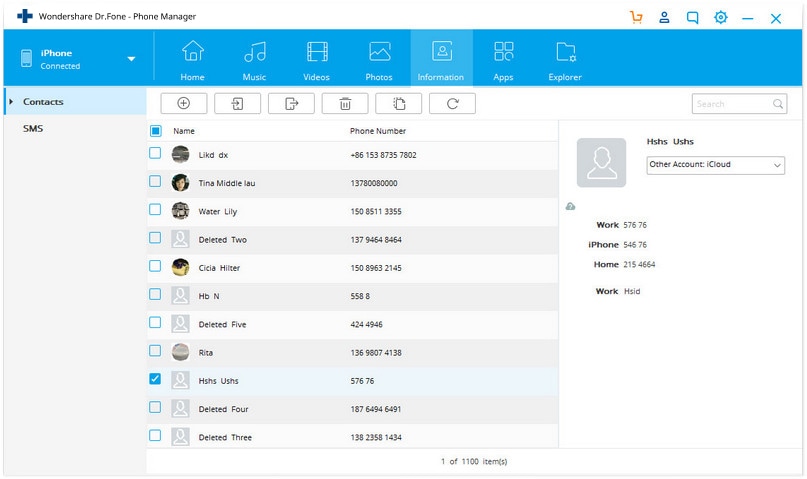
5. Now, to export contacts from Apple iPhone 12 Pro Max to Excel, go to the “Contacts” tab from the left panel. This will display all the contacts saved on your device. From here, you can add a contact, delete it, sort them, etc.
6. Select the contacts that you wish to export. You can even look for a contact from the search bar. If you wish to export the entire list, then check the select all button.
7. After making your selections, click on the Export icon on the toolbar. The tool will allow you to export contacts in different formats like CSV, vCard, etc. Select the “to CSV File” option.
That’s it! In this way, you would be able to automatically export iPhone contacts to CSV. Now you can just visit the location and copy the file to any other device.
Part 2: Export iPhone contacts to Excel free using SA Contacts Lite
You can also try SA Contacts Lite to export iPhone contacts to Excel free as well. It is a freely available app that can be downloaded from the App Store. The app can be used to import and export your contacts in different formats. It makes the process of exporting iPhone contacts to Excel pretty easy. You can make it work with these simple steps:
1. Firstly, download SA Contacts Lite on your iPhone. Whenever you wish to export contacts from Apple iPhone 12 Pro Max to Excel, launch the app.
2. Go to the “Export” section of the app. It will ask permission to access the contacts on your device. Simply grant the respected permission to proceed.
3. Now, you can choose if you wish to export all contacts, groups, or selected contacts. Additionally, from the Property Style dropdown menu, you can choose if you wish to export iPhone contacts to CSV, vCard, Gmail, etc.

4. Go with the default option of “Separated” or “Backup” and tap on the Start button to initiate the process.
5. In no time, the app will create a CSV file of your contacts. From here, you can mail yourself the CSV file as well.
6. Furthermore, you can tap on the More option as well. This will allow you to upload the CSV file to any cloud service like Dropbox, OneDrive, Google Drive, etc.

7. For instance, if you wish to upload the file to Dropbox, simply select the provided option and grant the app the needed permissions.
Part 3: Export iPhone contacts to CSV using iCloud
If you don’t want to take the assistance of any third-party app to export iPhone contacts to Excel free, then you can also use iCloud. The process of exporting iPhone contacts to Excel using iCloud is a little tedious compared to other methods. Though, these steps will help you meet your requirements.
1. Before you proceed, make sure that you have already synced your iPhone contacts with iCloud by visiting its Settings on your device.

2. Afterward, go to the official website of iCloud and log in with your credentials. From its welcome page, select the Contacts option.

3. Click on the gear icon (Settings) on the bottom left corner. From here, you can select all contacts in one go. Though, if you wish, you can manually select the contacts you wish to export as well.

4. Once you have made your selection, go to the Settings again and click on the option of “Export vCard”.

5. The exported vCard will automatically be saved in the Downloads folder (or any other default location). Now, you can simply go to a vCard to CSV converter web tool to convert the vCard to a CSV file.

We hope that our quick and smart guide would be able to help you export contacts from Apple iPhone 12 Pro Max to Excel. Dr.Fone Transfer provides a fast and easy solution export iPhone contacts to CSV and other formats. It can also be used to transfer other types of content between your iOS device and computer too. Give it a try and make the most of your iPhone without any trouble.
Should I Switch From iPhone To Google Pixel?
The battle between smartphone giants has been a consistent source of intrigue for consumers. Through every new launch, tech giants such as Apple and Google introduce impressive functions. These allure users with the prospect of improved efficiency and seamless usability. This prompts the fundamental query of whether one should consider switching from an iPhone to a Pixel.
Amid the ongoing discourse about these two devices, it becomes imperative to go through the advantages and disadvantages inherent to each. This serves to equip you with the necessary insights for making a choice that aligns with your preferences. In this guide, we will explore the key considerations to contemplate when switching from an iPhone to a Google Pixel.
Part 1: What Is The Google Pixel?
An Android smartphone launched by Google in 2016, Google Pixel was designed to replace the Nexus. Similar to Nexus, the Pixel operates a “stock version” of Android, which means that it gets updates as soon as they’re released. Other Android smartphones sometimes delay updates for weeks or even months. The Google Pixel comes with free unlimited photo storage on Google Photos. Additionally, Google Photos for the Pixel doesn’t compromise the photo quality in order to save room. Well, there is much more to explore about Google Pixel.
Key Specifications-
- OS- Android 7.1 and upgradable to Android 10.
- Internal Memory - 32GB 4GB RAM, 128GB 4GB RAM
- Main Camera - 12.3 MP & Selfie Camera - 8 MP.
- Premium design with fingerprint sensors
- Headphone Jack & USB Type -C
- Larger and crisper display
Let’s first have a quick look at all versions of it:
- Google Pixel & Google Pixel XL- Launched in 2016, these come with a circular icon theme and offer free unlimited full-quality photo storage.
- **Google Pixel 2 & Google Pixel 2XL -**The 2nd generation Google Pixel was launched in 2017. The XL version contains very slim bezels, like iPhone X smartphones. It even facilitates a far better camera in comparison to its competitors.
- Google Pixel 3 & Google Pixel 3 XL - Launched in 2018, Google Pixel 3 followed the trends of the first two phones. Enhancements to the display, screen, and camera were made and other improvements as well. The Pixel 3 XL even has entails a top-notch, like the iPhone X. However, you have the choice to remove the notch by disabling the display at the top. It also comes with a wireless charging feature.
- Google Pixel 3a & Google Pixel 3a XL - They are less expensive versions of the 3 and 3 XL. The notable difference is that 3a entails a single selfie camera, whereas 3 has a dual selfie camera.
- Google Pixel 4 & Google Pixel 4 XL - Launched in 2019, the fourth generation drastically enhanced face unlock. A 3rd rear-facing camera was introduced to the Apple iPhone 12 Pro Max device. On the phone’s front, the notch was substituted by a standard top bezel.
- Google Pixel 4a & Pixel 4a 5G - Released in 2020, the Pixel 4a was a more affordable variant that retained many features from its predecessor. It offered a compact design, a single impressive rear camera, and the latest Android software. The Pixel 4a 5G shared similarities with the Pixel 4a but introduced 5G connectivity and a larger display.
- Google Pixel 5 & Pixel 5a 5G - The Pixel 5, released in 2020, focused on a balance of performance and price. It featured a mid-range Snapdragon processor, 5G capability, and an improved camera system. The Pixel 5a 5G, introduced in 2021, continued the legacy of affordable yet capable Pixel devices, enhancing the camera and offering 5G connectivity.
- Google Pixel 6, Pixel 6 Pro & Pixel 6a - Launched in 2021, the Pixel 6 series marked a significant departure in design and hardware for Google. The devices featured Google’s custom Tensor chip, aiming for enhanced AI capabilities. The Pixel 6 Pro boasted a larger, higher-resolution display and additional camera features than the standard Pixel 6 model. Both phones focused on camera advancements, software enhancements, and unique design aesthetics. The Pixel 6a continued to be the affordable version of the Google Pixel 6 series.
- Google Pixel 7, Pixel 7 Pro & Pixel 7a - Arrived in 2022, the Google Pixel 7 series came equipped with Google’s 5nm Tensor G2 chip and powerful 50MP camera. It also boasts 8 GB of RAM and a long-lasting battery. The Pixel 7 Pro is the higher-end product of the series. It has additional camera enhancements and more RAM or storage options. The Pixel 7a is a more affordable variant with some compromises in hardware specifications compared to the higher-end models.
- Google Pixel 8 & Pixel 8 Pro - Running on a Powerful 4nm Google Tensor G3 chip, Google Pixel 8 and Pixel 8 Pro are the latest devices in the Pixel series. The RAM has increased in these devices, with the Pixel 8 boasting 8 GB RAM and 12 GB for Pixel 8 Pro.
Considering key specifications and features, it is definitely worth switching from Apple iPhone 12 Pro Max to Pixel, especially if it has been a long time since you’ve been using an Apple device.
Part 2: Notice That You Should Know Before Switching from iPhone To Google Pixel
Before you switch iPhone to Pixel 2, there are certain things to consider or you need to do, so let’s have a look at them-
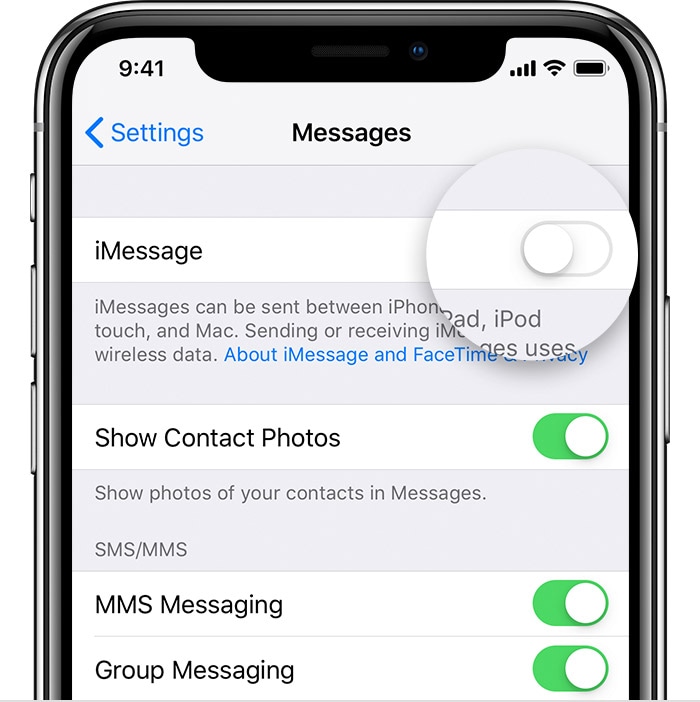
1- Disable iMessage
When messaging other iPhones from your iDevice, they’ll communicate through iMessage when you connect to the internet. That’s different from usual SMS texting. And if you leave iMessage switched on your iPhone, many of your messages will be routed via that service. If you’re on a new Google Pixel smartphone, you won’t get any of those texts. Thus, you need to turn off iMessage before you make that switch. While you’re here, disable FaceTime.
2- You Might Need to Buy Your Apps Again
Have you pay-front apps on your iDevice that you paid for? If so, then you’ll probably need to purchase them again from the Google Play Store if you want those apps on your Google Pixel phone as well. The App Store and Google Play Store are entirely different entities and the housed apps are designed for different platforms. Some apps you had on your iDevice may not even be accessible for your Google Pixel device and vice-versa. However, if you’ve subscribed to a service such as Spotify, you just have to get the app and sign in to your new Android device and that’s it.
3- Re-Sync Your Crucial Data
If you have all of your calendar events, contacts, documents, and photos synced with iCloud and all is on your iPhone, you’ll probably need to re-sync all on your Google Pixel device. Android’s cloud version is housed in Google apps such as Gmail, Contacts, Docs, Drive, etc. When you set up your Google Pixel, you’ll create and set up a Google account. From this point, you can sync some of the iCloud content with the Google account, thus you won’t need to re-enter lots of info.
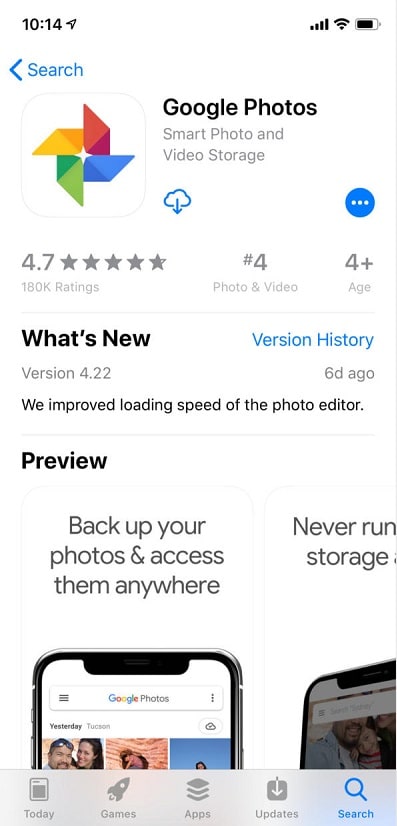
4- Back up Photos to Transfer them from Apple iPhone 12 Pro Max to Google Pixel with Ease
The easiest way to transfer your pictures from your iPhone to Google Pixel is to use the Google Photos app for iPhone. Log in with your Google account, click the backup and sync option from the menu, and then, get Google Photos on your Google Pixel and log in.
5- Back Up Your iPhone Data to Avoid Data Loss
1. Using iCloud Backup
To begin, link your iPhone to a Wi-Fi network. Then, navigate to the Settings app and tap on your name, followed by selecting “iCloud.” Scroll down within the options and locate “iCloud Backup.” Switch on the “iCloud Backup” option and proceed to tap “Back Up Now” to immediately initiate the backup process. Make sure to verify that the backup is fully completed before moving forward.
![]()
2. Using iTunes on a Computer
Begin by linking your iPhone to a computer using a USB cable. Launch iTunes and pick your device from the list. Navigate to the “Summary” segment and opt for the “Back Up Now” selection. This action will generate a comprehensive backup of all your iPhone data on the computer.
![]()
3. Wondershare Dr.Fone
![]()
Wondershare Dr.Fone
One click to back up your iPhone data!
- One-click to back up the whole iOS device to your computer.
- Allow previewing and selectively export from Apple iPhone 12 Pro Max to your computer.
- No data loss on devices during the restoration.
- Works for all iOS devices. Compatible with the latest iOS version.


3981454 people have downloaded it
The most advanced and reliable phone backup toolkit is Wondershare Dr.Fone because it helps you back up data without worrying about storage space. It also provides the Incremental feature through which your iPhone is backed up without connecting to the computer.
Furthermore, you can preview data stored in your iPhone backup file and restore specific data to your iDevice. It can also restore your iCloud/iTunes backup to your iPhone/Google Pixel without factory resetting the Apple iPhone 12 Pro Max device.

Part 3: How Many Data Can I Email To Google Pixel?
Thinking about transferring data from Apple iPhone 12 Pro Max to Google Pixel by Email? Well, it is the best option only if you want to transfer small-size files and not much data. And yes, there is a limit to how many or much data can you email to your new Google Pixel device.
The email size limit is 20 MB for some platforms and 25 megabytes for others. For instance, if you want to send a video from your iPhone to your new Google Pixel device, then the video should be less than 15 or 20 seconds long to share via email.
Part 4: One-Stop Solution to Switch Data From iPhone To Google Pixel
If you want a one-stop solution to transfer data from Apple iPhone 12 Pro Max to Google Pixel, then you need to rely on a powerful phone-to-phone data transfer software like Dr.Fone - Phone Transfer . With its assistance, you can transfer contacts both in a cloud account and phone memory along with videos, photos, text messages, etc from Apple iPhone 12 Pro Max to Google Pixel in just one click.
To help you learn how to use Dr.Fone - Phone Transfer program for switching iPhone to Google Pixel 3, below is the simple guide-
Step 1: Get the Dr.Fone - Phone Transfer on your computer and then run it. Then, choose the “Phone Transfer” option.
Step 2: After that, connect both of your devices to the computer and let the software detect them. And ensure that iPhone is selected as a source and Google Pixel as the target and select the files you want to transfer.

Step 3: Finally, hit the “Start Transfer” button to begin the transfer and that’s it.
And if you ever want to get back to your iPhone, then you would probably wonder how to switch from Pixel to iPhone. In that case, all you need is a phone-to-phone data transfer app like Dr.Fone - Phone Transfer to make the switch successful with all the data you need on your new device.
The Bottom Line
Switching between the iPhone and Google Pixel demands thoughtful deliberation, as evidenced by the ongoing debate. Factors like OS preferences, app compatibility, and data synchronization need to be considered. While the transition process may seem daunting, many tools can simplify the switch. They ensure a smooth experience of switching from Apple iPhone 12 Pro Max to Google Pixel.
In this context, Wondershare Dr.Fone emerges as a comprehensive and user-friendly solution. It helps you in transferring data from an iPhone to a Google Pixel. With its versatile data transfer capabilities and emphasis on data security, Dr.Fone offers a reliable and efficient data transfer method.
How to Move Custom Ringtones from Apple iPhone 12 Pro Max to Android?
“Is it hard to move custom ringtones from Apple iPhone 12 Pro Max to Android?”
Apple has always emphasized IOS’s superiority over Android. Making it easier to transfer music files, ringtones from Apple iPhone 12 Pro Max to Android was never Apple’s priority. There are times when people feel the urge to transfer iPhone ringtones for android. The process is easy but it requires a bit of manual intervention on user’s behalf. Sometimes the entire data needs to backed up or transferred to another device. In this article, we will explain clearly on how to move custom ringtones from Apple iPhone 12 Pro Max to Android without any fuss.
Part 1. How to move custom ringtones from Apple iPhone 12 Pro Max to Android?
IOS’s file extension of a ringtone is .m4r whereas on an Android device a file with .m4a can be selected as the ringtone. This is the primary reason to change the extension when ringtones files are needed to be transferred from Apple iPhone 12 Pro Max to Android and vice versa.
Before we proceed, it is important to let you know that making ringtones from Apple music is not possible with any application since they are encrypted by Apple.
There are a dramatic number of versatile apps for all purposes related to iTunes, Android, IOS devices. With help of third party Phone Manager, you can manage all activities of your contacts right from your Desktop. Simply a hassle free as well convenient way. Here we will introduce Dr.Fone - Phone Manager (iOS) due to its important feature of the ability to provide so many functionalities without iTunes.
You can also explore all the files of your Device from your computer. With the help of this option, you can manually select an individual file to copy it on your computer.
Dr.Fone - Phone Manager (iOS)
One Stop Solution to Make and Manage iPhone Ringtones
- Transfer, manage, export/import your music, photos, videos, contacts, SMS, Apps etc.
- Backup your music, photos, videos, contacts, SMS, Apps etc. to computer and restore them easily.
- Transfer music, photos, videos, contacts, messages, etc from one smartphone to another.
- Highlighted features such as fix iOS/iPod, rebuild iTunes Library, file explorer, ringtone maker.
- Fully compatible with iOS 7, iOS 8, iOS 9, iOS 10, iOS 11, iOS 12, iOS 13, iOS 14, iOS 15, iOS 16, iOS 17 and iPod.
3,426,808 people have downloaded it
There are many online tools also which claims to provide similar services. However, it is crucial to note that trustful application will increase your experience in comparison of other unreliable apps that could spy and harm your devices.
Here are the methods to successfully transfer iPhone ringtones for android and we will show you how to custom iPhone ringtones as well.
Transfer iPhone Ringtones for Android with a Trustful App
Step 1 Dr.Fone - Phone Manager (iOS) allows the transfer of selected media files like videos and ringtones. To do that, you need to install the application first. Connect your IOS device and run the application.
Step 2 Choose the source device that you want to transfer from.
Step 3 Go to the “Music” tab. Select the Ringtones option on the left sidebar. Choose the ringtone you want to transfer and go to “Exports” option and select the “Export to …….” Where “……” is your Samsung device in this example. You can export the files to as many IOS, Android devices you want.
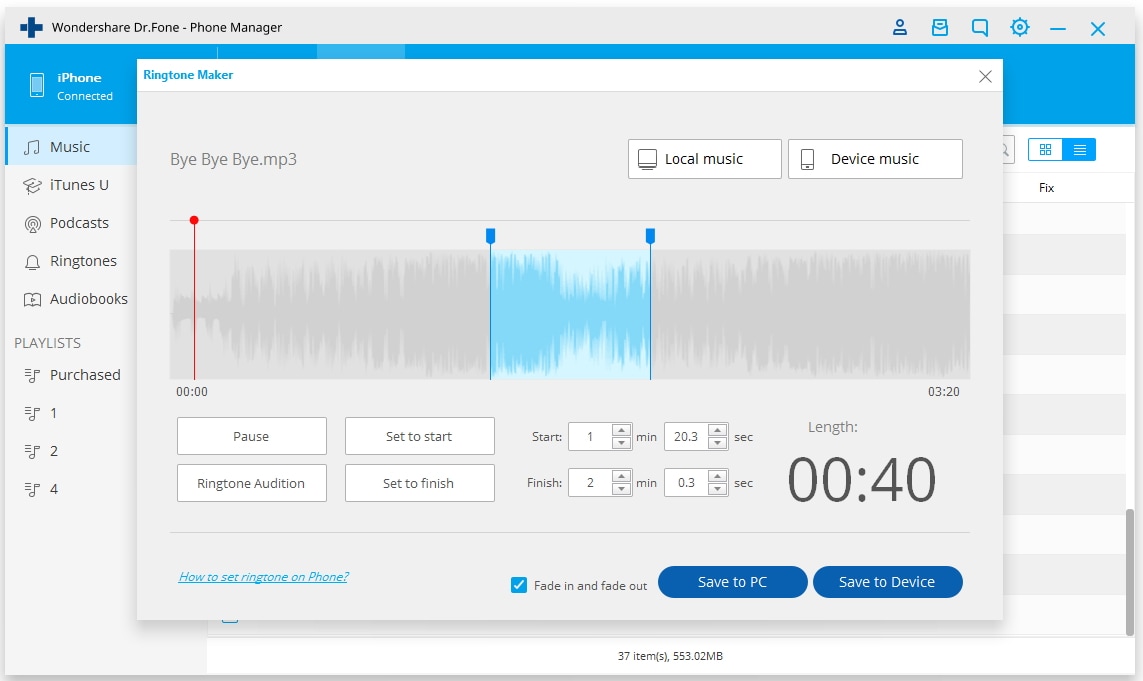
Part 2. How to Make Ringtones for iPhone?
Creating Ringtones for iPhone is easy and convenient with Dr.Fone - Phone Manager (iOS).
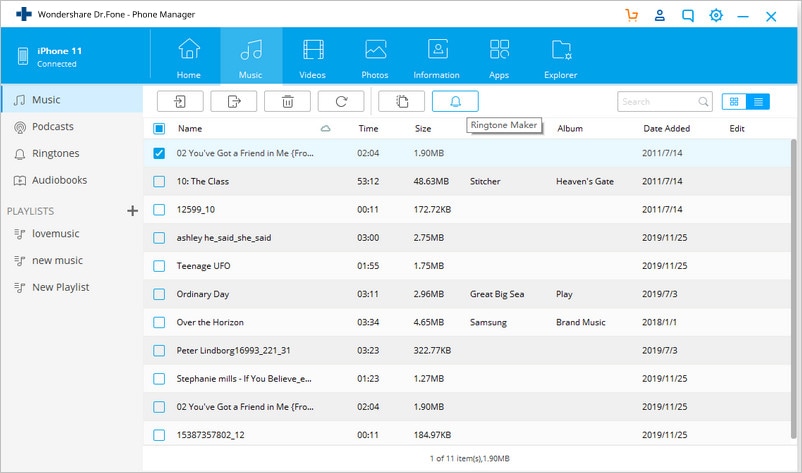
Step 1 Install and run Dr.Fone - Phone Manager (iOS). Connect your device to the computer and click on the “Music” tab.
Step 2 Then click on “Ringtone maker”. Or you can also select individual music file and right click on it to select the “Ringtone Maker”.
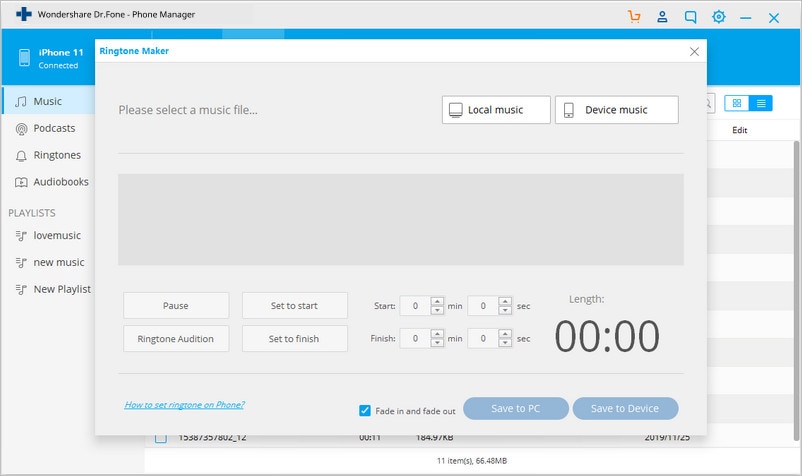
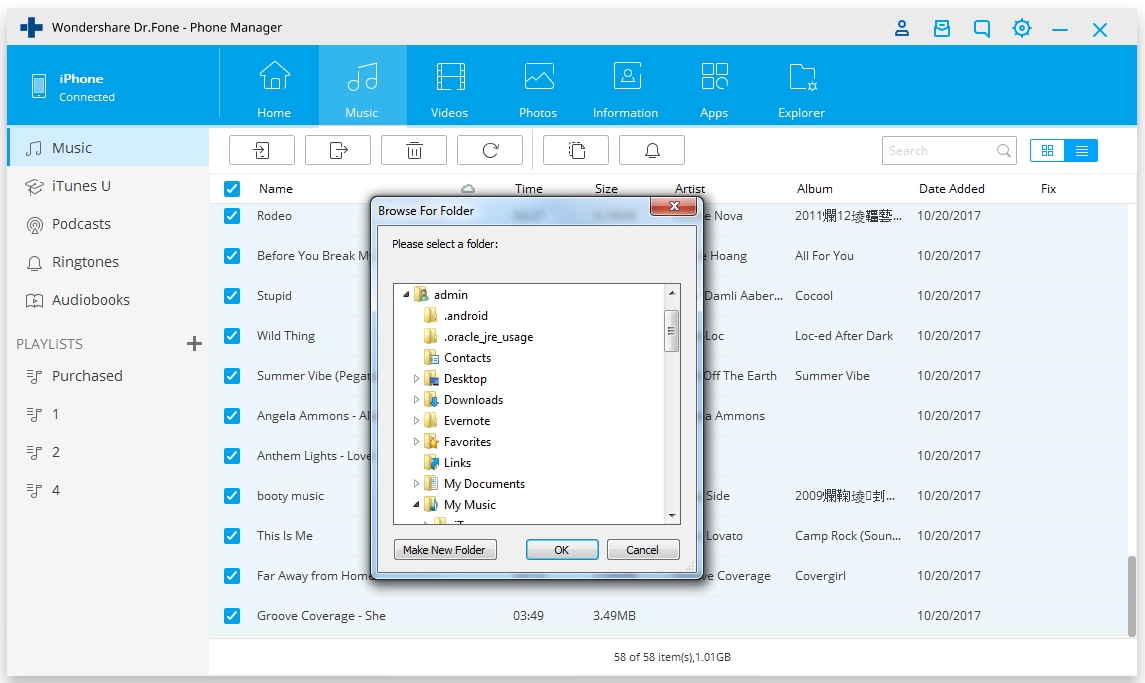
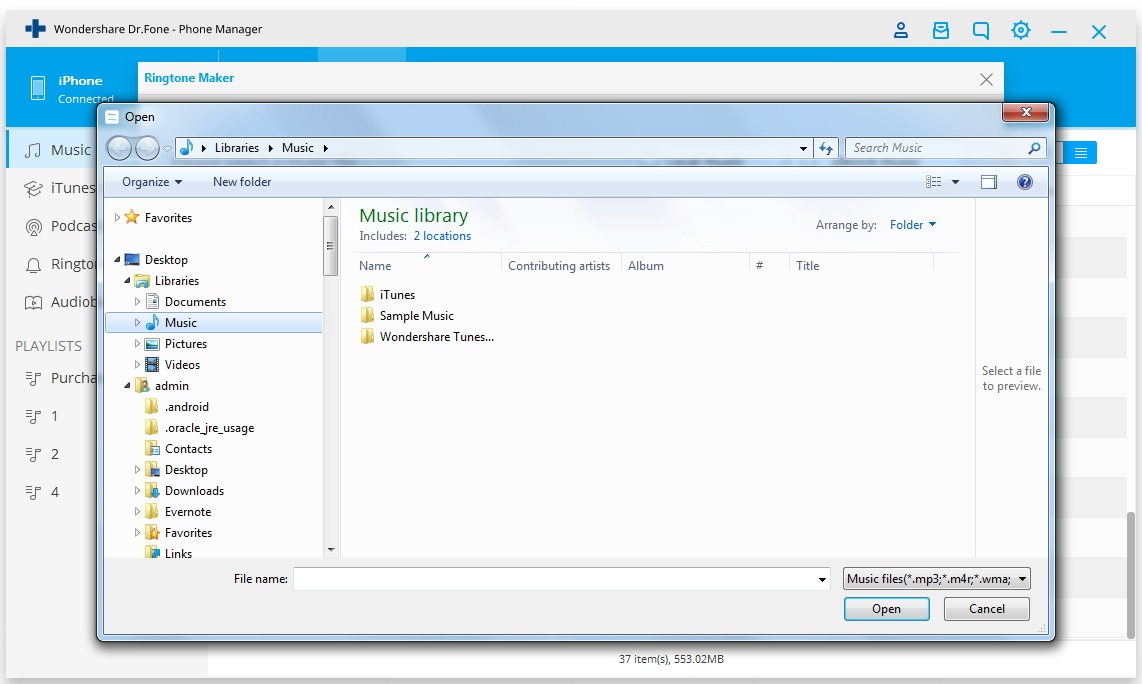
Step 3 A new window will pop up. To select the files from your computer, click on “Local Music”. To select files from your connected device, click “Save to Device”.
Step 4 You can select the start and finish time for the duration of your ringtone. To preview the ringtone, you need to click on the “Ringtone Audition”. Once you have mentioned the start and finish time, click on “Save to PC” or “Save to Device”.
With so many applications in the market related to services of iTunes, it is hard to try and test each one of them. Placing a high value on User experience and convenience, Dr.Fone - Phone Manager (iOS) was created to offer as many functionalities as possible.
Be it backing up IOS data on your computer or transferring music files from your IOS to Android Device, Dr.Fone - Phone Manager (iOS) does everything. The app is light and does not hog on memory resources. The design and interface is simplistic yet appealing.
Because of the above factors, Dr.Fone - Phone Manager (iOS) is widely used all over the world. Try Dr.Fone - Phone Manager (iOS) for making ringtones in iPhone. The trial version allows you to use the software for limited time. With nominal pricing you will get lifetime license with access to newer updates which would help in improving the efficiency of the product.
In case of technical concern, you can always contact our customer representative. This service is available only to premium customers. We also offer a 30-day money back guarantee.
Also read:
- [New] Framerate and Quality in Game Recorders Explored
- 3 Ways to Unlock Apple iPhone 11 Pro without Passcode or Face ID
- 5 Tutorials on How to Transfer Photos From Apple iPhone 15 Pro to New iPhone | Dr.fone
- Best Strategies for Effective Thumb Drive Data Retrieval
- Game Changer Review DJI Mavic Air Takes on Spark
- How to Copy Contacts from Apple iPhone 6 to SIM? | Dr.fone
- How to Move Custom Ringtones from Apple iPhone 11 Pro to Android? | Dr.fone
- How To Transfer From Apple iPhone 6s to Samsung Simplified Guide | Dr.fone
- How To Transfer Messages From Apple iPhone 11 to other iPhone All iOS Versions | Dr.fone
- How to Transfer Photos from Apple iPhone 6 Plus to other iPhone without iCloud | Dr.fone
- In 2024, How to Transfer Everything from Apple iPhone 14 Plus to iPhone 8/X/11 | Dr.fone
- MMX 200 Audial Excellence Highlighted in Review
- Navigating the Troubleshooting Process for an Inaccessible Instagram Account
- Tailor-Made Downloads Selecting Your Perfect 4K App for 2024
- The Most Advanced Workout Trackers on the Market
- Troubleshooting WoW - How to Get Past Launch Problems on PC
- Various Methods to Transfer Pictures from Apple iPhone XS Max to PC | Dr.fone
- Title: 3 Ways to Export Contacts from Apple iPhone 12 Pro Max to Excel CSV & vCard Easily | Dr.fone
- Author: Charlotte
- Created at : 2024-10-28 17:45:03
- Updated at : 2024-11-04 17:31:17
- Link: https://iphone-transfer.techidaily.com/3-ways-to-export-contacts-from-apple-iphone-12-pro-max-to-excel-csv-and-vcard-easily-drfone-by-drfone-transfer-from-ios/
- License: This work is licensed under CC BY-NC-SA 4.0.